728VT really unhappy!

I re-measured everything today on my PM728VT (I am not the original poster of this thread).

I took my known good machinist square and found the squarest size of my 246 block. I have a granite square that comes with papers on order so i can do this measurement again and get more practice. I would use the square, but it has a tapered edge so not easy to run my DTI up and down that edge.

My column was .001 over 5" on this measurement. Past measurement was .0015 over 5 inches.

Quill was much better also. Less then .0005 over the 3 inches of travel that it has. I noticed my quill seemed tighter. I maybe used the handles while the fine feed was engaged. I hope i did not hurt anything.

I will delete my video as even though it is not public i dont want my beginning machining skills to give PM a bad name in any way.

I trammed the head and got to .0005 on X and less than .0005 on Y.

As i am learning more i appreciate everyone input. I locked down each axis before recording the measurement.

Again, i am not the original person that posted. I just happen to have purchased a PM728VT around the same time.

Chad
Chad, I'm very happy to hear your machine is not near as questionable then first reported.
.001 over 5 inches is still a little farther "out" then I would like to see. .0005 to .0007 in every 6 inches is acceptable to me.

Anything I can offer help with please ask, although I believe you said your brother was a die maker as well.....and omg, he makes really nice pens!! Might have to contact him about doing a couple "slab blanks" outa resins for my, I have a couple of chrome plated Colt pistols that need colorful stocks!

Matthew at PM said he out all week, so expect very little updates on the saga of droopy column
 
So I did a second test, and there is .001 to .0015 thousands taper in the table or saddle. So my question is how do ya fix this? Or do I just simply have a problem child??

 
It is not really a knee machine (can’t blame the column). Is your X axis locked (i.e. is the X slide pulled down hard onto the saddle)? The Y should be right down on the ground surface. Is the Y slide clean? Is the Y axis gib clean and evenly tight? At each of your measuring locations, do you get any dial movement if you were to snug the Y axis lock?
 
Did you level the base of the machine first? The castings on these small mills are pretty flexible and twist will throw off all your measurements. Start from the bottom up before shimming anything.

Here is a video that shows what I am talking about.

 
I had a minute to get on here before I left for the week, wanted to give what I have.

Yes I second what GB21 said, please check that out.

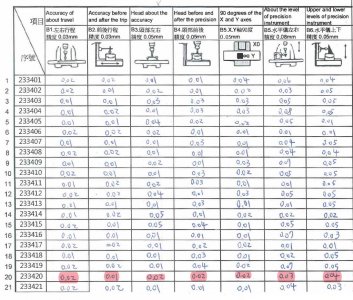
That table being .001" over the travel in the last post is within spec. The spec is max of .03mm (.00118") over the travel, shown in B2 in the sheet attached here. It measured at .01mm during inspection, better than you are getting, but you are still within spec. As mentioned make sure the bolts holding it down might not be pulling/twisting on the base. I have definitely had that happen in the past and threw things all out of wack, way more than this.


I'm posting the tolerance checks for your specific machine that were done, highlighted in red. Obviously something isn't right with the column here, we just need to figure out what it is or exchange it out. Keep commenting if people like, I will be back next week.
 

Attachments

  • Inspection Sheet, PM-728VT Photo.jpg
    Inspection Sheet, PM-728VT Photo.jpg
    208.9 KB · Views: 186
I had a minute to get on here before I left for the week, wanted to give what I have.

Yes I second what GB21 said, please check that out.

That table being .001" over the travel in the last post is within spec. The spec is max of .03mm (.00118") over the travel, shown in B2 in the sheet attached here. It measured at .01mm during inspection, better than you are getting, but you are still within spec. As mentioned make sure the bolts holding it down might not be pulling/twisting on the base. I have definitely had that happen in the past and threw things all out of wack, way more than this.


I'm posting the tolerance checks for your specific machine that were done, highlighted in red. Obviously something isn't right with the column here, we just need to figure out what it is or exchange it out. Keep commenting if people like, I will be back next week.

My serial number is 233469. So these numbers this is the quality level we should expect from the PM728VT?

Can some one decipher the test types? The wording and pictures are not very intuitive or clear. Not sure if these test are standard so it should be easy to understand. I am too new to this hobby.

I think B6 seem to be head travel up and down and it's squarness. Is that over the entire distance of column travel?

THanks for the transparency on the quality tests!

Chad
 
After I re leveled the machine, I did the Z axis test in the Y plain .007 taper

 
So what do you say? Does my NEW machine have service problems??

I didn't take pictures, but I did machine off some T nuts , with a ⅜ end mill, and there is a very noticeable step in the top of the work (if I feed in the X axis) , not quite as noticeable but still a step if I feed in the Y axis.

I think my machine has problems
 
Back
Top