Anyone else get carried away with 3d printed tool storage?

If you are adding a touch sensor (ie: bltouch, etc) consider getting rid of the bed springs. I ditched them on my CR10 V3 as they would allow too much movement for me and they would routinely loose their adjustment. That was with the "upgraded" springs. I printed out solid mounts, trued the bed up and now it never comes out of adjustment. the BLtouch maps the surface so once the z offset is set, perfect prints every time.

I also run a Volcano hot end as I found the stock end could barely keep up with a 0.4 nozzle. Now it can run up to a 1.2 nozzle without skipping a beat.

A direct extruder is also highly recommended. I run E3d's titan extruder. I got tired of the bowden tube eventually pushing it's way out of the clamp and went with the titan. No more filament problems.

Lastly, I run a custom version of marlin. Not that you can't get by with what is provided by creality (it's an older version of marlin), but there are so many more features in newer marlin builds that make printing soo much easier. The custo firmware I use is from a facebook group called nick's firmware, or something similar to that. It all used to be free downloads, but I've noticed lately he is transfering a lot of stuff to "patreon".

Good luck and have fun.

Great tips, thanks.
 
For those that havn't tried them, these auto body fasteners work pretty good.

You can just press the plastic screw in with your thumb to lock them, and thread them out with a screwdriver to release. It was about 9$ for a bag of 100 on Amazon.

 
Last edited:
I like that color. What filament are you using?

It's CC3d metallic rose gold coffee PLA, from Amazon.

I got it because it kinda looks like tatanium.

Silk Rose Gold PLA Filament 1.75mm 3D Printer Filament 1KG 2.2LBS Spool 3D Printing Materialc Silky Shiny Shine Rose Gold (Dark) Metallic PLA Filaments CC3D Coffee Brown Chocolate PLA https://a.co/d/bEJfxwI

You'll need to look up the ideal silk PLA settings for your printer, because it pillows pretty bad using regular PLA settings.
 
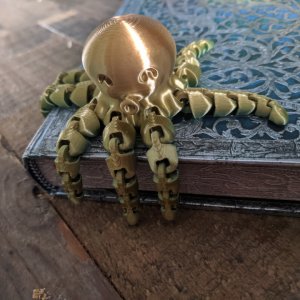
The co worker at work printed this yesterday. Wants to submit to a competition where the part has to be done in one print. Cool!
Pierre
EC225E97-B618-4ABA-B17E-4B4FBEB4B81D.jpeg
 
Those types of parts are called Print In Place (PIP). There are some very interesting PIP designs out there. Here is a typical one that I pulled from the web.
 

Attachments

  • 720X720-oct-copy.jpg
    720X720-oct-copy.jpg
    154.6 KB · Views: 124
Those types of parts are called Print In Place (PIP). There are some very interesting PIP designs out there. Here is a typical one that I pulled from the web.


I was testing my CAD abilities out with a print in place model a few days ago. It was tougher than I expected.

It took me a half dozen prints to get the air gap between moving parts just right. With PLA it works very well, albeit a bit tight to get the moving parts broke loose without breaking it. The "general rule" of double the layer height is a starting point. You definitely gotta tweak it from there to fit the material. For standard PLA, I ended up with just i little more than double the layer height to get it to work.

I made good use of Alibre Design's equation editor with this one, to create parameters than could be changed and re-exported on the fly.

Unfortunately, when I print one in PETG, ABS or silk PLA the air gap dimensions change and it's either locked up solid, or too loose to be useable. It would seem that the air gaps need to be tuned to a specific material. One of these weekends I may print/test and adjust the parameters to get some PETG and ABS versions.

img_20221020_182327197.jpg


The front and rear "extra" parts are snap-off support tabs. They print in place with the model, then are snapped off and thrown in the trash.


Untitled.jpg


But, we don't buy chip clips anymore :}


On tool storage, I modified my MT3 tailstock rack to create a R8 versions. I have one running in silver silk PLA now. 15 hours to go.:(

Thingiverse website seems to suck lately. I started uploading my modes to Prusa's version, Printables.

 
Last edited:
I was testing out a print in place model a few days ago. It was tougher than I expected.

It took me a half dozen prints to get the air gap between moving parts just right. With PLA it works very well, albeit a bit tight to get the moving parts broke loose without breaking it. The "general rule" of double the layer height is a starting point. You definitely gotta tweak it from there to fit the material. For standard PLA, I ended up with just i little more than double the layer height to get it to work.

I made good use of Alibre Design's equation editor with this one, to create parameters than could be changed and re-exported on the fly.

Unfortunately, when I print one in PETG, ABS or silk PLA the air gap dimensions change and it's either locked up solid, or too loose to be useable. It would seem that the air gaps need to be tuned to a specific material. One of these weekends I may print/test and adjust the parameters to get some PETG and ABS versions.

View attachment 425353


The front and rear "extra" parts are snap-off support tabs. They print in place with the model, then are snapped off and thrown in the trash.


View attachment 425354


On tool storage, I modified my MT3 tailstock rack to create a R8 versions. I have one running in silver silk PLA now. 15 hours to go.:(

Thingiverse website seems to suck lately. I started uploading my modes to Prusa's version, Printables.

What's gone wrong with Thingiverse?
Hoping to give this a try in the next couple of weeks. My printer will be shipped soon.
 
Back
Top