New to me 1929 wide (heavy?) 9" long bed and overhead silent drive casting trade

Matt, are you going to paint the yellow pinstripes on yours?

joe
 
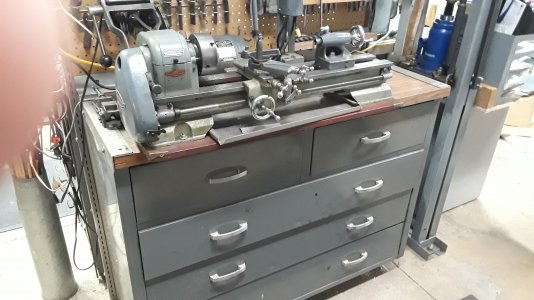
Love the restoration. New here and wish i discovered this forum a long time ago. Sadly i recenly had to help a old friend dispose of all his 9 and 10 SBs plus a ton of other machines. I made a serious mistake of offering them on a rather snooty venue with poor results. In hindsight i shoulda gone and got them all and tried another (and last) resto. This is the running one he had. the others possibly 4 plus parts). Woulda coulda shoulda

yeah, that's rough. I was both lucky and the recipient of karma with this one - lucky in that the PO needed to move and didn't want to keep it, karmic in that I only knew the guy because I answered a post on here needing some help setting up a lathe (the one he's keeping, a really nice Clausing).

Matt, are you going to paint the yellow pinstripes on yours?

joe

hells no. I'm even debating whether or not to paint the steady rest to match the rest of the lathe. I've no objection to painting machines but a) the paint on this is way tougher than anything I could do and b) I'm too keen to actually use it :) Plus I tried the machine painting thing with my Atlas and have had a 1/2 grey, 1/2 blue lathe working perfectly well for the last 5 years!
 
I'm even debating whether or not to paint the steady rest to match the rest of the lathe. I've no objection to painting machines but a) the paint on this is way tougher than anything I could do and b) I'm too keen to actually use it :) Plus I tried the machine painting thing with my Atlas and have had a 1/2 grey, 1/2 blue lathe working perfectly well for the last 5 years!

The original finish isn't really a paint. It's called "Japanning", which is a lacquer-style "varnish". It is thick, and one of the most durable finishes you can get. If you still have that, keep it. I didn't have it on a few parts, so I had to paint. The paint has bumped off already, while the areas of japanning (still in heavily used areas) is properly protected. If the steady is a different color, it likely does not have the same finish, and you can always paint it to match when the paint starts to wear.

Zora Duntov, one of the designers of the Chevrolet Corvette, said "trailers are for horses, Corvettes were made to be driven." Your lathe was meant to work, so using it and not turning it into a museum piece would make the original producers more proud.
I have restored several lathes and other machines. Some were sold to fund better ones and some were kept. Those that were kept have been heavily used like this old M6. I thought about adding embelishment but just keeping it running and true was enough.
 

Attachments

  • 20200705_094955.jpg
    20200705_094955.jpg
    1.9 MB · Views: 16
yes, it definitely still has its original japanning and some previous owner in the last 90 years put a thick layer of black paint over that as well. I think the brass and silver accents will make it look good enough as it is and it'll never be a show pony, it even has Atlas lathe feet :) This is going to be used hard and well, really looking forward to it. I've used the snot out of my Atlas 618 over the last 5 years or so, probably way beyond it's design intent, and intend to do the same with this one! Going to have to get a DRO for it though, adding one to the Atlas made it a lot easier to use.
 
thanks, I'm really looking forward to using it!

Made a single way wiper this afternoon, hopefully the next 3 will be quicker :) Pics when I've finished.
 
I have read that the Japanning finish can be reproduced by dissolving vinyl records in lacquer thinner. The resultant fluid can be painted onto uncoated or poorly coated surfaces
 
I might be able to get away with that in San Antonio, but I wouldn't dare try in Austin, I'd get run straight out of town :)

Finished up the remaining way wipers. Hope I don't have to do that again, what a pain. Made even worse by one of them spanging off my face shield and disappearing into my garage for a couple of hours!

Made a little photo documentary of how I make them.

First make a paper template
IMG_9981.JPG

Cut it out and use a template of the final shape (end of the carriage essentially) to trim to rough shape
IMG_9982.JPG

Bend the sides. I used a 1/4" lathe bit to allow the 2nd side to fold over in my vise. Use a piece of wood and a mallet/ hammer to do the bending.
IMG_9983.JPG

Next, find a round thing that has about the radius of the top of the wiper cover. Then tap the top part of the cover round over it and smoosh it into the rest of the cover
IMG_9984.JPG
IMG_9985.JPG

Do three more
IMG_9986.JPG
IMG_9987.JPG

looks a bit like the logo of Aphex Twin (look up Windowlicker on youtube)
IMG_9988.JPG

Then file the top to merge the displaced metal into the top and sides, trim the bottom, file the back so that it's flat (I cut off the excess with a dremel first, which is how no. 4 went flying), drill and countersink the hole and file to fit the way. After many hours of misery you get:
IMG_9989.JPG
IMG_9990.JPG

they aren't perfect, but they'll do and I sure as shinola don't want to do this again!
 
alright, getting back to it. A big thanks to UlmaDoc for the loan of the 1/2-10LH acme tap and the gift of the 1/2-10LH acme threaded rod - made my life considerably easier!

This is all part of extending the tailstock quill travel by an inch and a bit (Halligan's workshop or something on Youtube has a 3 part series on this). The mod consists of three parts - an extended nut, an extended screw and a barrel extension that moves the rear screw support back by the same amount.

Made the nut out of 7/8" 932 bearing bronze
IMG_0130.JPG
IMG_0131.JPG
finished the extended tailstock screw. Made it in two parts - the handle end and (cheating) 1/2-10LH acme threaded rod
smile.gif
The end was supposed to be 0.2" longer but for some reason I totally screwed up the overall length.
IMG_0147.JPG
Overshot the end of the threaded rod by 1/2 thou, so it ended up being a light press fit into the handle end. Added some JB weld to make sure, but if that isn't enough I'll cross pin it.
IMG_0148.JPG
and compared to the old screw (kept for posterity's sake)
IMG_0149.JPG
 
Back
Top