Splat's new Heavy 10

The method of joining the belt is the standard way of doing it. Failing to have the necessary parts to do it yourself,drilled holes and naked copper wire about 12 gauge can be used to sew the ends of the belt together should you need to shorten or replace it. Put the suede side of the leather against the pulley. Cut shallow grooves in the belt on the pulley contact side to avoid hearing the clicking sound when the belt is rotating. Don't cut into the hair side. Most of the strength of the leather is on the hair side,so don't groove it. It doesn't matter of the copper wire is proud on the outside of the belt since it doesn't touch anything in rotating. Secure the end of the copper wire by twisting it together on the outside of the belting.

The alternative is to skive the belt and glue it together with hide glue. The liquid stuff is fine. Skive the belt to about 1 1/2" long angle. Getting the belt the correct length is trickier when skiving. Allow for shortening the belt 3" if you decide to skive 1 1/2" on each side.

I prefer to just sew it,as leather keeps stretching so much. The process has to be repeated.

You can also go to a rubber supply store and get a more modern material,like fabric impregnated with rubber belting. Sew it the same way.
 
Got the headstock apart. One "uh-oh" moment is she's missing the pipe plugs on the back bearing cap. The front ones are the same so I took one to Ace to find two more but no good. I misplaced my pitch gauge so I can't tell what it is exactly but it looks like 3/8-28 thread. Can anyone confirm the thread or might have a pair of these plugs they wouldn't mind getting rid of?

OK...looking at my charts it appears it might be a 1/8-27 pipe plug....which is, ironically, what the part's called...a pipe plug. :confused: :D
 
Last edited:
Don't know if our lathes are the same and this is the right plug, but I took mine out.. more like a drain plug.. the one to the right in the rear for the backgear bearing is 5/16-24 .

EDIT------------ oh.. are you talking about the plugs behind the oil cups? My headstock is very crusty :)
 
Last edited:
Thanks guys. It turns out a regular pipe plug will fit. I guess it is 1/8-27tpi, tapered. I had an old brass plug in my toolchest and it fit perfectly. Gotta get to HomeDepot and get another. Crisis avoided. :phew:
 
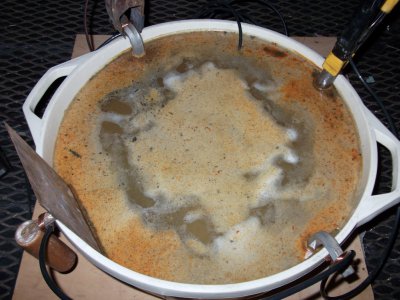
I tried Citristrip on the headstock and I'm pretty pleased with it. I found that more than one or two applications would be needed though so after two applications I started thinking about electrolysis. I had found a few references discouraging use of copper wires or copper anything within the solution. At first I did use 10ga copper wire to attach the charger's negative lead to the headstock in the solution. After a while I noticed some green debri floating around the top so I nixed the copper. I found a beat up shop light so I cannibalized its clamp and used that for the negative lead. Clamped it onto the headstock, checked connections again and juiced her up. Ideally I'd like to use a sheet of metal wrapped about the whole tub or find a stainless tub on the cheap but for a first run we'll see how it goes. I have some more big old hex wrenches I may add into the soup. I can't wait to see what it looks like tomorrow. This is a pic before I switched out the copper wire attached to the headstock. Hmmm.......Splatrolysis. :rofl:

Splatrolysis.JPG

Splatrolysis.JPG
 
Last edited:
Cut shallow grooves in the belt on the pulley contact side to avoid hearing the clicking sound when the belt is rotating. Don't cut into the hair side. Most of the strength of the leather is on the hair side,so don't groove it. It doesn't matter of the copper wire is proud on the outside of the belt since it doesn't touch anything in rotating. Secure the end of the copper wire by twisting it together on the outside of the belting.

Can you explain this grooving thing again George? Are you saying to groove the smooth side, away from the pulley? I do have the copper clamped around away from the pulley, and it still clicks.

Unless you are saying that grooving the soft side, toward the pulley, would raise the joint away?

Bernie


Bernie
 
Wow Splat!

I would have been happy to help you if I knew you last year! You drove right past me to go to Sussex.

I've moved mine down and up a hurricane door just like you described, and now into a garage. I have a bench style, so only two enormously ha peavy parts :) .. But not the most awkward thing I moved- the worst was Hardinge TM mill- 960lbs one piece! Hah.

You are inspiring me to go over mine and pretty it up- all I did was the spindle assembly when I first got mine, and I'm very happy I did. Besides that I have only de-grunged as I went.

Did you acquire a new felt set on EBay as well? The guy who sells the sets also has a good book on it. (Now that you're almost done! Hah hah)


Bernie
 
I would have been happy to help you if I knew you last year! You drove right past me to go to Sussex.
I've moved mine down and up a hurricane door just like you described, and now into a garage. I have a bench style, so only two enormously ha peavy parts :) .. But not the most awkward thing I moved- the worst was Hardinge TM mill- 960lbs one piece! Hah. You are inspiring me to go over mine and pretty it up- all I did was the spindle assembly when I first got mine, and I'm very happy I did. Besides that I have only de-grunged as I went. Did you acquire a new felt set on EBay as well? The guy who sells the sets also has a good book on it. (Now that you're almost done! Hah hah)

:) Actually I did get the book and the felt set and I'm glad I did. At least you did the spindle but you really should go over everything if you can. When I first started this I was amazed how much swarf and gunk was everywhere inside the QCGB which was the first part I refurbished. If you can do the rest of your machine then besides knowing it inside and out you'll feel one helluva sense of accomplishment and pride in what you accomplished. It's not really that complicated, just time consuming. Just do it, man! :)
 
Electrolytic crap removal, electrolysis whatever you wanna call it, I love it! :thumbsup: So I removed the headstock from its disgusting watery home for the past 22hours and "jawdrop: ....what a beautiful site to see. A clean headstock looking back at me. So I dried her off with towels as quick as I could, then a quick once over with acetone on a towel and then into the basement bathroom....I mean paint booth. :p The only frustrating part is forgetting to take darn pictures but I always bring the camera upstairs to get the shots off it and then leave it there so no updates shots at this time. Now I have the back gear baking in a fresh tub. Can't wait to see how that comes out because the PO got some paint on it and there's some grease too. Come on baby, work your magic! Splatrolysis! :D
 
Back
Top