-
Welcome back Guest! Did you know you can mentor other members here at H-M? If not, please check out our Relaunch of Hobby Machinist Mentoring Program!
You are using an out of date browser. It may not display this or other websites correctly.
You should upgrade or use an alternative browser.
You should upgrade or use an alternative browser.
SB Rehab/Restoration
- Thread starter Kroll
- Start date
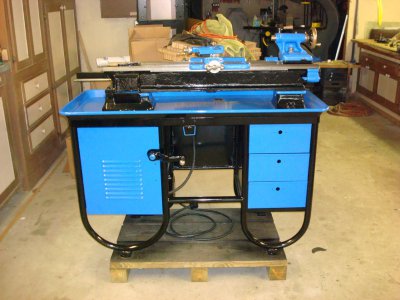
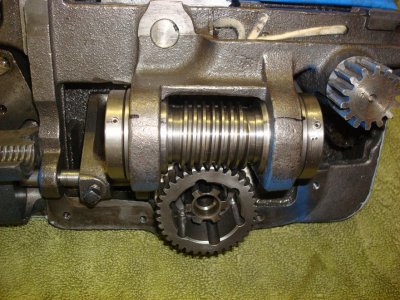
Good afternoon guys,here where I'm at the bad weather has left Tx for now so it is fantastic outside this past weekend and till next weekend.I also have almost finish repairing my sewer lines(covering them up)so I though I would work on the lathe alittle.Finish painting both halfs of the door and the inside/outside drawers.Mounting the front half and installing the hinge pins then putting the back half on.Before the door was spot welded but I went back with rivets then just touch them up with paint and it kinda looks nice.Now today or maybe the rest of the week will be spent trying to get the apron together,which I had to replace the worm,worm gear,and the worm bushings.These bushings are new and they have the channel for the wick but they have no pin to keep them from spinning in the apron.So going to try and figure up a game plan for that without messing this all up.Anyway sorry took so long to post some progress but it is moving,thanks for looking and any comments on how you would drill pins through the bushing and into the apron,I'm all ears----kroll


Last edited:
- Joined
- Jan 11, 2013
- Messages
- 1,821
Wow! That is beautiful! Nice color scheme!
Bernie
Bernie
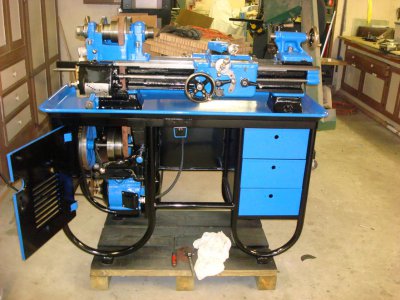
Afternoon guys,its been awhile since last post due to OT at work.Well this weekend I got after it finishing up on the apron but what give me hell was the dovetail gib.I got the half nut all put together but it was so tight just would not move.I had to shim the gib out by .005 so that the half nut can be open/close.I took it apart several times checking for something or what I did wrong so started adjusting by .002,002,001.This problem took up a good part of the morning(any ideals on what I did wrong?).Next I pickup another pair of worm bushings,worm,worm gear.Problem with the worm bushings was no pin to keep them from rotating.Using my drill press I drill a 3/32 hole for a harden pin but it could only be bout 1/16 long. I finish up on the bushing and they came out pretty nice and snug.After that I install the worm collar on the right side and the drive pin as well so issues yet.Next I install the left side and line it up with the hole in the worm but it was just to loose,bout 1/8 play side to side.So I rotate the collar about 1/2 turn,mark the collar then drill it out on the press.Guys I screw it back on the worm and I be dang it line up with the original hole in the worm so I install the pin,yahoo and now the worm only has just alittle side to side play maybe 32th.Well I'm feeling good so now to put this thing together,install the apron,lead screw on the gear box then install this section.I then rotate the lead screw but it was just alittle tight in one spot.So far so good so I move on to the head stock the the reverse gear and the gear train.I install the belt,and adjusted the tension rod just about all the way up. I smile then took some pics for you guys,took me a sip of tea seat down and took a well deserve break.Now I wanted to flip the switch and play with the power feed but I figure I will check all gears on the box and rotate it by hand.Well guys it would rotate maybe a turn and a half and hit a spot where it was diffcult to rotate.But I was able to get it pass it and easy again till got to about the same spot.Again I though it was just stiff figure it would work loose,but it did not.Guys its just diffcult with each rotation and its not getting loose.My smile was short lived,I'm guess that one of the shafts may be bent either by me when installing the pins(I had the shafts supported) or bent from the beginning or its the one that I replace.I don't know,I remove the reverse gear and left the big gear on the QCGB and its still hard.Lesson learned,before I start to take something like a lathe apart check to see what actually works,I should have tried the qcgb to see if it was smooth and I should have check the half nut lever.Boy I have made some mistakes on this,so add about couple more weeks.Now something for my headache---kroll


Today was some what of a good day.This morning after some coffee I started taking the lathe apart so that I could remove the QCGB cause I was thinking that was where my problem is.After bout 1/2hr I had it setting on my bench with the lead screw still attach and I put the drive gear on.Started turning it by hand and it turn pretty easy,all look good at this point.So I put this back together on the lathe,but sliding it through the apron and the worm was alittle tough so using some oil down the channel of the lead screw it slide right on.Next item was the gear train, the two gears(one that slides) wiggles at lease 1/8 maybe more so heres another problem area and same thing for the mating gear.
Now after putting this all back together and having the reverse gear engage I could turn the drive gear by hand,while not easy but it turns.So I engage the back gear and turn it on,guys it took off running,maybe more noise than it should but it runs.Now for the embarrassing part,I forgot to check the spindle cause I had remember that I needed to add some shims.For testing purposes I loosen the cap screws just to see if it would run.So next week I will be making some shims.Another problem solve is the half nut gib,by itself it was just to tight to open/close so I put some shims under the gib.But while reading woodtickgregs restoration project I read where he took a file and just remove some high spots on his gib so maybe thats what my problem is.So next week I will take it apart and just check it out.
For the moment the hew:smile has returned----kroll
Now after putting this all back together and having the reverse gear engage I could turn the drive gear by hand,while not easy but it turns.So I engage the back gear and turn it on,guys it took off running,maybe more noise than it should but it runs.Now for the embarrassing part,I forgot to check the spindle cause I had remember that I needed to add some shims.For testing purposes I loosen the cap screws just to see if it would run.So next week I will be making some shims.Another problem solve is the half nut gib,by itself it was just to tight to open/close so I put some shims under the gib.But while reading woodtickgregs restoration project I read where he took a file and just remove some high spots on his gib so maybe thats what my problem is.So next week I will take it apart and just check it out.
For the moment the
Guys I am getting so close to the point that all I have left is putting the finishing touches on the lathe.I am finish with shimming the spindle,all I had to add was .002 to the front.Its not perfect but very,very close.I change speeds with the belt,change the gear box,engage the half nut,use the power feed in both directions,all works.Doing alittle touching up with the paint,install some of the badges and mounted the backgear covers.I will place one more small order with McMaster-Carr for some SS screws,drive rivets or screw rivets(?) and couple of SS lock screw for the dials.Nothing worthy of pics yet but I hope by next week it will be 100% finish and I will post some pics of the finish lathe.The real test will be when it makes some shavings.Hope I did not jix myself---- )
)
One thing i did that may help is torque the spindle bolts that way you can control the lift on the spindle that you are after, use a good torque wrench
That confirms the theory I came up with as I have been thinking through how best to go about reinstalling my spindle when I get to it.

