My Heavy 10 Rebuild

Hello All,

Ok. I am stumped on this one...

I am attempting to disassemble the headstock, and have run into a head scratcher... the only way that I can see that this oil cup was even installed was to press it in with the bushing that looks like it is pressed into the casting? There are no holes or markings in this bushing.

As shown below, there is not enough clearance to spin the oil cup without damaging it. Anyone have any experience with this? Greg, I am sure that you have an idea! Any help would be appreciated.

I am not against buying a new oil cup, they aren't very expensive, but even if I just destroy this one getting it out, I cannot see how to re-install it without adding an extension.
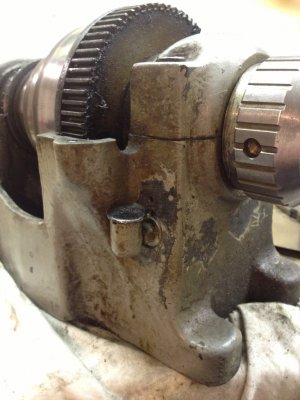
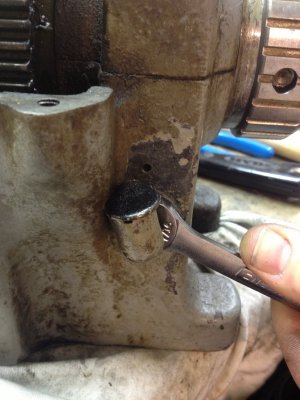
Photo Jun 23, 12 20 00 PM.jpg

Photo Jun 23, 12 20 11 PM.jpg

-Cody

Photo Jun 23, 12 20 00 PM.jpg Photo Jun 23, 12 20 11 PM.jpg
 
You are correct in assuming that it was pressed in with the bushing at the factory, some of them where real close to the casting on the left side of the cup. It always seems to be on the front or right hand side. Your options are....destroy it as you already thought about, try and make a tool to pull the bushing with the cup still in place, and if that fails make a puller that will thread into the bushing to pull it. Some heat to the casting may help to break the grip on the bushing. Once you get it out and before you paint it thread a oil cup in and check for clearance, some of the casting can be ground away for clearance of the cup. Yours is really close by looking at the picture and may have to be just pressed back in. Take your time on this one and think about what you are doing so as to avoid any damage to the parts you have. It's not like we can just go down to the south bend store and get new parts,LOL. If you destroy the bushing let me know, I have an old bad casting that I might be able to get a bushing pulled from. GOOD LUCK and keep us posted on your progress with this dilema.
Greg
 
Thanks Greg,

That's what I thought. I've set it aside for now, got the rest of the spindle apart, and started cleaning it. When it comes time to strip and paint things, well maybe before that time, I'll look at getting that cup out...

Thanks again!
 
I just took my oil cups off this morning. Mine made contact with the headstock but were still able to be spun off. As the paint on mine is basically gone I wasn't worried too much about scraping it alittle.
 
Hello All,

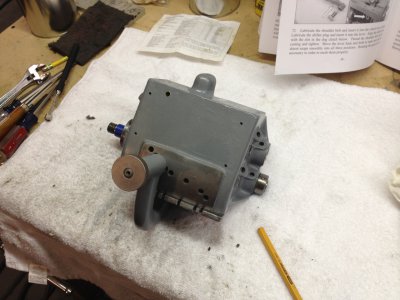
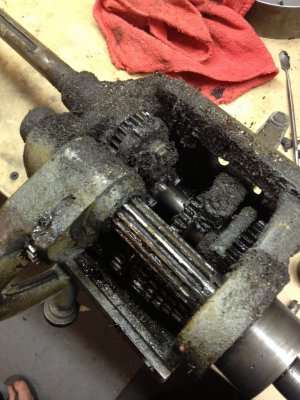
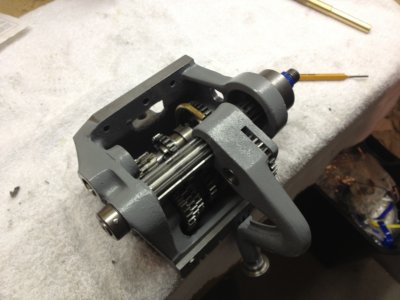
I finally feel like I accomplished something on my project. I have completed the restoration of the QC gearbox!

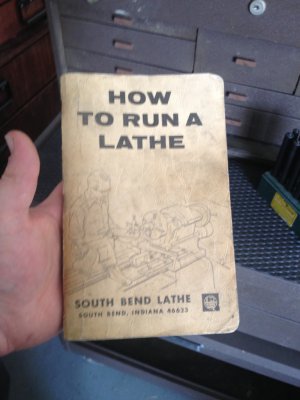
But wait there's more! I found a present in the mail today, the supposed original copy of "How to run a lathe". It is unfortunately not the same year as the lathe, but it is an original printing of the book. The PO promised that he would mail it to me when he found it, and after a couple of weeks, I gave up hope. Good to know there are still people that will keep their word these days!

I have also completely dis-assembled the headstock, and cleaned it. Just need to strip, paint, and re-assemble.

I also gave up trying to get the oil cup out of the headstock, attempted to heat and pull, more heat, etc. I gave it the old college try, but I didn't want to break anything, so I quit while I was ahead. That bushing is pressed in TIGHT!! I ended up cutting the cup off. I made a adapter to attempt to press the bushing out, but was unable to make it work. I plan on making an extension tube to re-install the oil cup.

PICS!!

Still needs the info plate restored.
Photo Jul 06, 2 30 11 AM.jpg

BEFORE:
Photo Jun 14, 10 18 46 PM.jpg
AFTER:
Photo Jul 06, 2 30 30 AM.jpg

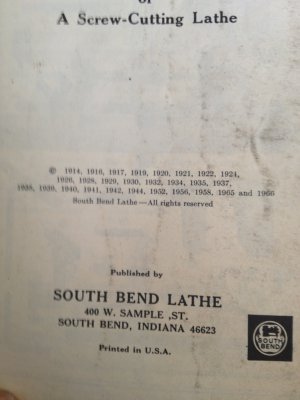
The well loved South Bend Book
Photo Jul 16, 3 30 06 PM.jpg

1966 is the last copyright.
Photo Jul 16, 3 30 21 PM.jpg

Have a great day everyone!

-Cody

Photo Jul 06, 2 30 11 AM.jpg Photo Jul 06, 2 30 30 AM.jpg Photo Jul 16, 3 30 06 PM.jpg Photo Jul 16, 3 30 21 PM.jpg Photo Jun 14, 10 18 46 PM.jpg
 
Cody,

You are doing an excellent job on your 10L. You are going to be so proud when it's complete. Hang in there, it takes time and patience.

I was interested to note that the shaft that the tumbler lever rides on is splined. I've never been inside a SB gear box, but my Logan just has a plain shaft.

Nice work!

Steve
 
Awesome work, very nice job. well done. Funny I must be getting tired because when I first read the title of the book I read it as "how to ruin a lathe":rofl: LOL I don't need a book for that! I had a good little chuckle at myself. Now where the heck did I put my glasses?
I purchased the new repops of the info plates off of ebay, they are pretty nice and really made a difference in how the lathe looks, took it from just repainted to restored. They are just flat plates and not the stamped raised type, but they are very nice. They where a little pricey, but they really where the finishing touch.
 
Cody,

You are doing an excellent job on your 10L. You are going to be so proud when it's complete. Hang in there, it takes time and patience.

I was interested to note that the shaft that the tumbler lever rides on is splined. I've never been inside a SB gear box, but my Logan just has a plain shaft.

Nice work!

Steve

I found it interesting myself. And that is the gear that transfers power from the spindle, through the gear train, through the gear mounted in the selector handle, into the gearbox, and eventually to the leadscrew.

-Cody
 
Got some more work done this weekend, dis-assembled the entire carriage, taper attachment, compound, and cross slide. And found something quite disturbing...

The split nuts are almost completely worn away. (I have pics that i'll post tonight.)

This lathe must have done a LOT of threading, and without proper lubrication, as there is only a sliver of threads remaining on the nuts. The strangest thing is the lead screw shows very little wear, which I find very confusing...:thinking:

I am really at a loss as to how to proceed from here, a quick search of the bay returns nothing. Anyone have a lead on new split nuts?

I guess that I could do a braze repair, then set them up and re-thread the nut via tap or single point. (Though it will be hard to single point thread that on the mini-lathe...:dunno:)

Any suggestions? :anyone:

-Cody
 
What I often do when I don't see what I need on ebay is look for a seller that has multiple parts listed, they are usually parting one out. Send them a message and ask if they are parting one out and ask if they have what you are looking for. sometimes on those half nuts you might have to buy a complete apron assy, but then you would have some spare parts or even be able to combine all the best parts and build your own apron. Thay can be had, you just have to be patient and look.......a lot.
 
Back
Top