MT4 Adapter spun in spindle, how do I clean up the spindle taper?

I suspect both MT4 adapters, sourced from eBay are not to spec. I get effectively 0 contact, save for at the spindle mouth. My finger smeared prussian blue isn't disturbed, save for at the very nose, and some incidental contact on the way out. @RJSakowski do you remember who you bought the adapter from? I can get an OEM MT4 dead center from Grizzly for $22.50. Won't have a carbide tip, but should be ok. I can buy a carbide tipped one from Grizzly, but am not sure if it would fit. Suppose I could ask Grizzly.

Interesting that my spindle bore is 26mm, (1.024") and RJ's measures out at 27mm (1.06").

How does one accurately measure the taper? Never done it. Found a ball bearing method for the socket, but it would cost me $24 to buy the balls, a 1-1/8 and a 1-3/16. Is there an easy way for the male taper? Answering my own question. Use 123 blocks and two dowels. Measure at 1" then at 2", difference is the taper. This would work if the base is flat. What if the base is of unknown flatness?
 
A longer taper will not bottom out. The bore diameter past the tapered section exceeds the diameter of the taper at that point.
Agreed that it won't with the measurements you took. With the measurements Wobbly took, the only conclusion that can be made is that the centers that he has are out of spec.
 
being a chinese machine, the spindle taper could be off or a 1/2 size.
 
It would seem they are out of spec. The original one, the one that spun, was measured with two 1/2" ground dowels at 1" and at 2" using 123 blocks. Measured it twice with a 2-3" micrometer. First time I got a taper of 0.0534", the second time it was 0.0538"/inch. The spec for MT4 is 0.0519". This would account for seeming to fit, but not really. It would touch only at the mouth of the spindle and nowhere else. This matches exactly what the bluing showed. As a poor sanity check I used a digital caliper, not using the dowels, but on top of the 123 blocks at 1 and 2 inches. I got a difference of 0.057" over 1". The taper is just plain wrong.

Haven't measured the dead center, but it's bluing behavior is identical. It will have excess taper as well. Case closed on root cause.

Have already sent message to seller, stating their part was not compliant with MT4, and caused some damage to my lathe. Who knows what will result from that, but the message was done via eBay.
 
being a chinese machine, the spindle taper could be off or a 1/2 size.
Maybe. However, RJ's spindle seems to work well with an MT4, and I have the same basic lathe. My datasheet says it is MT4, the dead center that Grizzly sells for it under parts, is an MT4.

It seems the male taper adapter sold to me wasn't an MT4, although it was sold as one. Measured taper was greater than the largest taper allowed for any MT. Seems the steepest taper is an MT5, which is 0.0526"/inch. I measured 0.0534 and 0.0538. MT4 is 0.0519"/". Zero bluing contact, save for at the spindle nose. My adapter is not a good match for my spindle, nor is the adapter an MT4.
OK, here's the scoop on my G0602. 1.054" will pass through. 1.057" hangs up in the bore at 4-1/2" from the spindle nose, as does 1.060". This would be the start of the rough bore though the spindle, 1.055" hangs up at 4-1/4" as for all other diameters tested through 1.092". A spec. MT4 taper has a length of 4.06" and a small end diameter of 1.020 and so would clearly fit in my MT4 socket.

I wouldn't be too quick to dismiss the two tapers as faulty. To be sure, I would want to check them in another known good machine first. Accurately measuring a taper can be tricky as it is hard to get a good diameter reading on tapered surface.

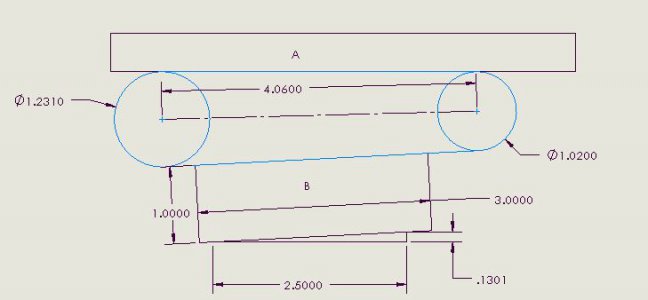
Here is an method to accurately measure the taper of a Morse taper. Refer to. drawing below
  1. Place a straight edge (A) on your mill table a sweep with a dial test indicator and adjust so it is parallel to the x axis. The straight edge should be taller than half the large diameter of the taper.
  2. Place the taper, represented in blue, along side the straight straight edge and place a second straight edge along side the taper sandwiching the taper. The second straight edge (B) should be taller than half the large diameter of the taper. The two vertical faces should be parallel to each other. (I used a 1/2/3 block)
  3. Move the dial test indicator to a spot near the large end of the taper and move the y axis to zero it. Set the x axis reading to zero as well.
  4. Move the table a known distance towards the small diameter end of the taper and move the y axis to re-zero the dial test indicator. Record the new y axis position.
This will determine the actual taper of your taper. I changed my x axis position by 2.500" and moved the y axis by .1302" to re-zero the dial test indicator. From the specs for a MT4, the y axis movement should be .1301" for a difference of .0001"/2.5" or .00004"/1".Morse Taper Measurement.JPG
 
OK, here's the scoop on my G0602. 1.054" will pass through. 1.057" hangs up in the bore at 4-1/2" from the spindle nose, as does 1.060". This would be the start of the rough bore though the spindle, 1.055" hangs up at 4-1/4" as for all other diameters tested through 1.092". A spec. MT4 taper has a length of 4.06" and a small end diameter of 1.020 and so would clearly fit in my MT4 socket.

I wouldn't be too quick to dismiss the two tapers as faulty. To be sure, I would want to check them in another known good machine first. Accurately measuring a taper can be tricky as it is hard to get a good diameter reading on tapered surface.

Here is an method to accurately measure the taper of a Morse taper. Refer to. drawing below
  1. Place a straight edge (A) on your mill table a sweep with a dial test indicator and adjust so it is parallel to the x axis. The straight edge should be taller than half the large diameter of the taper.
  2. Place the taper, represented in blue, along side the straight straight edge and place a second straight edge along side the taper sandwiching the taper. The second straight edge (B) should be taller than half the large diameter of the taper. The two vertical faces should be parallel to each other. (I used a 1/2/3 block)
  3. Move the dial test indicator to a spot near the large end of the taper and move the y axis to zero it. Set the x axis reading to zero as well.
  4. Move the table a known distance towards the small diameter end of the taper and move the y axis to re-zero the dial test indicator. Record the new y axis position.
This will determine the actual taper of your taper. I changed my x axis position by 2.500" and moved the y axis by .1302" to re-zero the dial test indicator. From the specs for a MT4, the y axis movement should be .1301" for a difference of .0001"/2.5" or .00004"/1".View attachment 399984
Just to make sure I understand this. The measurement is along the bottom face of the 123 block, pushing the 123 block towards the taper?

Willing to measure the tapers this way as it helps me learn better ways to measure things. Now to clean off the mill table!
 
Just to make sure I understand this. The measurement is along the bottom face of the 123 block, pushing the 123 block towards the taper?

Willing to measure the tapers this way as it helps me learn better ways to measure things. Now to clean off the mill table!
Measure on the vertical face. The reason for the second block is that the centerline moves down as you traverse from the large end to the small end and the test indicator tip would have to be adjusted vertically. The inside of the block is in contact with the diameter of the taper all along the taper and the vertical faces insure that the probe os making a good measurement without having to change its vertical position.
 
Measure on the vertical face. The reason for the second block is that the centerline moves down as you traverse from the large end to the small end and the test indicator tip would have to be adjusted vertically. The inside of the block is in contact with the diameter of the taper all along the taper and the vertical faces insure that the probe os making a good measurement without having to change its vertical position.
Measuring the same way you suggested yields a 0.05378"/inch taper. This is a steeper taper than an MT4. y travel = 0.1345, x travel = 2.5000", y/x = 0.05378"/inch taper. This is very close to my earlier micrometer and dowel reading on 123 blocks with the taper vertical method.

I used two 123 blocks. I clamped the first 123 block down (with an aluminum shim to protect it) to the table and aligned to less than a 1/4 of a ten thousandth of an inch over the full 3 inches of the block. Got to love that Interapid DTI! Then layed the taper down on the mill table, and a second 123 block on the table on it's 1" x 3" face. (2 inch face was vertical.) Indicated along 2.5000" of x travel.

The external taper of this MT4 to MT2 taper reducer is not that of an MT4. Tomorrow, I measure the "MT4" dead center I bought.
 
Back
Top