The Voron kit build thread

I have one of the 12864 displays that I picked up for the DIY Trident. I should give it a shot at some point. The LDO Kit's BTT 4.3 touchscreen is very good looking. The 12864 is more like the Prusa interface which is adequate if a bit old style. :)
 
Last edited:
I have one of the 12864 displays that I picked up for the DIY Trident. I should give it a shot at some point. The touchscreen is very good looking. The 12864 is more like the Prusa interface which is adequate if a bit old style. :)

Yea, the mini isn't very flashy at all. To be honest, the estop is the only function on it I've used.


I kinda wanna go headless, but after my missed steps incidents a couple weeks ago, caused by a mal-placed linear bearing ball, I used the estop more times than I'd like to admit.

When a stepper misses a dozen steps in one direction, then takes off full-speed in the opposite, it hammers itself right into the limit switch and just clicks away trying to keep going.


Maybe in a few months when I start trusting it more I'll consider going totally headless.
 
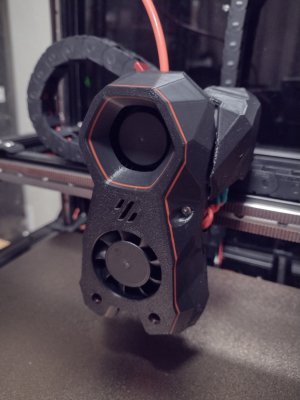
After trying multiple colors and changing my mind half a dozen times, the wife decided that black with a couple layers of red, printed on a textured plate, will be staying on.

My Voron knocked it out in 4hrs.
 

Attachments

  • IMG_20221230_202810191_HDR.jpg
    IMG_20221230_202810191_HDR.jpg
    165.9 KB · Views: 100
So we're about 20 days out on the Repbox with the desiccant, and the RH in the box has been rising the last few days from 10 to 14 and now 20. I just dumped out the bottles and refilled them with fresh from the bottle, so about 300g of desiccant lasted about 20 days. There's a gap in the seal on the door that isn't helping. The beads have gone from orange to clear/yellow so they are definitely indicating a change.

Nice touch with the layers of red.
 
After a few hours with the new 300g of desiccant the Repbox is back down to 10% RH, even without the tins of additional that were also in before.

Preparing to bake the loaded desiccant in the toaster oven at 250F for 3 hours, the recommended procedure.
 
Last edited:
The USB cable LDO supplied with this kit from the Pi to the Octopus board was a bit long and stuck downward from the Pi which is not a good direction. I picked up a cable from Amazon that is right angles on both ends but shorter and stays in the plane of the USBA connector which is a better fit. A small improvement.
 
Sound like your pretty close to starting the calibrations, tuning and test prints. I'm looking forward to seeing how it goes.


Mine was surprisingly easy. Most of the default values in the printer.cfg file were spot-on. I had to tweak the extruder ratio by a small amount, but otherwise my calibration parts came out to within .05mm of nominal.

Im still doing some fine tuning with ABS, to get the surface finishes as cosmetically good as possible.

PLA was ridiculously easy. With Polyterra PLA running at 55° bed and 210° hotend, I'm getting beautiful surface finishes. Even at the rather fast default PrusaSlicer settings.
 
I have to dig in and finish solving some issues with the printhead and wiring. Getting close.
 
Decided to make a better mount adapter for the LDO Hartk toolhead board to the LGX Extruder while I wait for the LGX Extruder motor connector to arrive, a custom cable will be required for this motor. A few more details remain to get the printhead finished.

1672630955390.png


This adapter sits between the PCB and the Extruder. Prototype example below the unit installed on extruder. It's primitive but fits accurately and insures the pcb does not short against the motor.

1672639175964.png
 
Last edited:
Decided to make a better mount adapter for the LDO Hartk toolhead board to the LGX Extruder while I wait for the LGX Extruder motor connector to arrive, a custom cable will be required for this motor. A few more details remain to get the printhead finished.

View attachment 431824

This adapter sits between the PCB and the Extruder. Prototype example below the unit installed on extruder. It's primitive but fits accurately and insures the pcb does not short against the motor.

View attachment 431842

It looks like you decided to go with the Afterburner setup, on that LGX extruder.

Out of curiosity, why the Afterburner rather than the Stealthburner?

Is that extruder compatible with the Stealthburner?
 
Back
Top