The Voron kit build thread

I am glad to see an organized forum. Discord is such a mess.

I am hoping to start on my frame today. My printed parts will not be here until the end of next week. I am going to be making an aluminum bottom plate for underneath the heat bed, either in conjunction with the provided plastic panel or in lieu of the plastic.
I have a table in my shop that is 5ft x 4ft with a 1" thick Blanchard ground top on it, so that should be flat. :grin:

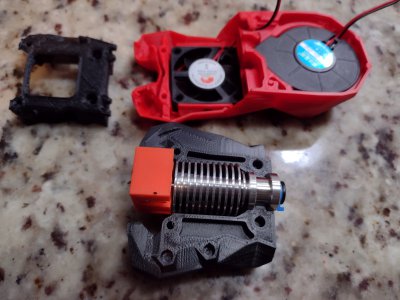
I used the granite countertops in the kitchen, and some v blocks clamped onto the corners.

I wish I had room for a 5' x 4' ground tabletop. That sure would have saved me some guff from the wife. I have the basic framing done, now I'm at a standstill waiting for those cnc aluminum parts so I can start on the Z axis stuff. That aluminum parts kit should be here Tuesday.
 
I got some of the stealthburner parts printed and assembled. It's a cool looking contraption.

I'm reprinting that v6 rear cap. It didn't come out quite right. Those 1-1/2 long bridges are tough to get perfected, especially with ABS.
 

Attachments

  • IMG_20221119_071813481.jpg
    IMG_20221119_071813481.jpg
    300.9 KB · Views: 68
  • IMG_20221119_071758371.jpg
    IMG_20221119_071758371.jpg
    274 KB · Views: 69
  • IMG_20221119_071731739.jpg
    IMG_20221119_071731739.jpg
    292.4 KB · Views: 77
Last edited:
I've built a few frames on this marble end table round including the MK3. I'm going to disassemble and reassemble the Trident frame today and see if I can get it to square up. The marble round is two feet diameter and 20mm thick. I have a granite surface plate but it is a bit small at 12x18 and not easy to use for this.

The wife doesn't want me to use the new ceramic topped range for some reason.

I agree on the forums organization vs Discord disorganization (organized chaos?). Discord is very popular for some reason but it is a mess compared to a good forum.

I dug out the PIF printed parts (no easy feat in itself), and the panels are "in the mail". I'll have to hold on the bottom panel when I get to that, but the rest of the panels aren't needed till near the end or even after the printer is working. I suspect that a few more printed parts may be needed, the LDO build has a few mods in it so it is not a direct BOM build - it has quite a few PCBs and a Klicky probe so I suspect my standard printed parts set will need a few changes. I'll cross that bridge when I get to it, printing anything else needed on the Prusa MK3 in PETG hopefully. If it has to be ABS or ASA I could move the printer to the garage and use an enclosure, or just use PETG for now and replace that part later, if it is not too hard to get to.

I reviewed Nero's short video on frame assembly. I'm also recalling what 'Steve Builds' does when he builds Voron frames. He does several things beyond the instructions, one is to use washers on the screws. I think I will do that too. As the screws are torqued they tend to move the frame and disturb the alignment. Washers reduce this effect. I'm also going to use more clamps and alignment tooling to get as precise as I can. I'm also going to compare the lengths of the extrusions to insure they are matched, which I think they are but differences in length will cause alignment problems. I suspect it was just some poorly aligned joints that caused my frame to be out of alignment by 1-2mm. Nero mentions under 0.5mm diagonal differential. I asked the question on Discord and was told 1mm diagonal difference max is a good rule of thumb. I'm aiming for whatever I can get as long as it is well under the 1mm diagonal, would like to be well under 0.5mm though that's getting difficult to measure.
 
Last edited:
These heat set inserts are kinda fun to install.
 

Attachments

  • IMG_20221119_115908560.jpg
    IMG_20221119_115908560.jpg
    662.9 KB · Views: 68
That worked. Frame now much flatter on the marble round. Within the thickness of an index card of flat. It was better than that up till the last cross pieces, but not worth doing more. I added washers, did a much more careful job of aligning and tightening, in a couple of cases rotated a piece to get a better fit to the square.

Heat set inserts are great. A proper sized hole works pretty well too, but heat-sets are better for serviceability.
 
20221119_145329.jpg


LDO Trident 250 frame. Railcore 300XL on the left.

Panels just arrived.
 
Last edited:
Installed a few heat set inserts. Built the A and B motor assemblies and the front idlers.

Enough for one day.
 
The Orange Pi thing isn't going well.

It came with Android installed on the Emmc, and apparently Android causes it to skip the boot from SD card thing. I'm trying to figure out how to get it to boot from an SD card so I can install Armbian.
 
The Orange Pi thing isn't going well.

It came with Android installed on the Emmc, and apparently Android causes it to skip the boot from SD card thing. I'm trying to figure out how to get it to boot from an SD card so I can install Armbian.
I worked on this for a couple of hours last night, Ken. When I install the SD card in the Orange Pi, it will boot from the SD, and it 'seems' that Armbian is installed. However, when I power it down, remove the SD card and then power it back up, it boots right back into Android. This does not make sense to me because I thought I had Armbian installed on the Emmc, but apparently not?
I found a Reddit thread from 7 months ago that said Armbian was not compatible with Orange Pi 3 LTS, but not sure if that is really the case. I cannot find that thread at the moment but here is a thread that may be useful.
Here is another Reddit thread regarding Fluidd and Mainsail.
 
@Ken226 Can you hurry up and figure that out, so I know what to do? LOL


EDIT:

Here is the thread I found regarding the Orange Pi and Armbian. Even if Armbian does work with the Opi 3 LTS now, there is still a lot of good info in that thread. Getting Orange Pi to work with Klipper and Fluidd
 
Last edited:
Back
Top