Next Project Boring Head

If you look at the plan (boring head 02 posted above) that I am loosely following the lead screw is trapped against the head by a small plate. I am debating whether to do that or to put a nyloc nut on the lead screw at the other end of the head. One way or another I will do something that holds the lead screw in place as you turn it.
 
Life has been busy but it looks like I will get some shop time next week to finish this project. My indecision at this point concerns what size boring bars should I use. The choices seem to be either 3/8" or 1/2." If I drill for 3/8 I can always increase it to 1/2" but can't easily go backwards from 1/2 to 3/8. I have never used a boring head and have no clue which size is better or if it makes any difference. Another question. I have seen boring heads that besides having two holes in the top also have a hole in the end for a boring bar. See my drawing in post #9 above. Is this a good thing to have or not?
 
I would go .500 and put that bore in the end also . Most heads are .750 bores . If you need to use smaller bars , use a split sleeve on them .
 
Let me offer some food for thought, although the choice of boring bar is up to you. You have an Excel Mill Drill, which is a benchtop mill similar to an RF-30, correct? I would consider the forces the head generates as part of your decision tree.

The boring bars in a boring head encounter the same three forces they do on the lathe - axial, tangential and radial forces. However, the MILL experiences an additional force - Centripetal Force. This is a real force that is sustained by the mill, which is why a bigger mill with bigger mass that can go slow enough can bore bigger holes. Not to get too technical here but it will help you think this through. The formula for Centripetal Force is:

Centripetal force = mv2/r, where m = the offset center of mass from the spin axis, v = rotational speed and r = radius of the tool holder/tool assembly. The forum software won't allow exponents so note that this is MV(squared) / R. Things to note:
  • M is your boring bar. The bigger and/or heavier the bar is, the bigger the CF becomes.
  • V is your rotational speed. The faster you go, the greater the CF becomes ... very quickly.
  • R is the extension of the bar out from the spindle centerline. Note that as R increases, CF actually decreases. What this means is that as your required hole gets bigger, CF gets smaller IF you can go slow enough.
  • When CF reaches a certain point it will begin to cause the mill to move or vibrate. This varies with the mill, speed, size of the boring bars, how much extension you have on the boring head, type of boring bar you're using (HSS, cobalt, brazed carbide or inserted carbide). If you use a big enough bar and go fast enough, the CF can get big enough to make the mill literally walk across the shop and down your driveway. This is also why a bigger, heavy mill can bore bigger holes - it has the mass to resist the CF the head generates. Got it?
With the above in mind, and remembering we are speaking of a benchtop mill, smaller bars are probably a good idea. You might think that there is little difference between the weight of 3/8" and 1/2" bars but there is where CF is concerned. Using sleeves with smaller bars also adds to the mass. I suspect your mill can handle 1/2" bars if you bore out to maybe a max of 3" or so. Beyond that and the mill may start to vibrate if you cannot go slow enough.

I have multiple boring heads that take either 3/8" or 1/2" bars and whenever I can, I use the head with the smaller bars and this is especially true when the bore diameter goes up. This allows me to go faster for a better finish without the mill moving much at all. On smaller bores, the size of the bar becomes less important.

As for the side hole, I suggest you incorporate it if you can, not just because it allows you to put a boring bar there to bore bigger holes but also because you can put a shaft in there that holds adjustable weights to counter CF. We'll talk more about this after I build one.

In any case, think about it before you drill holes.
 
Wow, I learn something every time I tune-in to H-M! Centripetal force increasing with an increase of mass and velocity of the boring bar makes sense but a decrease with an increased radius is a bit counterintuitive, at least for me. So it seems to me that when using the same size boring bar that with an increase of the hole diameter you are boring, the centripetal force decreases for a couple of reasons: the first reason is as r, the denominator, increases CF will decrease according to the formula for CF, the second reason is that if you maintain a constant SFM cutting speed you will decrease the velocity(v), one of the numerators, which will also decreases CF.

Small bars, slow speeds, big holes decrease vibration(CF). Good to know, thanks Mikey.

However, I just remembered that the original post is to make a boring head to be used in the tailstock to achieve a taper and will not be rotating so in this case I would think the bigger the boring bar the better.
 
Mikey, Thanks for the info. I like that kind of info because it helps me understand how things work. My mill/drill is the next size up from the RF 30. The slowest speed is 90 rpm. Using my mill/drill has been a real eye opener on the forces involved.

While the initial projects that I will use the boring head for are turning some tapers on the lathe down the road it will also get used for boring holes.

The idea to use counterweights is interesting. On my boring head the holes for the clamping screws are drilled and tapped all the way through. I did this so that I could attach a flat bar or angle iron that would extend out over the ways of my lathe and have adjustment screws to keep the boring head level when turning tapers. I could use those same holes to attach counterweights to the boring head. Something to think about.

I think that I will start out with 3/8 holes. I can always increase the size to 1/2 if I feel the need for that down the road. I could also make another head with 1/2 holes.

Again thanks for the help with this.
 
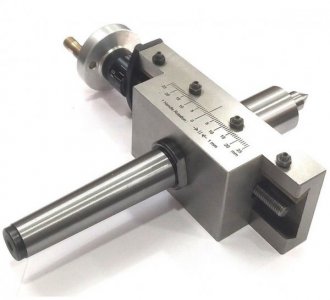
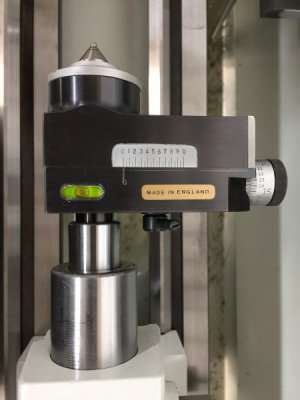
mickri, looks like a neat project you are working on and I wouldn’t want to discourage you from it but have you looked at a tailstock offset device like the ones pictured below? The Royal I bought used on eBay. It is nice because the center has a ball nose and there is a spirit level to help you position it since, as you know, the offset will change if the offset device tilts. The second photo is an inexpensive offset device that is easily found new online. They are of course only designed for forming a taper on a lathe so would not help you with your boring needs on the milling machine. Great project; keep us updated! TK

67C3FAA0-F51D-469E-AAB0-3EBA2B2C546A.jpeg

8F0F2DC0-84D4-4BAE-92F6-743A56D62CF5.jpeg
 

Attachments

  • 00EEF446-FFB9-4C05-B5DE-6CB0337D7790.jpeg
    00EEF446-FFB9-4C05-B5DE-6CB0337D7790.jpeg
    34.2 KB · Views: 9
  • 123DD95B-E142-4F4A-A2B6-FC8FFF6F1C97.jpeg
    123DD95B-E142-4F4A-A2B6-FC8FFF6F1C97.jpeg
    35.1 KB · Views: 6
I really didn't mean to go into boring on the mill here. I simply wanted you to know how to think about your tooling because I guarantee you that one day your mill will begin to move when boring a hole. Since the mass of the bar is fixed and your extension is also fixed by the size of the required bore, the only answer is to alter speed. Since CF varies with the square of velocity, even a tiny bit of speed reduction will often resolve the issue. This is made easier if you have variable speed control. Then the only worry is if this reduction in speed will adversely affect the finish requirements you have.

Related to speed is the type of bar you use. Inserted carbide is a common choice in hobby shops but that type of bar requires higher speeds to produce good finishes. Faster speeds lead to higher CF. This is why I prefer cobalt or solid carbide boring bars on the mill - better finishes and it is easier to hit your required size because you aren't dealing with a nose radius.

Anyway, lots to think about.
 
Of course, that relationship above is in terms of linear velocity. If one considers angular velocity, centripetal force is m*r*ω^2, where ω is angular speed (radians/sec). As we typically think of “speed” when boring as the spindle speed, it seems a better form of the relationship. And thus, increasing radius while maintaining a constant spindle speed does increase centripetal force. If you think about a certain surface speed of the cutter, then using that speed over a larger radius logically reduces the force, as it slows the angular speed (rpm).
 
I really didn't mean to go into boring on the mill here. I simply wanted you to know how to think about your tooling because I guarantee you that one day your mill will begin to move when boring a hole.

Of course, that relationship above is in terms of linear velocity. If one considers angular velocity, centripetal force is m*r*ω^2, where ω is angular speed (radians/sec). As we typically think of “speed” when boring as the spindle speed, it seems a better form of the relationship. And thus, increasing radius while maintaining a constant spindle speed does increase centripetal force. If you think about a certain surface speed of the cutter, then using that speed over a larger radius logically reduces the force, as it slows the angular speed (rpm).


Mike, I am glad you did go into boring on the mill and happy jwmelvin contributed as well. It taught me something that I wasn’t aware of as a newbie: CF/vibration is reduced by increasing the radius IF you maintain a constant SFM which means decreasing the spindle speed. I think where the confusion arises, at least for me, is that intuitively I think that If I have something “off balance”, like a boring bar, and I extend it outward that will “obviuosly” make the vibration worse. For some reason in this “mind experiment” I do not change the RPM or spindle speed so a reduced vibration with extension of the rod seems counterintuitive. Your formulae make it clear why CF and vibration will be reduced with a larger radius when one maintains a constant SFM. Thanks guys, I am now very slightly less of a newbie.

mickri, sorry if we have hi-jacked your thread for a bit. But it was a “teachable moment” for me, at least. BTW, I really like your project and I hope will keep us posted on your progress. TK
 
Back
Top