Update from OP:
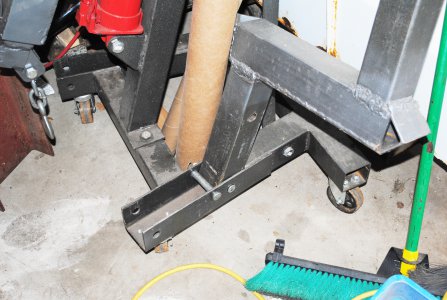
I remembered I have a set of leveling feet, with long 5/8-11 stems, that I no longer need, one of which will serve nicely as a jacking screw, at the position shown in the pic below. It will screw into a 1/2in plate I happen to have in my scrap bin.
The 1/2in plate will bolt to the underside of the horizontal frame member, at the two bolts shown. The leveling foot will the simplify the tilting of the base of the hoist to more easily allow sliding the legs into place.
The small casters need only be lifted 1/2in to facilitate sliding the legs into place. Once the legs are in place the jacking screw can be unscrewed out of the way.
The 1/2in plate cannot provide maximum threaded strength, which may or may not be needed, but I may weld a "regulation" 5/8in nut to the plate. Two jam nuts at the top end of the stem will make it quick and easy to screw in/out the jacking screw with a drill motor.
This approach will not compromise the integrity of the hoist whatsoever.