Still dealing with some after effects from covid, Doc said my lungs were damaged but will fully heal in time. There may also be some heart damage that is also expected to heal. The surgery is pretty well all healed up. My physical stamina is all but gone, I have to take a lot of breaks if I am doing any thing physical. Fortunately my job is sitting at a desk beating the heck out of a CAD computer all day.
Well I made some progress even if it was only in my head.
The angled surface on the 2 sectors (010 & 012) turned out to be much harder than I thought.
My original intent was to just put them in an angle vice set for 30° and cut them down.
The problem comes in that the thin edge is only .040 thick, that is not a lot of material to hang on to, AND then the cutter would be running into the vice jaws. I thought about making up some aluminum soft jaws but then I am still trying to hold onto a .040 edge after the first piece cuts the clearances into the jaws.
SOOOoooo........
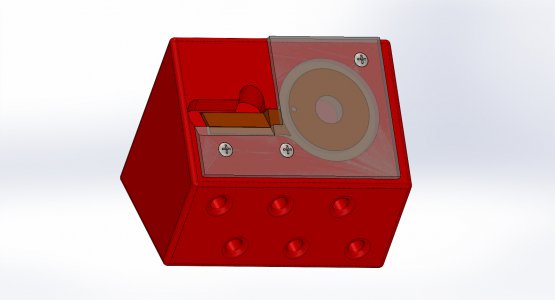
After a LOT of pondering I came up with the idea of 3D printing a custom fixture to hold the part at the correct angle with the part being clamped down securely with a plate.
I made the depth of the holder .005 less than the thickness of the part so that it will stick up enough to be sure it is clamped down good. I even designed the run out for the cutter into the 3D part so that when the cutter does run off the part it is not compromising the wall thickness of the holder. I added the 6 thru holes to make some internal structure to resist crushing in the mill vice.
The bevel on the clamp will magically appear as I make the first part. I will then just lightly deburr the knife edge so it will not curl or snag the cutter on subsequent parts.
This part will take about 20 hours to print. Then I have to find a chunk of 1/8 thick material to make the clamp out of and order the thread inserts from McMaster.
After all this I bet it will not take 30 seconds to make the actual cut. HA! 4 months of setup for a 30 second cut.......
Fortunately my mill is big enough that I do not have to take down the rotary table setup that was used to cut the profile of the part. I can have both of these setups and still have room at the other end of the table for the odd job that comes along in between.
I have no clue if this will work, This is my very first venture into 3D printing a work holding fixture. I may turn into a learning experience. I have no clue as to the proper design of the 3D printed fixture to get proper strength. At least the sectors are soft plastic and it is not a very deep cut and I have a brand new very sharp end mill so the forces on the fixture should be low.
Then I get to start all over to make the mating part, It will need a new 3D fixture and clamp (It might just be a mirror image) of its own.
Go ahead, rotate and zoom that JPEG, I dare ya.....


