Ball Turner Experience

Jim Sehr’s ball turner. I made a few blank disks to hold the .25 round carbide cutter . To get ball size I put one of the disks centered on the mill. Then dial off radius center plus half of cutter dia. I get balls within a couple thousands. The top end of round cutter is the cutting edge. Top of cutter should be dead on center . Once set all radius are the same , size is controlled by cross slide dial. There is no clearance on carbide round cutter. So it will cut the radius or turn a dia but it will not face a part. The cutter holder in video will cut 4 different size balls. But I can make any size radius cutter holder faster then trying to set the right size radius by trial and error with like you have to with other types of ball turners. And if you want you can use the other side of cutter and cut a concave radius into the od of a bar. It will be a half inch bigger radius than the inside radius. You can save different radius disks and change them on minutes. Their axis is only a socket head cap screw. When ball is almost to size check with micrometer to cut last few thousands.
Jim Sehr
 

Attachments

  • IMG_0002.mov
    57.9 MB
Last edited:
I have looked at the Holdridge. I don't see how to precisely set the radius? Can someone elaborate?
Did you look at the .pdf that I posted below the cartoon? That demonstrates how it works.

Holdridge can be expensive, so I'm not saying to go out an buy one. Mine was a good deal but still expensive at $750 shipped. One of the guys here recently got a nice one for half that, for a big you suck award.

I'm more interested in sharing how it works, it is suitable for precision and versatile for many interior and exterior arcs. It has a much larger capacity than any other tool post mounted design. Check out the literature attached to my "Holdridge" post, it may give you ideas for an improved fabricated tool.
 
I have looked at the Holdridge. I don't see how to precisely set the radius? Can someone elaborate?
Here's mine and the instructions for setting the radius.

20230721_154647.jpg
20230721_155013.jpg

The yokes have ground pads high & low that a 1/2" thick gauge block sets on. That block has a hole for the anvil of a depth micrometer. Don't quote me on this as I admit to not reading the instructions, but the depth mic should read 1" greater than the radius as the gauge is 1/2" thick and the yoke gauge surface to pivot axle is 1/2".

20230721_155052.jpg

20230721_155250.jpg

Again, I haven't studied the instructions, but for a concave radius, I'd do much the same thing except in reverse and use an outside micrometer. Set the 1/2" gauge block on the yoke, and mic from the block to the tip of the tool. Again, the offset would be 1". Or, use gauge blocks on the yoke to shim the 1/2" gauge block and set the radius with a depth mic.

Bruce
 
Last edited:
Jim Sehr’s ball turner. I made a few blank disks to hold the .25 round carbide cutter . To get ball size I put one of the disks centered on the mill. Then dial off radius center plus half of cutter dia. I get balls within a couple thousands. The top end of round cutter is the cutting edge. Top of cutter should be dead on center . Once set all radius are the same , size is controlled by cross slide dial. There is no clearance on carbide round cutter. So it will cut the radius or turn a dia but it will not face a part. The cutter holder in video will cut 4 different size balls. But I can make any size radius cutter holder faster then trying to set the right size radius by trial and error with like you have to with other types of ball turners. And if you want you can use the other side of cutter and cut a concave radius into the od of a bar. It will be a half inch bigger radius than the inside radius. You can save different radius disks and change them on minutes. Their axis is only a socket head cap screw. When ball is almost to size check with micrometer to cut last few thousands.
Jim Sehr
Remember the radius stays the same but the cross slide changes the size.
 
Isn't the LMS ball turner a knock-off of the Holdridge design?

FWIW, I've managed to survive without a ball turner so far using:
  • Hand ground HSS form tools (admittedly just for smaller ball ends).
  • Form tools made from tool steel with angled holes to provide relief, then milled back, hardened, polished with stones, and mounted upside down on a rigid rear tool post.
  • Parting tool plunged to pre-calculated radii at different Z offsets, then bluing and filing until the blue lines go away (Guy Lautard method)
Next time I need to make more than one at a given diameter, I'll definitely make one of Jim's tangential ball turners. Much simpler to construct than the Holdridge design.
 
Rex
When I made my ball turner I thought how often does a hobby guy need to make a ball?
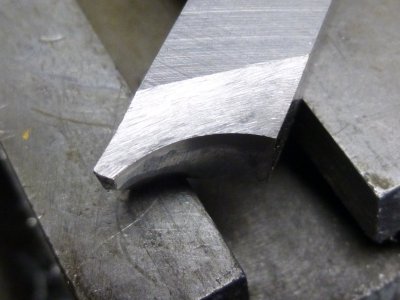
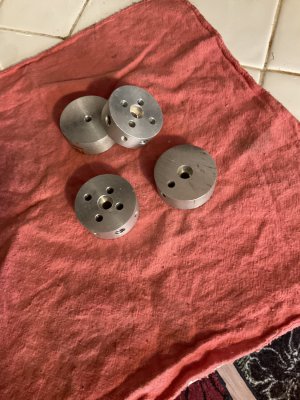
Do I need a bearing for an axis just to make a few balls? NO. Does it need to be hardened and ground? NO. What size would most home shops want. How many hobby guys would ever make a 6 inch ball? Very few. So I went with my motto( Make It Simple ) First I made a ball turner that I could adjust the ball dia and it worked great. But you still have to fiddle around to get it to size. Also I had never seen the end of a round cutter used as a cutting tool. So I tried it. It worked and takes no skill to grind. It can turn the ball or an od but it can not face. I can make a radius on a hss tool within a thousand of being true. With out all the hassle of heat treating. If I want I can make a radius .265 .When I made my Jimsehr ball turner I also made a few extra blank blanks so if I wanted to make some thing like a metric radius I was ready.
First pic is hand made radius tool second is blanks to make different size radius cutters. And to me it is faster than adjusting an adjustable cutter.
lf I needed a thousand balls I would make them on a CNC.
jimsehr
 

Attachments

  • BB53C638-9537-4956-AB7D-CBA2D20F251F.jpeg
    BB53C638-9537-4956-AB7D-CBA2D20F251F.jpeg
    370.5 KB · Views: 16
  • 6F06200A-833E-4855-80B7-0ED3828EB352.jpeg
    6F06200A-833E-4855-80B7-0ED3828EB352.jpeg
    326.2 KB · Views: 16
Last edited:
And to me it is faster than adjusting an adjustable cutter.
That’s what I like best about the design. Fixed radii rather than adjustable makes perfect sense to me, especially since my parts with ball ends are usually ornamental anyway. Two or three sizes suffices for most of what I do, but I really like the idea of having a blank on hand for a specific radius if I needed one.

I see some of the blanks in the second photo have four different radii — I hadn’t noticed that detail before.

It looks like the cutter is secured with a grub screw? And the handle can attach in multiple locations?

I’ve hand ground several radius tools like that, but it’s time consuming. Your ball turner would be quicker to set up and use than grinding a new form tool for sure.

Only problem with your tool on my lathe is I’d have to mount it on the rear of the cross slide and run the spindle in reverse. My compound is a PITA to remove, and I’ve not gotten around to wiring in a drum switch yet.
 
Rex
I see no reason you can not run in front side of cross slide on your 10 inch Logan
with regular cross slide or Logan production cross slide. I’ll call you and tell you how.
jimsehr
 
After speaking with Jim a bit, here's what his design looks like for his super-simple ball turner with fixed radii that you can make from scrap and attach to any compound:

Screenshot 2023-07-22 at 8.38.48 PM.png

(view from the back of the lathe)

The parts are a tee-nut base, a swivel puck, a handle, a cutter (worn out end mill or whatever), some set screws, a long screw (sized to fit the radii you need) and a couple nuts. The tee-nut should be slightly proud of the compound top.

Since most of us have our compounds semi-permanently mounted, this design conveniently fits in the tee slot of the compound. Four set screws secure it in the slot securely.

The swivel puck is just a piece of CRS of convenient size. Drill and (optionally) ream a hole that's a fairly precise fit for a socket-head cap screw through the swivel base and the end of the tee-nut, then capture the swivel base with a cap screw and two nuts (one to adjust the tightness and another as a lock nut).

Find an old worn out end mill or whatever to use as a cutter, and grind one end perfectly flat and perpendicular to the sides. You want a sharp edge all the way around the circular top of the cutter.

Drill and (optionally) ream a hole the same size as the cutter through the cylindrical swivel exactly the desired radius from the center of the cylinder minus the radius of the cutter you chose. I thought this had to be a blind hole to bear against the cutting forces. A flat bottomed hole exactly the right depth to position the cutter at center height would be a PITA to make, but Jim says a grub screw in the side is more than sufficient to bear the cutting forces and is a whole lot easier to adjust.

Finally, mill a flat at an angle and drill and tap a hole for a handle at a convenient location (or three).

Notes from our conversation:
  • This has a zero rake angle and no relief. This is not an issue in practice (witness Jim's video above). It's basically a tangential turning tool for already cylindrical stock, but it won't work for for facing. Since the cutter is at or slightly below center height, you don't need any relief (the work itself already falls away).
  • The zero rake angle is actually fine for even harder materials, but the lack of any chip breaker can make for some scary chips. But only the final pass will stay in contact with the entire sphere (and since you're swinging the handle manually I imagine it's easy to break chips like pecking while drilling).
  • Note that the swivel puck diameter and thickness affects the maximum diameter ball that can be turned. When you feed in enough on the cross slide to make the final pass at the final sphere radius, the puck must not interfere with the bottom of the work.
  • In use, the cutter is behind the axis of rotation, of course, but you want the handle attached to the right so that you can cut almost a complete sphere (or as narrow a shaft as you like for ball handles).
  • Of course, there is nothing preventing you from drilling holes at multiple different radii!
  • Jim is the master of keeping things simple. He points out that we usually don't need a tool with a continuously adjustable radius. We just need a tool that can cut the radius we need RIGHT NOW. In practice, how many different sizes do we really need? If you don't have a puck with the radius you need, just drill another hole in one at the correct offset and drill and tap another hole in the side for another grub screw. In my case, I'm mostly putting a relatively small ornamental ball at the end of a lever, so the size isn't particularly critical anyway. I've no need for turning 6" spheres.
I'll be making one of these over the coming days, and probably remaking some of the umpteen ball handles on my Quorn (just two radii required). I'll post an update if I learn anything new.

I'll also be posting another thread on how Jim makes and polishes/laps his radius form tools. As usual, super simple and effective.
 
Back
Top