2021 POTD Thread Archive

I made some brass fingers for my steady rest
The steady rest looks great. I hear you about working with brass.

I made a dishing puck out of a piece of 4340; it is not as nice as brass. Lots of cranking the compound for the 15° depression, which made me realize just how much I appreciate power feed. Though it was late, I couldn’t resist banging on a piece of metal to see what the future holds. It worked surprisingly well for a no-heat test.
B279A429-6DA0-4B8A-999D-C78CE9C059EA.jpeg
 
Last night I made a ball-peen hammer to use with the dishing puck. A section of car axle (half shaft) turned in the lathe to clean it up and roughly round the ends, with a piece of flat bar welded on and secured in an old axe handle with a couple brass pins and wire wrap. It has a couple different radii and the extended reach definitely helps get into the center of the dishing puck.
F2A6EFD6-2B52-4F9A-8F95-30082B0EEDE5.jpeg
 
Last night I made a ball-peen hammer to use with the dishing puck. A section of car axle (half shaft) turned in the lathe to clean it up and roughly round the ends, with a piece of flat bar welded on and secured in an old axe handle with a couple brass pins and wire wrap. It has a couple different radii and the extended reach definitely helps get into the center of the dishing puck.
View attachment 387829
what are you going to make with the dishing puck?
Nice job on that hammer.. what shape did you put on the other side of the hammer? Hard to tell.
Hatchet handle?
 
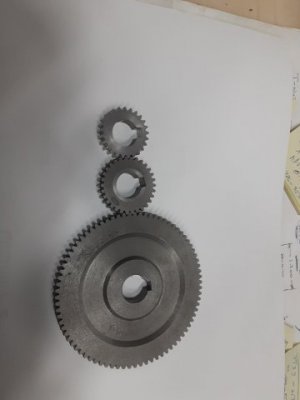
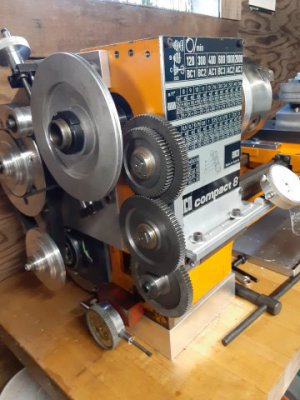
I looked everywhere for a 25 tooth spur gear to fit the Emco Compact 8 power feed gear cluster. Did find some 80, 60 and 30 toothed ones, so I broke down and machined a 25 T from some 416 SS I had, now I have .008" and .004" per revolution power feed! :eagerness:
 

Attachments

  • Gears-1.jpeg
    Gears-1.jpeg
    15.9 KB · Views: 24
  • Gears-2.jpeg
    Gears-2.jpeg
    43.5 KB · Views: 24
what are you going to make with the dishing puck?
Nice job on that hammer.. what shape did you put on the other side of the hammer? Hard to tell.
Hatchet handle?

I’m trying to make a ladle. Seems like I could just about cold work the spoon but I’ll probably use some heats at the same time I forge the handle. It’s by my sister’s request for something like this: https://permanentcollection.com/products/original-egg-spoon

The hammer has hemispheres on both ends, one smaller than the other. It is indeed a hatchet or axe handle, cut down.
 
@jwmelvin
That is a deep draw for cold working. I would expect to see stress cracking long before you reached the final form.. It is best don by heating to a bright red heat and working hot. A problem with a thin piece like this is that it will cool quickly once removed from the heat source so at best, you will only get a blow or two before it needs to be reheated.

Forming a bowl like this is best done with a swage block with a spherical depression that matches the final form as closely as possible. The flat face of the anvil will only swage out a small region at the center of the blow and excessively thin it. Not say it can't be done but the work becomes much more delicate as it requires hundreds, if not thousands of well placed blows to achieve the effect. There is a reason why the linked ladle is priced at $300.

The handle, by comparison is much easier. It can easily be made with an anvil. A short cut could be to turn it to nearly finished form and then forge it to final form to obtain the hand forged appearance.

Edit: I hadn't seen your previous posts. It looks like you have the swage block covered.
 
Last edited:
[mention]rjsakowski[/mention] yep, I do plan to use heat when I attempt the ladle. Just playing around cold with the new puck and hammer. I’ll probably put a steeper depression in the puck’s backside and see how it goes.
 
I made these a year or two ago, had to use one today to find a ballast in my windows so I could hang a shade. I didn't want to hit the ballast.
Anyway, I thought these would make great stocking stuffers if you are looking for ideas. I made these for myself, for my tool box and white board so I can hold up tapping charts, oiling charts... etc.
hope it's useful. 20211208_162835.jpg20211208_162855.jpg
 
Just circling back to close the loop on this little effort, I cast the replacement part yesterday and just wound the machine up on its maiden run a few minutes ago. Very smooth, very quiet.


I made my mould for the friction wheel out of some black acetal I had on hand and while I was at it made a few others for replacement feet out of what I think was LDPE, again from an off cut I had on hand. I mainly wanted ease of turning as my experience with casting silicones is they release easily from just about anything with no separate release agent, but I knew the plastics would also help with that. The mix ratio for this product is 100:3 by weight so it helps to mix a meaningful quantity otherwise the smaller of the two quantities gets hard to measure accurately. I use an an old school beam balance with the sliding weights — no batteries to go flat. Here’s a picture of the just-filled moulds.

1639008280615.jpeg


Okay, I lied. That picture was of the moulds filled the first time. I actually screwed up the volumes on the first batch and measured out three tenths of a gram instead of three grams! Uh yah, big time oops. Cleaning out uncured silicone is not fun… . Anyhow, second batch I did correctly and here’s the results.

1639008335713.jpeg

The Shore 60A hardness is a bit soft for my liking but not terrible. My diy durometer says it’s not way off the hardness of original wheel but I think it is some. I’m running with it for a while though and see what happens.

1639008377942.jpeg

The installation tool worked nicely to reinstall the split pin too. I made a second driver part for it so one drives the pin out and then the second one has a concave tip to drive the pin back in. Give me Singer any day to work on though — as beautiful and precise as these European machines are they’re equally fussy and hard to get at unless you’ve got the fingers of a watchmaker, and I do not.

1639008419649.jpeg
1639008455570.jpeg
1639008495800.jpeg


So there you go. In the time between starting this and finishing it another almost identical Supermatic fell into my lap, also needing a new friction wheel, so I get to do it all again soon. :)


Thanks for looking!

frank
 
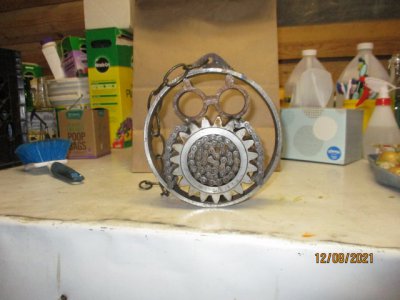
The body is the idler gear from an oil pump, the eyes are waterwall, sometimes called boiler membrane, the wings and breast are timing chain, it's really heavy but whooo cares.
 

Attachments

  • IMG_0021 (2).JPG
    IMG_0021 (2).JPG
    52.5 KB · Views: 36
Back
Top