2020 POTD Thread Archive

@gr8legs, What is your plan for fixing a flat on the side of the road (on a mountain pass in a winter storm... etc.) when you need to develop 9 million foot-lbs of torque to change a tire? I'd either get an electric impact that can run off of your onboard power, or search up what is called a "torque multiplier", which is basically a planetary gear reduction for a ratchet and breaker bar, and keep that in the tool box in case of emergency.

They make these in several sizes. Once upon a time, I ran a 120,000 lb. tracked recovery vehicle. The only way to do anything on that beast in field conditions was to use the old torque multiplier with a hydraulic impact because 1300 ft-lb sometimes wasn't enough.

images
I wondered what a torque multiplier was. Now I know - thanks!

These rigs are cool but a bit fussy about being jacked up or towed. I have not yet acquired the jacking adapter or a suitable jack to lift it myself.

My plan for the event is to not be on the road in snowy ugliness and if I do get 'stuck' somewhere then we'll just go in back, play gin rummy until the AAA or FMCA road service arrives.

Thanks for asking, it's something I've pondered myself.

Stu
 
Who doesn't love chocolate ice cream? :encourage:

Serendipity - the occurrence and development of events by chance in a happy or beneficial way.
"a fortunate stroke of serendipity"
I Scream.... You Scream... We All Scream for Ice Cream.
 
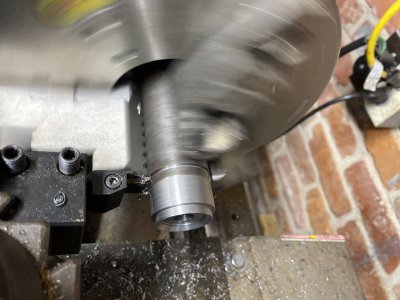
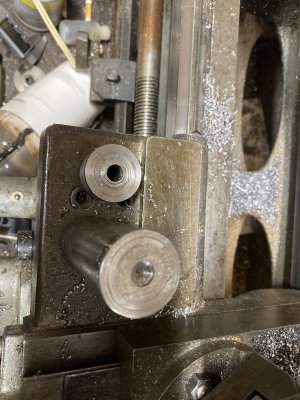
Had to install some overflow spouts.... aka” bird’s mouth “ on the house gutters. Just set an inch or 2 below the top so when the gutters get overwhelmed from partial clogs or whatever.... the water doesn’t run behind the gutter and rot the facia or soffits.
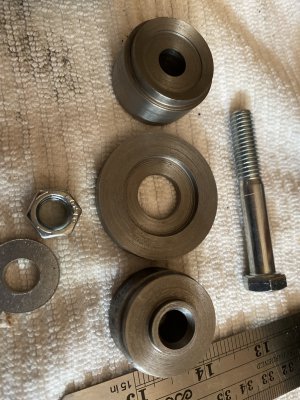
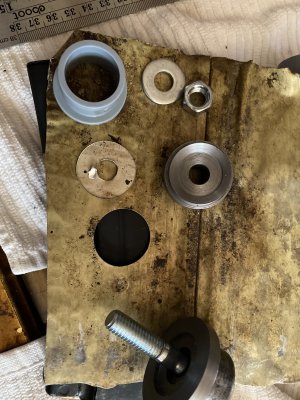
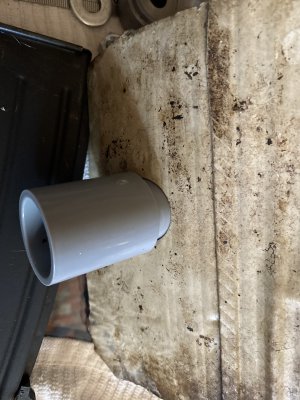
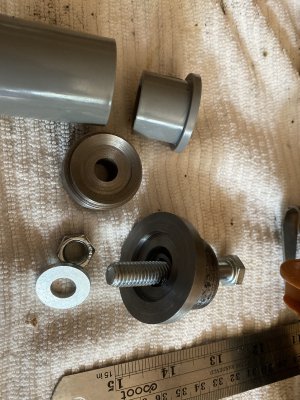
Years ago.... many years ago, you could buy birdsmouths at hardware stores. Anyway I decided to use PVC electrical box fittings which are used to mount pipe to panels along with a pvc union
coupling.
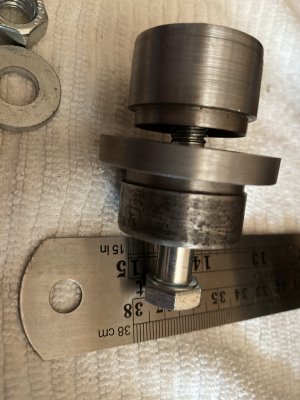
So... since aluminum gutters are pretty thin and I didn’t want to risk butchering the gutters with a big bit or hole saw. I made a knockout punch sized to the PVC fitting.
Works like a champ.
Just tried it on a scrap piece of aluminum gutter downspout.
 

Attachments

  • 203ADE90-5D5B-45E8-B8AE-F4E0FB4B6972.jpeg
    203ADE90-5D5B-45E8-B8AE-F4E0FB4B6972.jpeg
    3.1 MB · Views: 34
  • 2865AE56-78FB-484C-9709-D8D348ED7748.jpeg
    2865AE56-78FB-484C-9709-D8D348ED7748.jpeg
    1.9 MB · Views: 32
  • FF9A1F86-3942-409B-9DAD-426E5E277677.jpeg
    FF9A1F86-3942-409B-9DAD-426E5E277677.jpeg
    1.9 MB · Views: 31
  • 1839E52A-602B-47FF-9852-369FEFC86205.jpeg
    1839E52A-602B-47FF-9852-369FEFC86205.jpeg
    1.5 MB · Views: 31
  • 7C63C42B-93F1-40A1-BE16-613DB514127F.jpeg
    7C63C42B-93F1-40A1-BE16-613DB514127F.jpeg
    2.2 MB · Views: 31
  • 3A1EB433-A885-44B0-9CF9-4E3BF081AF60.jpeg
    3A1EB433-A885-44B0-9CF9-4E3BF081AF60.jpeg
    1.9 MB · Views: 30
  • 63B79C58-CCB2-4E14-AF23-D7ED7BD69C8B.jpeg
    63B79C58-CCB2-4E14-AF23-D7ED7BD69C8B.jpeg
    1.9 MB · Views: 30
POTD was reading the electrical cabinet wiring schematic for my Tormach 1100 Series 3 mill. As you can guess, if I'm reading the electrical schematic, I must of had a problem. . . .

Was setting up to run a part; locked it in the vise, probed a corner and top surface to set the coordinates, pulled the probe and hit CYCLE START. The auto tool changer grabbed the right tool, routine was about to start then everything went dark. . . All of my 115V "stuff" was dead. E-stopped the machine, shut everything off and fired it back up to no avail.

The computer controller, monitor and coolant pump all get power from the mill's electrical cabinet. I could fire up the stepper motors, but read nothing at the 115V outlets. I plugged the monitor and PathPilot controller into an extension cord plugged to a wall socket and they did fire up. I could also control the table/column/spindle from the jog shuttle/keyboard and touch-screen. That told me the controller wasn't fried, and it was communicating properly to the electrical panel and the machine control board.

Minor kludging to get back up and running. I plugged my coolant pump into a wireless outlet as it would have to be manually turned on/off until I figured out the real problem. Easy to hit an ON/OFF switch on the FOB to run the pump. Well, the pump wouldn't run. When I bought the mill, the previous owner used a 1/2 HP sump pump for coolant. Motor was very hot to the touch also.

Looking at the electrical schematic, the most likely suspect was a 6A fuse which protects the 115V circuits for the pump, monitor and controller. Sure enough, it was blown. I suspect the pump had frozen up and popped the fuse when the routine called for coolant to come on.


A look inside the Tormach 1100 electrical panel. The red LED lit up on the RH side indicates that fuse FU6 is blown. Guess I now know if the LED is on, that's a bad thing.
View attachment 336939


I ended up replacing the 1/2 HP pump with a 1/4 HP pump and did some changes to the coolant system plumbing. The 1/2 HP pump was rated at a peak of 3000 gph, 1/4 HP is 1200 gph. I typically run coolant at less than 60 gph, so no issue with less max delivery.

The previous owner had plumbed the output of the pump to a house water filter, then a ball valve to control outlet flow. I questioned this at the time but didn't take any action as the ball valve was nearly choked off to get the flow at the outlet of the LOC LINEs to a reasonable level. I suspect the pump may have nuked from only getting 2% of its rated flow through the ball valve.


Green hose is the inlet. Coolant runs through a house water filter, then a 'T' to a wash down hose (blue hose) and then a ball valve to control flow at the mill's coolant lines. The valve handle at vertical is shut off, this is the position I'd normally run it in. If I ran high flow through the valve, it was really tough to regulate the coolant flow at the Loc Line valves. I even blew a Loc Line apart in the past leaving it at high flow.
View attachment 336941


My original plan was to plump the output through a shower mixer with one line running to the mill's coolant lines and the other to a line back into the coolant tank. That way the pump isn't getting dead-headed as I choke down the outlet at the mill. Was digging through our garden hose fittings and found a better/cheaper mixer: a simple garden hose "Y". The pump outlet now runs into the "Y" with a hose going right back into the tank and the other to the original set up. The pump should run much happier now, though I believe some pumps can handle being dead-headed.


New coolant pump and the shower mixing valve for the original plumbing plan.
View attachment 336940

Ended up running the pump outlet through a "Y" with one line going directly back into the coolant tank and the other up to the mill.
View attachment 336942

No issues with coolant now. If I open the Loc Line valves completely open, it'll shoot coolant 6' away.
View attachment 336943

Had to fab up an 'anchor' to hold the diverted line in the tank. Yeah, fired up the pump and shot the hose out of the tank
View attachment 336944


Alas, no extra 6A fuses to get everything back to normal, but my work around is at least functional. Amazon says 3 days for replacements.

Thanks for looking,

Bruce
Oh geez! terrifying! Glad you're all good...maybe better off? I have those damn fuses too, made sure I have extra's as they are expensive and not quick/easy to get. I was thinking this as I was building my mister system...why can we not switch those fuse din units with breakers?
 
A tale of two mallets.......

I took a break from re-sheathing the sheds to have some fun on the lathe.

I've had this cheap mallet around for years, it originally had one hard plastic face and one rubber face.
The plastic one broke years ago and the rubber one was now junked.
mallet1-1.jpg

I had picked up replacements over the years, but none of them fit!
mallet1-2.jpg

I recently saw some suitable unknownium plastic at my local shop:
mallet1-3.jpg

and made up these:
mallet1-4.jpg

mallet1-5.jpg

and after tapering the heads and crowning the faces:
mallet1-6.jpg


I believe I got this other little mallet handle in a $5 box of random bits. It's never had any faces since I've owned it.
I thought some brass would add some useful weight to it:
mallet2-1.jpg

Since the head wasn't round, but kind of oval, I left the faces oversized:
mallet2-2.jpg

I still need to crown those faces.

-brino
 
Built a gate for alongside my house. It’s just to keep the deer from getting into the back, not security or anything, and I didn’t want to obstruct visibility with anything too structured. Welded from 1/2” rebar with my little 135 mig. Biggest challenge was assembly space — my basement shop has a 7’ ceiling and this is easily 8’ tall and spindly. Managed to do it without welding myself into the shop though :)

-frank

B2F4383E-D29F-443C-8567-E5D7F4238D92.jpeg
 
Built a gate for alongside my house. It’s just to keep the deer from getting into the back, not security or anything, and I didn’t want to obstruct visibility with anything too structured. Welded from 1/2” rebar with my little 135 mig. Biggest challenge was assembly space — my basement shop has a 7’ ceiling and this is easily 8’ tall and spindly. Managed to do it without welding myself into the shop though :)

-frank

View attachment 337599

Very clever Frank.
All you need is a metal Charlotte!


Sent from my iPhone using Tapatalk
 
Built a gate for alongside my house. It’s just to keep the deer from getting into the back, not security or anything, and I didn’t want to obstruct visibility with anything too structured. Welded from 1/2” rebar with my little 135 mig. Biggest challenge was assembly space — my basement shop has a 7’ ceiling and this is easily 8’ tall and spindly. Managed to do it without welding myself into the shop though :)

-frank

View attachment 337599

Seems our deer are much smarter than yours:D
 
Back
Top