Thread dial question

the new bearings should be hear in a few days...I cant wait to try it out again.. I'll post the results.John
the manual that I have I found on e/bay ... A little pricey but it shows all the part numbers and a lot of info on setting up the lathe in your shop, how to run it ,how to service it, adjustments, ect. I see they still have some for sale there. Just type in Metal lathe 10'x24"-12" x 36" instructions & parts manual.. on e/bay search bar
 
Last edited:
OH SHUCKS ,MY BAD :slapping:... I see from the photo of the end cover on my lathe is the gear set ups for all the threading details ..I am so sorry everyone I should have studied my own photos .. Well if nothing else I have gained knowledge for sure . I will set up the gearing as what the end cover shows and get on with it. I feel so bad for wasting everyone's time. My profound apology to all. Again I am very thankful for the support shown by all on the hobby machinist forum.:whiteflag: please don't shoot me . John Mullen


I think the reason many of joined this forum is to be able to help out where we can. I think at one time or another we have all been in a position where another set of eyes (or a few), is helpful. Even if the solution is right in front of us all the time, sometimes we just don't see it. I have certainly had that happen to me.

When you get your new bearings, please let us know how everything worked out.
 
I think the reason many of joined this forum is to be able to help out where we can. I think at one time or another we have all been in a position where another set of eyes (or a few), is helpful. Even if the solution is right in front of us all the time, sometimes we just don't see it. I have certainly had that happen to me.

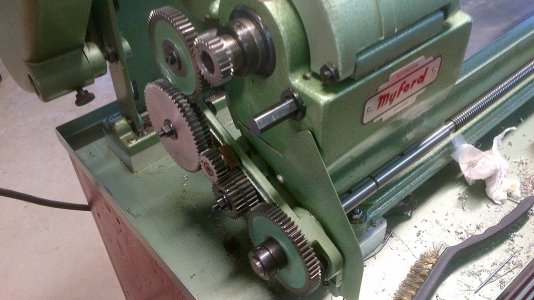
Yes it's amazing how you can overlook things, just recently I needed to cut some metric threads on my Myford, I looked at the threading chart and seen I needed a 63 and a 39, so I cut the gears cleaned everything up and went to make threads, I should have looked closer at the chart, in one setup it needed two 50 Tooth gears and I only have one, have a look at the picture if you notice I have an extra 2 gears in the train to compensate.

Long Gear Train.jpg

Long Gear Train.jpg
 
Thanks guys for the Kind comments.:phew: I feel a little better knowing others have overlooked things as well. I guess if we were perfect we would not need each other hear on the forum. I'll let you all know how I make out with threads as soon as I get it together...John
 
Please pardon a little (okay, a lot) of thread drift: In post #6, Mr. Mullen's photo shows a red "build your own" V belt. Are there any comments about these as an alternative to the standard V belt? I have just purchased a green version of this as an emergency alternator belt, and would appreciate any thoughts about these. I might be recommending them to friends...
 
Please pardon a little (okay, a lot) of thread drift: In post #6, Mr. Mullen's photo shows a red "build your own" V belt. Are there any comments about these as an alternative to the standard V belt? I have just purchased a green version of this as an emergency alternator belt, and would appreciate any thoughts about these. I might be recommending them to friends...
I purchased this belt because I didn't want to take the spindle out to replace the old worn out belt. It was so easy to install and it works very well so far. they are directional and should be installed as instructed by the maker..
 
Thanks John,

I note your remarks about the direction of the belt. Mine did not come with directions, but I will install it the way yours can be seen (non porcupine way, as running). I have been fortunate that my big lathe has never broken a belt, so I have not had to deal with that - yet. I have an airplane, whose alternator is belt driven, and to change a belt requires removing the propeller. As this is not easy to do "away" from base, a belt which could be installed around behind seemed appropriate, and this is what I came up with. I'm told that forward thinkers tie back a second alternator belt at times when the propeller is off anyway, but then that belt perishes faster simply tied to the crankcase in the elements, not moving. With luck, I will not need to try the Lego belt, but it's reassuring.

Pardon the thread drift - thanks, Jim
 
OH SHUCKS ,MY BAD :slapping:... I see from the photo of the end cover on my lathe is the gear set ups for all the threading details ..I am so sorry everyone I should have studied my own photos .. Well if nothing else I have gained knowledge for sure . I will set up the gearing as what the end cover shows and get on with it. I feel so bad for wasting everyone's time. My profound apology to all. Again I am very thankful for the support shown by all on the hobby machinist forum.:whiteflag: please don't shoot me . John Mullen

As an onlooker, I too am impressed with the generosity and kindness of the participants here. It is a genuine pleasure to follow most of the threads as a learning opportunity without having to witness ego clashes. Being relatively new to lathe operation, in retrospect, I found it somewhat confusing to read and understand the charts riveted to the machine even if they are well thought out. Of course once they became familiar I wondered why it took me so long. Happy gear shifting and gear changing John.
 
I do not have the same type of lathe that you have but I also had a problem where the original thread was being destroyed as the next pass would align in the middle of the already cut thread. I was starting on "2" on the threading dial. After much tinkering, i changed to always start on "1" and it fixed the problem - don't know exactly why, but i now always start on the "1" position of the threading dial and didn't have any more problems.
 
I do not have the same type of lathe that you have but I also had a problem where the original thread was being destroyed as the next pass would align in the middle of the already cut thread. I was starting on "2" on the threading dial. After much tinkering, i changed to always start on "1" and it fixed the problem - don't know exactly why, but i now always start on the "1" position of the threading dial and didn't have any more problems.

This does happen from time to time, I diremember the rules for that but it has to do with the thread pitch, for instance the thread you where cutting you might have been fine to drop it in on No.3 if you started on No.1, when I cut a thread I always take a skimming cut and check the pitch with the thread gage, then try a different number with the tool out .050 or so, engage the split nut and let it feed a bit then stop the motor, wind the tool in and see how things line up, this might gobble up some time but I find it's worth it because the thread is usually the last thing I do and it's a pain to scrap a part on the last operation, if I have a spot to run out on the end of the thread I never disengage the split nut it's much faster to just do the forward reverse thing.:))
 
Back
Top