The Bronze-Loaded Acme Nut Experiment - Part 2

Put anti seize on the threads. Keep running the screw in and out and it will loosen up a bit.

I think using the liquid turtle wax was the problem. Too thin. A hard paste wax like mold release wax would have been a little thicker leaving more clearance.
Is your release agent a type you spray on? Can you "build up" thickness?
 
Just thinking..... What about wrapping it with Teflon Tape? It can be drawn quite thin. Just not sure thin enough? Tends to conform to the shape of threads as it is drawn down.
 
I started reading through this thread and thought, what the heck are you doing?
Once I realized the plan, I think it's a darn good one.
You'll get it.
Well done!!
Thank you. I was beginning to wonder whether I had gone too radical!

One way I consider, reluctantly, is to alter the screw. The whole idea was to mold something around it, and leave the screw unmolested. It is reasonably simple to spin something up the nut to take a thousandth or so off the crests of the internal thread, and (horror), rub a thousandth or so off the metal Acme screw tops. Then only the sloping surfaces would be involved. It might still bind.

When I said "zero backlash" I had not considered an outcome that overdid it, ending up too tight :)
[EDIT: The reason for this is found in post #28]
 
Last edited:
Just thinking..... What about wrapping it with Teflon Tape? It can be drawn quite thin. Just not sure thin enough? Tends to conform to the shape of threads as it is drawn down.
Indeed - that is what we considered in posts #7 and #9. PTFE stretches to about 0.0003, but it's very difficult to get a single thin uniform layer on. I have tried, and I have yet to clean up all the bits of messed up tape here. Spray painting may be the answer.
 
with the delrin Evanuts I think the idea is to use a spare piece of threaded rod gashed at the end to act like a thread chaser. Run that through a couple of times and that's usually enough to give you sufficient clearance. Or you could mold the nut around the new screw and then use the old screw, which presumably will be a little worn.

Really neat idea that you're working on though, I think it has an awful lot of potential, especially for harder to make parts like half nuts.
 
I use Meguiars Maximum Mold Release Wax. It is a hard paste wax specifically designed to wax molds used in making fiberglass and epoxy parts. It is not a thin spray on film. Some of the suggestions may work. Or may not. Why not use a product that was designed to do what you need.

In your application you have to be careful not to fill the threads with wax. If you have a regular Acme nut that fits your screw I would goober up the screw with wax then run the nut on and off the screw. This will leave you with the same thickness as the tolerance in the threads. If you redo your nut I would not use JB Weld. I would use a regular epoxy. Much easier to mix and apply with a longer working time. You want the consistency of peanut butter or just a little thicker.

I believe Maguiars is now owned by Stoner and sold as Stoner Maximum Mold Release Wax. I am sure that there are other similar products. http://www.shopmaninc.com/moldrelease.html

I think that the nut you have already made will work just fine. It just needs to be screwed on and off the screw a bunch of times. It will loosen up in use.
 
with the delrin Evanuts I think the idea is to use a spare piece of threaded rod gashed at the end to act like a thread chaser. Run that through a couple of times and that's usually enough to give you sufficient clearance. Or you could mold the nut around the new screw and then use the old screw, which presumably will be a little worn.

Really neat idea that you're working on though, I think it has an awful lot of potential, especially for harder to make parts like half nuts.
The scheme as I have done this first run does have it's imperfections. I have "got away" with a whole lot so far, but I am sure any future attempts will see this thread, and make some variations in view of what I have found. With a half-nut, at least you can cut it from a whole nut.

Metal polish and toothpaste!
Working it as a bit of a pastime now, using only fingers torques - no tools, and metal polish, and toothpaste, I can get it to screw through, but still stiff. Whatever abrasive are in these, they are very fine, and "wear out", unlike diamond lapping paste, which just keeps on cutting. The Acme screw is looking very shiny polished now. If I can burnish it enough this way, lapping it in, then my experiment also becomes an actual "repair".

The end result of having bronze loading particles bonded in a plastic should make a very good bearing, for something that does not have to move much. It makes me wonder how the original came to be so worn out and broken!

@mickri : My thanks. I have brought the nut to where my PC is, and I have been working it to loosen up as you suggest, When I get it running on such that I am convinced I am not going to break it, I may run it a few times back and forth using a hand drill. I am getting it to work, but ever so slowly.
 
Last edited:
OK - we make a discovery.
Much of the reason it can be so difficult to get the screw to run up the nut again, and why the force was enough to crack the mold away from metal adhesion on one side when first extracted, is because the mold was cast on a worn part of the screw - somewhere in between the V-blocks as it was set up. This wear is not on the crests of the screw. That measure was 0.372" all the way along. The wear is on the sloping parts of the thread.

As I "lapped" the screw into the nut, using only metal polish and toothpaste, everything slowly becomes easier. This form of lapping is ultra slow, and relatively harmless. We start to discover that in the first inch or so, something feels "out of round", in that there are two "easier spots" 180° opposite each other. "Easier" is a relative term. It's damn tight most of the rotation. There was some feature cast, affected by the fact it was set in a U-shape, and in a part of the screw that had seen more use. I have marked up the earlier picture to show this.
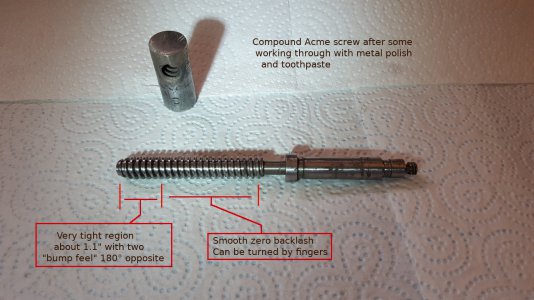
Compound Nut25a.jpg

If I leave it in it's current state, then I will have a repair part that should work just fine over the region of compound position most used, but it will encounter the stiffer unworn part when screwed to near it's extreme. Had I cast the nut on the unworn thread in the first inch, I might have ended up with a nut that was somewhat looser and "more sloppy" as it found the middle part of the screw.

What I should have done when checking out the screw was to wind some copper wire into the threads, and measured across, or used "thread pins", but I don't have a set of those.

The backlash is nothing! It cannot be felt, not even "rocking". Now I know that the screw is "unique", should I come to re-make it as part of a larger dials upgrade, then it will have to have it's own new nut to match. The experiment nut only has to survive taking some 3mm off the top, to not rub on the casting, and it can become a "repair part" for the present, because it will be a huge improvement on what was there before, even if looking a bit "experimental".

Actually - it kind of has to do service now, because I sacrificed the original working nut in a manner.. well.. kinda permanent! :)
 
Last edited:
You could always replace the ACME screw with a short portion of a replacement and pin in place. Keep your awesome nut.
 
You could always replace the ACME screw with a short portion of a replacement and pin in place. Keep your awesome nut.
The nut is a low cost, easy and fast way to get a quite effective fitting ACME nut. "Fast" means I don't include curing time when one is off doing something else. The actual time one gives it direct attention has to be less than going up the learning curve of grinding 29° boring tools, and single point turning an internal ACME thread, all assuming you have available "another" lathe to do the job anyway!

I am not completely happy with the nut I have as a functioning thing, because even though it seems OK, and my J-B Weld crack repair looks OK from the outside, I am considering a Nut MK2, implementing some of the suggestions regarding release agents, etc. and this time, choosing to mold at the "unworn" first inch of the screw. I admit that the ease by which one can end up with exactly fitting, strong, hard wearing, low cost, precision internal ACME thread part is just temptingly addictive. We shall see how that goes!

The solution I really fancy is shown here..
Backlash Compensated Nut Design
I know, I know! Let us be "gilding the lily"!

To do something like as in the video, to work in the confined space of that little compound may be unrealistic! The screws would have to be something like M2, or M1.6, and having to stick it all through a 5/8 round hole is a serious limitation. Milling the casting to have a squarer peg with rounded low-stress corners, or just simply have a bigger hole, might make more room, but these are all pipe dreams. I am OK with the South Bend being what it is. Perhaps given some TLC, and getting it back to something like the rugged, yet precision thing it was originally made to be.
 
Last edited:
Back
Top