

-
Welcome back Guest! Did you know you can mentor other members here at H-M? If not, please check out our Relaunch of Hobby Machinist Mentoring Program!
You are using an out of date browser. It may not display this or other websites correctly.
You should upgrade or use an alternative browser.
You should upgrade or use an alternative browser.
MLA A-11 Cross Slide
- Thread starter akjeff
- Start date
- Joined
- Dec 25, 2011
- Messages
- 10,511
On the subject of the compound, be sure that you hang onto it. One of these days you may need to cut a thread or do something else which you can't do with the T-Slot cross slide.
On the subject of load times, the OP can opt to display the thumbnails instead of the full size photos. Those are your only options from this end.
On the subject of load times, the OP can opt to display the thumbnails instead of the full size photos. Those are your only options from this end.
Definitely will be hanging on to the compound for cutting course threads and tapers. For fine threads( unless in something on the tough side ) I'll just plow straight it. My compound needs attention after I finish with this cross slide. It rocks terribly, and in addition to the sliding surfaces needing corrected, it would probably benefit from a gib lock.On the subject of the compound, be sure that you hang onto it. One of these days you may need to cut a thread or do something else which you can't do with the T-Slot cross slide.
On the subject of load times, the OP can opt to display the thumbnails instead of the full size photos. Those are your only options from this end.
Just found some good and bad info in the shop. The good is, I clamped a precision straight edge across the face of my chuck, and mounted an indicator on the new MLA-11 cross slide, and swept it the entire travel of the feed screw. Got less than .001" deviation, and even better the deviation ran progressively towards the chuck, as it should. Very happy with that. Also virtually zero play on the cross slide when I tried to move it left/right and fore/aft( I locked the carriage for this test).
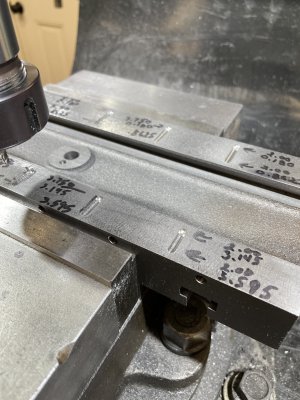
Now the bad. Disassembled the compound for a quick inspection on the surface plate. Holy cow, no wonder this thing has given me fits! The lower casting 704-016 isn't bad. The top dovetail is parallel to the swivel base base to within .001"-.002", and the dovetails are parallel to each other to a worst case of .003". The top casting 704-017 is another matter. Must have been made on Friday afternoon or Monday morning. The parallelism of the dovetails to the top surface( tool post mount ) is out by .008". The parallelism of the dovetails to each otheris off by .030"! That's not a misprint. They both converge towards one another at one end. No wonder I could never tweak the gib adjustments to a satisfactory level. I'll start a separate thread when I begin it's rehab.
Update:
Well, there will be no compound rehab thread, as the top casting is pretty much shot. Both dovetails angled in toward each other pretty severely. Looked like something shifted when they were machining it. Anyway, by the time I got them parallel, the gib would have to be damn near triple in thickness to snug it up. Thinking my best option is to simply make a new one out of Durabar, and mate it to the factory lower casting, which is dimensionally pretty good. Once I have my rigid tool post mount made, I can make this new compound of a thickness that will stack up to the exact height of the rigid mount, and will allow the Aloris toolholders to remain set.
Last edited:
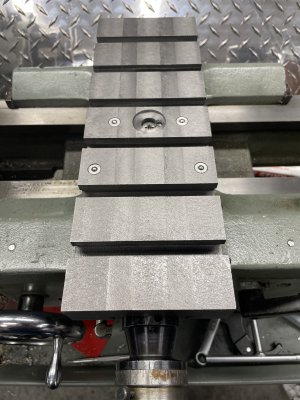
Made a little more progress on the cross slide this morning. Cut in the oil grooves, and countersunk the ball oiler ports. The oil ports are a snug slip fit, and will be anchored with Lock-Tite of some sort at final assembly. Still debating whether I'll surface grind the outer surfaces. A friend who's a pro machinist offered to have me out to his shop, and he'd tutor me on grinding, so I'd hate to miss a great opportunity like that. If I do opt to grind it, I'll wait until the tool post mount is done, and grind it all in one session.
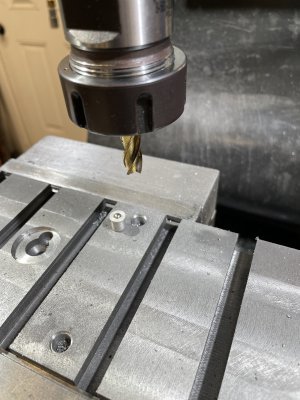
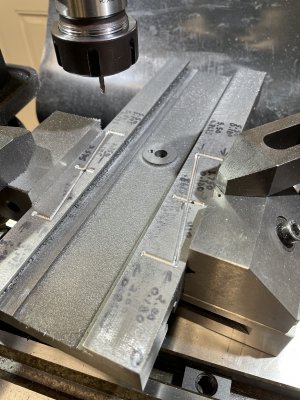
First cut the grooves in the Y axis, and through drilled the oil passages. Used a .125" ball end mill, to a depth of .065". Cut the counterbores for the ball oiler ports. Then moved to a toolmakers vice off to the side to cut the diagonal grooves, so I didn't have to move the mill vice out of tram. Then counterbored another pair of ball oilers that feed the top corner of the gib dovetails.
Hoping the steel for the tool post arrives this week, so that can get that knocked out, and be back in service. Once the lathe is functional, a plug will be made to both cover the nut screw/set screw, and will also have a ball oiler in it, to feed the nut. The left side of the slide will have a DRO scale on it, and that is why I chose to put all the oil ports on top.
Attachments
Last edited:
- Joined
- Dec 25, 2011
- Messages
- 10,511
Too bad about your compound slide. Hard to believe that it got past the QA.
The Atlas milling attachment uses the 10" and early 12" cross slide as a vertical slide. And comes with a gib lock. I bought one of the lock screws and installed in in place of as I recall the third gib screw. Works fine.
The Atlas milling attachment uses the 10" and early 12" cross slide as a vertical slide. And comes with a gib lock. I bought one of the lock screws and installed in in place of as I recall the third gib screw. Works fine.
Yep, that thing was grossly out of spec. You could see two distinct dovetails in the dovetail! Like something shifted in between passes. Ended up finding one on ebay, and it fits my lower casting great, which is awesome. Great idea using the milling attachment lock screw! I grabbed the one out of my milling attachment, but it's a screw size up from the 10-32's in the MLA slide. But, I'll simply get a couple 10-32 cap screws, and cross drill a pin in the head and that'll do the trick. Thanks for the idea!Too bad about your compound slide. Hard to believe that it got past the QA.
The Atlas milling attachment uses the 10" and early 12" cross slide as a vertical slide. And comes with a gib lock. I bought one of the lock screws and installed in in place of as I recall the third gib screw. Works fine.
- Joined
- Apr 12, 2013
- Messages
- 562
The T-Slots come in handy at times.Out of curiosity, would you rather have had the t slots omitted from the castings? If I was casting that for myself, I doubt I'd bother with them in the casting. Actually sort surprised the casting was flat. Nice project.....tools making tools.
Best,
Kelly

I just meant omitted from the casting only not the finished part. It's not much more material to remove to just machine the entire tee slot feature.The T-Slots come in handy at times.
Best,
Kelly
Might not be a bad option, then you could put them where you want them.I just meant omitted from the casting only not the finished part. It's not much more material to remove to just machine the entire tee slot feature.
Best,
Kelly