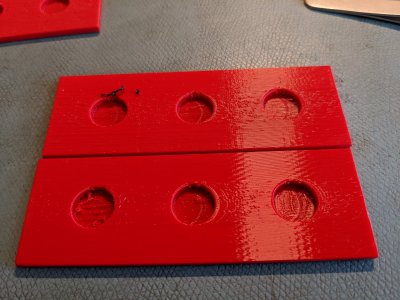
Help me dial this PETG in...

I would go back to having the outside surface down and pockets up. Standing up is just asking for problems...
I always try to maximize bed contact and have the bed as a finish surface.

Sent from my SM-G715A using Tapatalk
 
I would go back to having the outside surface down and pockets up. Standing up is just asking for problems...
I always try to maximize bed contact and have the bed as a finish surface.

Sent from my SM-G715A using Tapatalk
THIS IS A TEST PIECE! The real item is the box for my ELS controller - the very first picture in the thread. The wall where the pocket is vertical. Can't print a rectangular box with no vertical walls. The box has a vertical wall with pockets, just like this test piece. It also has a rectangular cut out which will have supports. The big PLA box printed the pockets ok - I'd be happy if I got the same quality, or even close in PETG.

edit: Sorry for hollering. You may not have read the thread from the beginning...
 
Last edited:
Is there anywhere where the fine points are written up? Like how to systematically converge on good settings? Hunting and pecking randomly doesn't seem efficient. From the perspective of a newbie I am hearing I need 100's of hours effing around, primarily since I know NOTHING about this stuff. I would have thought, naively, that using Prusa filament on a Prusa printer using default settings would get me in the ball park. Indeed, they aren't bad for the test piece laying flat. But for a short section of box wall, the settings are no good.

I have no idea what extruder I have. Newbie curse. Prusa i3 MK3S+.
Ok, so it's a direct drive extruder. Prusa uses a Bondtech BMG right over the hotend so that there's a very short path which means less chance for the filament to buckle, which increases filament ooze when the extruder stops moving. That said, it seems to be laying down too much filament at the beginning of the layer, and the extrusion doesn't look very consistent. It looks a lot like the printer is using "pressure advance" with the wrong settings. I think Prusa uses Marlin firmware on their printer? I use Klipper, so the methods and settings are different. Other factors are how consistent the filament diameter is (shouldn't be an issue with Prusa), and the z stepper motor and screws. Z stepping could be a little off, or the screws could be binding a little. You haven't said how fast you are printing either. I'm curious to hear that.
 
Ok, a reprint at a lower temperature 238/240C seemed to have better overall finish quality. I also hear tiny pops sometimes when printing. Have to assume that is moisture? The dew point is low. The inside RH is 25%. This filament picked up a bit of moisture perhaps? It's very dry here, so it had to have been at manufacturing or shipping. The filament was sealed at factory and had desiccant. I opened it yesterday.

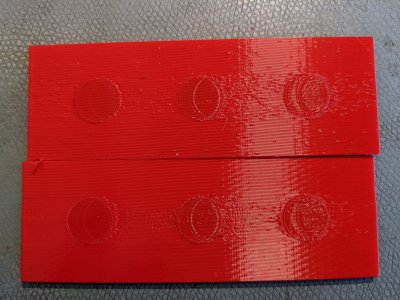
I think the slicer is screwing up. The echo of the pocket is due to the print extruder being commanded there. I saw it doing it repeatedly in the thin two layer section. The extruder is going to the middle of the pocket (the echo edge) where it is thin and then tying the layer to the thick areas between the pocket. I can try to further de-tension the X belt, but I don't think this is a tension problem. I think it may be non-optimal g-code. The extruder is being commanded to those locations, I can see it. Every time it does it, it leaves a little extra blob. The extruder is not doing this in other regions, and there are no blobs or echos elsewhere. Everywhere where the extruder bobble is, that is where the echo is.

Two pictures, front side and back side. Top: random. 240/245 nozzle temp. Bottom: aligned. 238/240. Much less nurbs in bottom print. Still see the echo on both sides.
PXL_20221121_162529137.jpgPXL_20221121_162617755.jpg
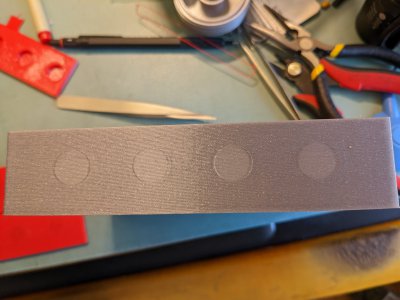
Reference PLA picture. Smooth back side.
PXL_20221121_162653739.jpg
 
The ghost rings are "ringing" which from the axis vibrating when it comes to a stop. If those rings are along the X axis of the print, it's the Y axis causing them (yes really) and vice versa. The lower temperature helped control the oozing, so that helped the layers. You can still see the start/stop of each layer, but honestly sometimes there's not much you can do. one trick is to tell the slicer to align them on a corner where it's not so visible.
edit:
I'm a little surprised to see that much ringing at such a low speed. That means speeding it up is not going to help much.
Another edit:
1mm of retraction is about right for your setup. Do you have it moving the filament back before printing? If not, that can aggravate those gaps at the layer seam.
 
The ghost rings are "ringing" which from the axis vibrating when it comes to a stop. If those rings are along the X axis of the print, it's the Y axis causing them (yes really) and vice versa. The lower temperature helped control the oozing, so that helped the layers. You can still see the start/stop of each layer, but honestly sometimes there's not much you can do. one trick is to tell the slicer to align them on a corner where it's not so visible.
edit:
I'm a little surprised to see that much ringing at such a low speed. That means speeding it up is not going to help much.
So I have been loosening my X all this time and seeing little change! Yes, the X belt is significantly looser than before, I have run out of adjustment. The piece is oriented the long way on the X axis, short thickness (3mm) on Y. Well I can change Y... I changed x because it was at the tight end of the setting. Y is currently at belt tension 274 according to the Prusa belt test. X is now at 255. To loosen further, I need to jump a tooth I think. The tension screw is loose, I just pushed the X stepper to the right as far as it would go and then tightened the motor. Prusa suggests the settings are from 240-300.
 
Too much tension can cause ringing, but it mostly just a function of mass. The table is heavy so it tends to bounce at the end of it's travel, and in the prusas' case, the head isn't a lightweight either. There are ways to reduce that, but it's complicated. Look up "input shaping" you would need to confirm what firmware Prusa is using, but I'm pretty sure it's Marlin. I also mentioned pressure advance before, and for Marlin it's actually called "linear advance" That one can be done pretty easily and can help a lot with keep the extrusion width steady.
 
Wouldn't you know it. Can't loosen Y axis significantly. Uggh. Need to go a tooth on the belt. Loosening the pulley and motor screws didn't change printer detected tension at all. It's ugly working on this printer, seems to be designed by a double jointed contortionist with skinny long fingers. Going to have to jump into this.

On the good side, I cleaned up the ugly wiring for the printer, the webcam and OctoPi. Got a new terminal strip for plugs. Much neater and better organized. Tied up the cables. Still need to get a sturdy table for this printer. The current table shakes a glass of water when there is printing. This can't be good.
 
Back
Top