-
Welcome back Guest! Did you know you can mentor other members here at H-M? If not, please check out our Relaunch of Hobby Machinist Mentoring Program!
You are using an out of date browser. It may not display this or other websites correctly.
You should upgrade or use an alternative browser.
You should upgrade or use an alternative browser.
Got me a Heavy 10
- Thread starter tk1971
- Start date
- Joined
- Mar 26, 2018
- Messages
- 8,407
I had a 1941 13” SB. The first thing I did was open up the apron.
I was very impressed with the quality and durability of the components that went without lubrication.
Seeing your unit packed in filthy grease just shows the inherent quality of the steel used in the parts.
Times have changed.
I was very impressed with the quality and durability of the components that went without lubrication.
Seeing your unit packed in filthy grease just shows the inherent quality of the steel used in the parts.
Times have changed.
- Joined
- Aug 1, 2022
- Messages
- 137
I received my cone gears set along with the clutch gear set. The 24t gear is actually worse than mine. But now, I guess I have spares.
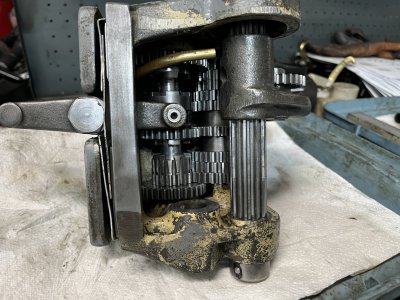
I had an “incident” last week while pressing the clutch gears out. I ended up cracking the clutch pinion gear because I didn’t remove the old hardened felt wick first. I was too forceful with the hydraulic press and displaced the key stock due to that hardened wick and yeah, once that key stock got in the way… crack! I ended up using a 1/8” square mill to mill out the center of the bunched up key stock. Once I got to the bottom, the remains of the key stock popped out of the clutch gear shaft. I cleaned up the shaft and replaced the 3/16” key stock cut to the proper length (1-3/4”).
I bought a entire used clutch gear assembly and installed the gears onto my existing shaft as the shaft that came with it was in worse shape than mine. I had to re-drill the detents on my original clutch shaft because the clutch pinion gear I bought didn’t line up with my shaft. I also had to reduce the diameter of the clutch pinion pin slightly in the middle so that the pinion would freely spin after installation. I contemplated re-drilling the hole for the pin but I needed just a little more room to allow the pinion to spin freely.
Oh man… I’ll say it again, the gearbox is the hardest part of the restore project for me. I find it difficult to remove/install the clutch shaft gear. I tried the 5/8” block trick per the Ilion book but the next time around (needed to remove everything a couple more times to drill new detents, fit this and that, etc.), I ended up just clamping the gear to the gearbox body using locking welding clamps. That, along with very carefully monitoring where everything is at when using the press, I was able to finally reinstall the clutch shaft /gears assembly.
Next week, I’ll install the cone gears / shaft, the lead screw, and I’ll start reassembly of the headstock.
Last edited:
- Joined
- Aug 1, 2022
- Messages
- 137
The headstock is in, as well as the spindle and motor.
Installed an Eaton DC1 VFD, which is 110v input, freeing up the 220v supply for my stick welder.
The previous owner cut up and welded the forward / reverse switch mounting post to attach the 220v input VFD via the 3/4” conduit hole at the bottom of the VFD, but it won’t work on the Eaton (which has a plastic body). I needed a more rigid mounting method, so I broke out the welder and some scrap.
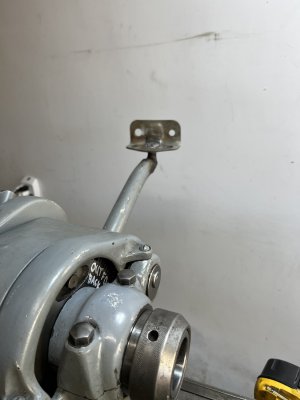
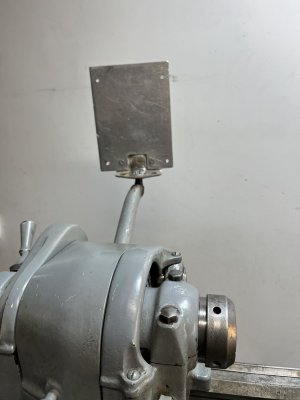
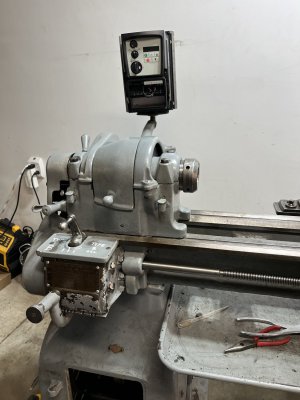
Gotta go to The Home Depot today for some misc electrical items and then I can fire her up.
I figure I’ll leave the lathe on the highest speed setting and use the VFD to adjust the speed.
Now I need to figure out how to mount a tach on the spindle.
Installed an Eaton DC1 VFD, which is 110v input, freeing up the 220v supply for my stick welder.
The previous owner cut up and welded the forward / reverse switch mounting post to attach the 220v input VFD via the 3/4” conduit hole at the bottom of the VFD, but it won’t work on the Eaton (which has a plastic body). I needed a more rigid mounting method, so I broke out the welder and some scrap.


Gotta go to The Home Depot today for some misc electrical items and then I can fire her up.
I figure I’ll leave the lathe on the highest speed setting and use the VFD to adjust the speed.
Now I need to figure out how to mount a tach on the spindle.
- Joined
- Aug 1, 2022
- Messages
- 137
- Joined
- Aug 1, 2022
- Messages
- 137
- Joined
- Mar 21, 2018
- Messages
- 1,597
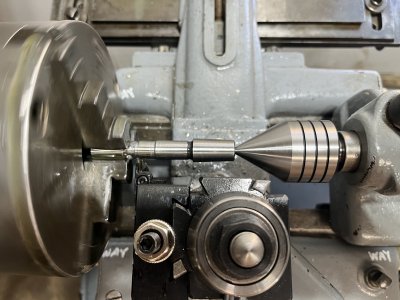
My advice? Put your carbide away and get some HSS blanks. Learn to grind and then hone a proper bit profile. This goes for your parting tool, too. For parting, I prefer a blade that is 0.060 to 0.080" wide. And for parting, a CONTINUOUS flow of lube is required.
- Joined
- Jan 20, 2018
- Messages
- 5,628
I use carbide for everything on my Heavy 10, everything EXCEPT parting. I don't mess around honing the parting blade (don't own a hone), grind the end on the radius of the 60 grit bench grinder wheel and get back to work. Getting lube all the way down into the groove is the key. The inexperienced tend to be hesitant about parting, babying the feed and backing off when it starts to chatter. This is exactly wrong. Keeping the feed rate up and the tool loaded down is necessary to avoid chatter. I don't use power feed, being able to feel how it is cutting (or not) is important.My advice? Put your carbide away and get some HSS blanks. Learn to grind and then hone a proper bit profile. This goes for your parting tool, too. For parting, I prefer a blade that is 0.060 to 0.080" wide. And for parting, a CONTINUOUS flow of lube is required.
- Joined
- Jan 25, 2015
- Messages
- 2,558
I am the same on my 10F. Carbide on everything except parting.I use carbide for everything on my Heavy 10, everything EXCEPT parting. I don't mess around honing the parting blade (don't own a hone), grind the end on the radius of the 60 grit bench grinder wheel and get back to work. Getting lube all the way down into the groove is the key. The inexperienced tend to be hesitant about parting, babying the feed and backing off when it starts to chatter. This is exactly wrong. Keeping the feed rate up and the tool loaded down is necessary to avoid chatter. I don't use power feed, being able to feel how it is cutting (or not) is important.


