
Sounds like you are making progress. If you are not used to adding pictures to your posts a big project like this is a good time to get going with that. They can really help the process.I have removed the slide, it's laying on the bench and I can see most of the lead screw it's bound up where it enters the cross slide.

-
Welcome back Guest! Did you know you can mentor other members here at H-M? If not, please check out our Relaunch of Hobby Machinist Mentoring Program!
You are using an out of date browser. It may not display this or other websites correctly.
You should upgrade or use an alternative browser.
You should upgrade or use an alternative browser.
Found this old South Bend lathe and it followed me home
- Thread starter olddude
- Start date
Thanks Kevin, I know how to post pics my problem is that I don't have internet in the shop and I'm at home. The screw where it goes through the saddle is a very close fit and is where it is tight. When I quit last night I just left it after I saw the dial was going to be a problem. I didn't want to take the neanderthal approach and try to free it with vice grips. I assume the hole wood chucker is talking about is under the dial.Sounds like you are making progress. If you are not used to adding pictures to your posts a big project like this is a good time to get going with that. They can really help the process.
I should have said where it goes through the carriage assy rather that through the saddle.
Attachments
Last edited:
- Joined
- Jan 18, 2016
- Messages
- 398
He has the bracket for both. Total score all round.It looks like your collet rack also supports a taper attachment too. I don't know, but I think it does.
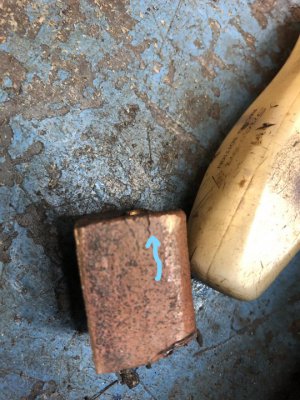
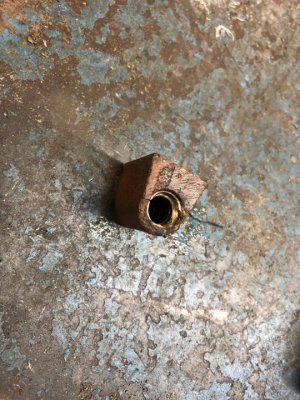
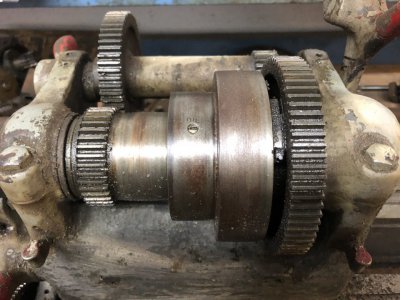
Well after about a hour or so of looking and trying to talk the screw bushing off I finally went into my tool room and came out with a small pipe wrench and crying,  as I did it locked the pipe wrench onto the bushing and started to pull. Oh, it hurt so bad because I could see it was putting some marks on the surface but kept on applying more pressure on the wrench until finally with one big heave ho it finally broke free. Once it broke free it came on out with little problem and once out, I couldn't really see why it would be so tight. There was no rust on it like I figured I would find and the surface was fairly shiny. I reamed out the hole with a small bristle brush and found there was a bunch of tiny pieces of chips and other debris in there. It's hard to believe that such a small amount of crud would cause the assembly to be so tight, but I reinserted the parts and it turned as free as a bird. The only thing I saw really saw wrong besides a good cleaning and oiling was something had gotten ahold of the big brass nut at some time in the past. The threads at one end were a little buggered up and there was a small crack starting on the flat side of the nut, it's kind of hard to see and probably would never be any problems but I know it's there and it bothers me, so I'll keep an eye out for a spare as it would be easy enough to change if needed.
Someone must have put a cheap Earl Shibe paint job on it at some time in its life because after taking a closer look I could see paint in places where none should be, and it would scrape off pretty easily with my fingernail, so I took a putty knife and went to work on a couple pieces and it took no time to get then paint free. I'm thinking I'll tape the shiny parts and put the smaller pieces in my glass bead machine and clean them up.
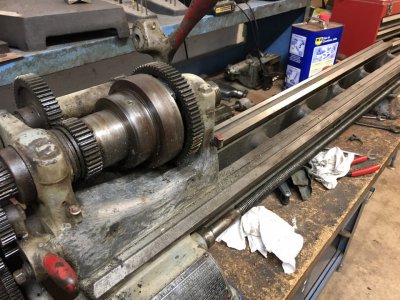
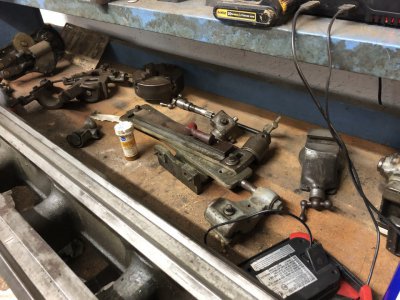
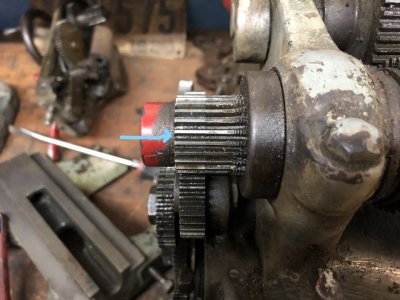
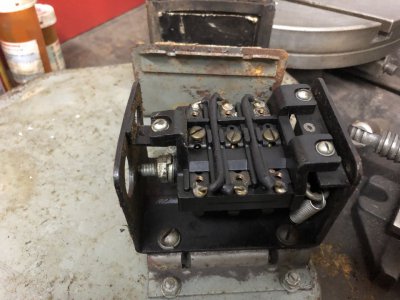
I got everything off except the head and the gearbox and I think I'll stop there for now and clean and paint everything else before I Tackel that part. what I have laying out now will keep me busy for a few days. I'll need to do quite a bit of thinking before I jump on taking the head and gearbox apart. the only real wear I see, other than a little on the lead screw and nut was a little wear on the main drive gear as noted in the pic. Also, I posted a better pic of that switch someone asked me about. The motor is a 1/4 hp Century motor and the switch is a CH.
as I did it locked the pipe wrench onto the bushing and started to pull. Oh, it hurt so bad because I could see it was putting some marks on the surface but kept on applying more pressure on the wrench until finally with one big heave ho it finally broke free. Once it broke free it came on out with little problem and once out, I couldn't really see why it would be so tight. There was no rust on it like I figured I would find and the surface was fairly shiny. I reamed out the hole with a small bristle brush and found there was a bunch of tiny pieces of chips and other debris in there. It's hard to believe that such a small amount of crud would cause the assembly to be so tight, but I reinserted the parts and it turned as free as a bird. The only thing I saw really saw wrong besides a good cleaning and oiling was something had gotten ahold of the big brass nut at some time in the past. The threads at one end were a little buggered up and there was a small crack starting on the flat side of the nut, it's kind of hard to see and probably would never be any problems but I know it's there and it bothers me, so I'll keep an eye out for a spare as it would be easy enough to change if needed.Someone must have put a cheap Earl Shibe paint job on it at some time in its life because after taking a closer look I could see paint in places where none should be, and it would scrape off pretty easily with my fingernail, so I took a putty knife and went to work on a couple pieces and it took no time to get then paint free. I'm thinking I'll tape the shiny parts and put the smaller pieces in my glass bead machine and clean them up.
I got everything off except the head and the gearbox and I think I'll stop there for now and clean and paint everything else before I Tackel that part. what I have laying out now will keep me busy for a few days. I'll need to do quite a bit of thinking before I jump on taking the head and gearbox apart. the only real wear I see, other than a little on the lead screw and nut was a little wear on the main drive gear as noted in the pic. Also, I posted a better pic of that switch someone asked me about. The motor is a 1/4 hp Century motor and the switch is a CH.
Attachments
- Joined
- Nov 25, 2015
- Messages
- 8,298
Here's a pic of my drum switch.Well after about a hour or so of looking and trying to talk the screw bushing off I finally went into my tool room and came out with a small pipe wrench and crying,
Someone must have put a cheap Earl Shibe paint job on it at some time in its life because after taking a closer look I could see paint in places where none should be, and it would scrape off pretty easily with my fingernail, so I took a putty knife and went to work on a couple pieces and it took no time to get then paint free. I'm thinking I'll tape the shiny parts and put the smaller pieces in my glass bead machine and clean them up.
I got everything off except the head and the gearbox and I think I'll stop there for now and clean and paint everything else before I Tackel that part. what I have laying out now will keep me busy for a few days. I'll need to do quite a bit of thinking before I jump on taking the head and gearbox apart. the only real wear I see, other than a little on the lead screw and nut was a little wear on the main drive gear as noted in the pic. Also, I posted a better pic of that switch someone asked me about. The motor is a 1/4 hp Century motor and the switch is a CH.
it looks the same as yours. My power - main is on the right, my motor is on the left as you can see the red line.. which must be my reverse.

edit: not sure this will be of any value, but here is my restore in pics:
Last edited:
- Joined
- Mar 21, 2018
- Messages
- 1,597
The only thing I saw really saw wrong besides a good cleaning and oiling was something had gotten a hold of the big brass nut at some time in the past.
If it is original to the lathe, the nut is bronze, not brass.
Woodchucker, thanks for the pic. Unless some more parts for the switch are missing mine is not quite the same as yours. I have one long cord with a 110v cord on it. The cord is connected where it comes out of the motor and where the motor wires and the cord connect there is another shorter cord pigtailed together. The short cord I think goes to the switch but there are only three wires in that cord. When I got it there were no wires connected to the switch but that short cord is just the right length to hook to it. There is a green wire with a ring terminal that looks like it goes to one of the switch mount screws (one of those mount screws was loose like the wire had been removed from there). The other two wires, a black and a white had the ends striped back like they went to the terminal board on the switch. One of the center terminals was loose the other two were tight. There were no screws in any of the outer terminals. That probably makes no sense at all but it's the best way I know to explain it.
Mine had an old mechanical circuit breaker called a safety switch mounted to the back of the pedestal. Main power went to there first, then to the drum switch. Maybe yours was setup similar. Mine was Navy use also.

Side by side with a replacement switch I found...
My drum switch as wired with the safety switch cut. The wires on the left were coming in from it. One the right going out to the motor.

Side by side with a replacement switch I found...
My drum switch as wired with the safety switch cut. The wires on the left were coming in from it. One the right going out to the motor.
Thanks, I have heard it referred to as brass and bronze, but I think you are right.If it is original to the lathe, the nut is bronze, not brass.