Eisen 1440EV has Shipped!

that's a bugger, sorry to see what happened. These things can happen in a blink of an eye, then it's just cleaning up the mess. Another idea for any future machinery moves - use black iron pipe. Low to the ground, not a big deal if one rolls out from under and they make you take it nice and slow.

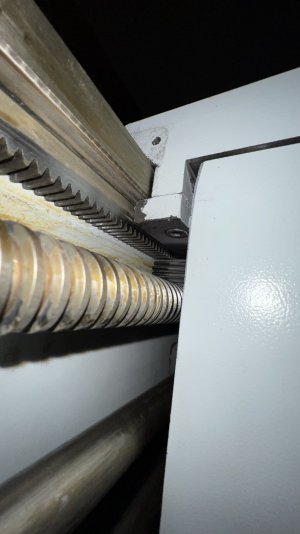
I'm a cheapskate and most likely wouldn't be in the position to buy a lathe like that new, but if I were looking to repair it, I'd take it apart first then see what needs fixing. My guess is that the cross slide screw is bent, jacking carriage down and causing those two breaks. If so, I'd straighten the screw in a press (not too hard with patience and a dial indicator), then pin and JB weld those two broken pieces back onto the carriage. If you put a couple of bolts in the holes and keep the JB weld away from them, I'd be pretty confident you wouldn't even need to retap the holes.

Even if you do replace the carriage and all the other bent/ broken parts, it wouldn't hurt to try fixing the broken ones. it would be good, low risk practice and if it works out you'd have some spares!
 
Ok need some help here guys - do I need to remove the entire apron to get the saddle off? It has clamps on the front left and right that I can’t get to the bolts…. (If this needs to move to a different sub-forum, please let me know.)
 

Attachments

  • DDC6ACCF-9C99-4731-B817-1FA199C900FE.jpeg
    DDC6ACCF-9C99-4731-B817-1FA199C900FE.jpeg
    418.9 KB · Views: 35
  • E13D308D-5B25-4CFB-B366-1433F5113368.jpeg
    E13D308D-5B25-4CFB-B366-1433F5113368.jpeg
    452.3 KB · Views: 32
  • D2554475-FEE5-4871-90EE-2BC0C6459094.jpeg
    D2554475-FEE5-4871-90EE-2BC0C6459094.jpeg
    145.9 KB · Views: 29
  • 43411520-8AD4-4A20-83AB-C2AEC0507C8C.jpeg
    43411520-8AD4-4A20-83AB-C2AEC0507C8C.jpeg
    176.9 KB · Views: 29
  • 66B166D2-7FF0-4EEB-B095-B6E8FA2B2FFC.jpeg
    66B166D2-7FF0-4EEB-B095-B6E8FA2B2FFC.jpeg
    197.1 KB · Views: 30
  • 5968C7A6-2C1E-4F64-B9B3-565BCD01D4C5.jpeg
    5968C7A6-2C1E-4F64-B9B3-565BCD01D4C5.jpeg
    226.3 KB · Views: 29
  • BD4AFB5E-2D29-4E3C-986E-8D7A0326FD1A.jpeg
    BD4AFB5E-2D29-4E3C-986E-8D7A0326FD1A.jpeg
    217.7 KB · Views: 27
  • 360C921F-BE13-4408-8802-2A11459E5C34.jpeg
    360C921F-BE13-4408-8802-2A11459E5C34.jpeg
    281.5 KB · Views: 29
  • 71946B0C-946F-4EB7-A644-E56A81571F7B.jpeg
    71946B0C-946F-4EB7-A644-E56A81571F7B.jpeg
    350.5 KB · Views: 33
Jareese, you can leave the apron and feed/lead screws in place. Lift the saddle off its dowel pins using an engine hoist. Remove all bolts in the top of the saddle. The only part that is called the saddle is the part you're removing, the rest of the carriage parts have discrete names. You will need to support the apron with a block of wood when removing the saddle. Nothing to it.

One thing I have to say about shafting- it can be straightened. V-blocks and a dial indicator are all you need, but a press helps.

The bearing carrier is probably easiest to buy, but looks easy to re-fabricate too (with a lathe, of course).
 
It's a new lathe. I personally wouldn't be happy with stray replacement parts. Eisen is a good company and great to deal with. I Purchased a lathe from them and it was totally destroyed in transit. I rejected the machine on delivery and they sent a replacement right out. I'm sure they will bend over backward to get you fixed up.

Hopefully they have a few "parts dogs" in the back room that sufferer damage, or what have you. Where is that "flood damaged" lathe when you need it?

tis but a scratch.jpg
 
Last edited:
@pontiac428
I’m not sure this one will come off that way? I can’t get it high enough to slide forward of the apron, because of the clamps on the left and right sides.. am I missing something?
76FF0A9B-F7BE-4078-BE9F-9BFB4C2EDCF9.jpeg

26FFA402-847D-4DEC-831F-21547E4CE280.jpeg
 
To remove the saddle is pretty easy. Block the gear box Assy. And lead screw so when it’s disconnected it’s supported.
You need to remove the plates that are bolted to the bottom of the saddle that keep it locked down to the lathe bed.
Unbolt the Allen’s on top the saddle that connect the saddle to the gearbox.
That should get you to the point of separation.
Personally I’d replace the bent screw. A new one shouldn’t be to bad. Good luck on your repairs!
 
I've never had any luck removing the gib plates with the apron in the way. I have removed my carriage by lowering the bearing block on the right end enough to slide the carriage over the gear. With the carriage all the way to the left, remove the bolts holding the block and gently pry it away from the machine. It is located by dowels or taper pins and these need to be removed prior to lowering, once these are out reinstall the bolts. Move the carriage all the way to the right, support the apron on a stack of shims, unbolt the apron and remove the bearing block bolts. Pull just enough shim to lower the apron and slide the carriage off to the right. I have done this more than once without any harm to the lead screw or feed rod on my 40" Jet.

The better option is to remove all 3 rods and remove the apron. Just be careful, it's heavy!
 
To remove the saddle is pretty easy. Block the gear box Assy. And lead screw so when it’s disconnected it’s supported.
You need to remove the plates that are bolted to the bottom of the saddle that keep it locked down to the lathe bed.
Unbolt the Allen’s on top the saddle that connect the saddle to the gearbox.
That should get you to the point of separation.
Personally I’d replace the bent screw. A new one shouldn’t be to bad. Good luck on your repairs!
I can’t get to the inside Allen bolts due to the carriage travel gear and the lead screw clamp.
I’ll see if I can upload a video?
 
Ok, can’t upload a vid, too big.. I’ll keep looking for options.
 
I can’t get to the inside Allen bolts due to the carriage travel gear and the lead screw clamp.
I’ll see if I can upload a video?
It's times like this we realize how valuable this group is.
I can appreciate the unknowns here.
We are all there with you, take your time, take pics, share with the group. The feedback will be worth it.
 
Back
Top