Ditron vs Sino...wich is better in your opinion

Your head maybe one thing, the conversion to data by the microprocessor in the DRO is another thing. If there was an issue with the data stream speed they wouldn't be selling 1 micron scales. On 3 lathes I had the same issues as to resolution errors on the cross slide when using a 5 micron scale, the issues became a magnitude less when using a 1 micron scale. It is general practice if you are using diameter mode on a lathe to specify a 1 micron scale on the cross slide. The long axis, a 5 micron scale works just fine. The quality of the individual components is what matters, I have seen people that have issues with the accuracy of the Ditron DRO's whether this is the DRO head unit or the scales I do not know. I have been using Electronica and Easson head units and have no issues with either other than the noted problems of using their 5 micron scale on the cross slide. Once they were replace with a 1 micron scale, I could easily get repeat turning accuracy of better than 0.001". If you do not need that accuracy than use a 5 micron scale, as I mentioned different scales have different accuracies even though they all have the same resolution.

Target diameter was 0.1550" +/-0.0005"
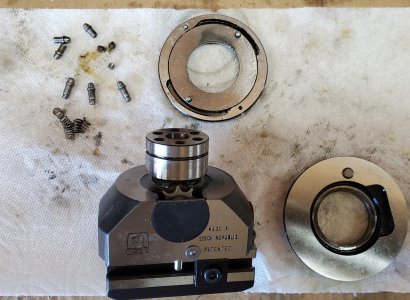
Those are the funkyest bullets I have ever seen. I love the micrometer! I may need one!
 
Do glass scales work the same way? How about capacitance? Is there some scale that uses an absolute reference rather than counting?

I don't know. The premise is when the actual data rate exceeds the sample rate of the head, the abs+incr checksum will fail. I am fairly sure all the scales on the market for these DROs are absolute scales. A checksum or step count failure will error out and do whatever it is programmed to (like maybe reinitialize after blanking out) regardless of where the error originated, the machine only knows it got a bad result when it expected a good one.

Sadly, I can only look at the symptoms and suggest an approach, but I have no idea how the device was truly implemented.
 
Most DRO scales are not absolute reading, they do not remember their origin point once power is removed. Absolute scales remember their origin or reference marks even with power loss, they are becoming available for machine DRO magnetic scales, I do not recall seeing them in the typical glass scales. Some companies offer them, but much more expensive. The ability to read at very high movement rates and maintain accuracy is dependent on the head and the DRO display. I assume as you mentioned, there is some form data verification to prevent reading errors. Your are seeing more absolute reading measuring devices, such as calipers and micrometers, like the newer Mitutoyo micrometers and calipers.

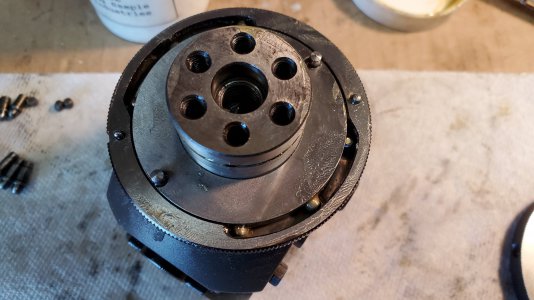
The funky bullets are actually engagement pins for my Narex head, there is a outer ring cam which pushes on the round heads of the pins and other end then engages a star wheel which increments the facing speed. The seller neglected to mention that the facing function did not work on the head because the pins had been shared off, most likely because the release clutch was set too high. You can see the broken tips in the picture below.
Narex VHU36 star drive.jpg
Narex control ring with spring and ball bearing detent.jpg
 
Most DRO scales are not absolute reading, they do not remember their origin point once power is removed.

I'll just leave this here. It's not expensive or difficult to implement absolute scales. It doesn't require any hardware change. There is a technology called interferential scanning that makes the whole thing more efficient in optical scales and raises resolution markedly trickling down to the cheapest tiers of the Chinesium state of the art.

I will repeat myself, most of the scales you buy today are absolute. You may not have a feature that lets you recall it, but it's there.

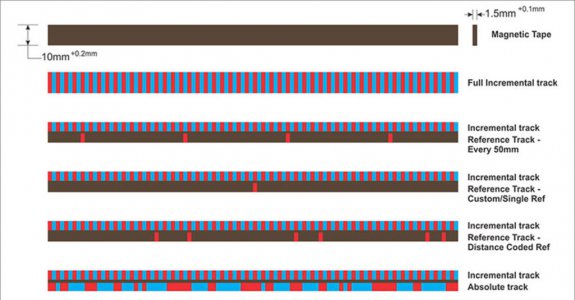
Magnetic-Tape-Examples-1024x535.jpg
 
Now that you mention it, I believe my scales have a reference track and a single absolute reference. I have not figured out how to use it yet. It was mentioned in the part about cutting scales. You don't want to cut past it.
 
I received my 1um scale and read head from China. I just installed it and I am getting similar errors that I saw before. When checked against a DTI there are errors of up to .002" in radius mode. That would be a disaster is diameter mode.
So I think I can answer the OPs question. DO NOT BUY THE DITRON DRO! In fact I would probably avoid all the direct to consumer Chinese DROs and just spend the money to deal with DRO Pros or another supplier.
I am very frustrated by this. Was hoping for accuracy down to a few tenths but maybe I am expecting too much? I am not sure where to go with this.
 
Last edited:
I can't fathom the errors you are getting, never seen anything that bad with either glass or magnetic scales, well except with Ditron DRO's.
Déjà vu
 
Thanks for sharing that link. I read the entire thread but it is unclear if anyone got their system working perfectly or just accepted the small errors?
I took some test cuts on material in diameter mode. After taking off about .100" my true diameter was off from the DRO by .002". So the scale is off by .001. That's not gonna be acceptable. I wanted to validate the error some other way than using a DTI.
MSKJ- How accurate do you think your magnetic scales are? Should I be expecting the 1um scales to be accurate to .0001?

EDIT:
Chatting with Ditron customer service. They are now saying that an error of .002" over 1 inch is normal for their 1um scale! That is garbage.
 
Last edited:
A 1 micron scale should not have an error of 0.002" over an 1", but in the past I had similar problems with a mill leadscrews that never agreed with the imperial dials that were in inch, and it was because the leadscrew was metric, evidently it was OK to have a built in error. My 5 micron magnetic scales ate within +/-0.0002" when measuring 123 blocks. I use both a Haimer and an electronic edge finder, they are both very reproducible in measuring an edge

You should be measuring the scales accuracy with an indicator and a gauge block, doing test cuts on a lathe will almost always give you a diameter cut which is slightly larger than expected do to deflection with the cut. Small cuts with a very sharp cutter are the exception.
 
MSKJ- Your results are in line with my expectations before purchasing. I made test cuts with a very sharp tool and a spring pass. The diameter was correct for multiple cuts and then came out .002" too small out of the blue. My lead screw is definitely imperial, my handwheel dial closely agrees with 2 different DTIs.
I could easily use a 123 block on the mill, but what would be the setup on the lathe? I suppose I could try to clamp it to the ways? Or bridge the ways with a piece of stock? What is best practice?
 
Back
Top