-
Welcome back Guest! Did you know you can mentor other members here at H-M? If not, please check out our Relaunch of Hobby Machinist Mentoring Program!
You are using an out of date browser. It may not display this or other websites correctly.
You should upgrade or use an alternative browser.
You should upgrade or use an alternative browser.
Clausing 4914
- Thread starter architard
- Start date
- Joined
- Sep 20, 2012
- Messages
- 560
I'll go ahead and get everything back together with the other bearing, and the bearing take up nut, adjust the pre-load and oil the bearingsNot sure if that was a typo, if it was please ingore the following.
You should lube before pre-loading, it's not good practice to assemble dry, you may not get good results as parts can jam together and even wear as they are pressed together, and might give a false impression of being correctly adjusted, then loosen up when it all gets lubed.
Bernard
Thanks everyone, this is why I asked. And thank you Bernard, I had no idea that you should lubricate before pre-load.
Yes I had not finished installing everything. There was no pre-load and no lube in there when I heard the sound. I went ahead and actually pressed everything together, lubing up the bearings with the proper oil and then setting some pre-load with the bearing take up nut. Everything is much much quieter, however I CAN still hear the a sound with the same characteristics as before, only much quieter. I went back to the video I had and if I listen very carefully it sounds like I can hear it too. At this point I'm not that worried about it, the spindle feels smooth. Once everything is buttoned back up I'll be able to make a judgement if I need to replace the bearing. Yeah it will be a PITA to take the headstock apart again, but guess what, I've got a lot of experience in that! :lmao:
As long and arduous as this re-hab has been I have to say I have no fear anymore of tearing a complex assembly apart to fix the darned thing. Not to mention I have an intimate knowledge of every last set screw, spring and woodruff key in this lathe.
In the long list of issues this lathe has lets add another one. At some point the woodruff key that was holding the backgear on the shaft had been sheared off and the shaft got super chewy and galled. I had a hard time even figuring out where the original key way was. Since the shaft was shot in that location I didn't feel bad attempting to re-make the keyway with a Dremel grinding wheel. I think it will work as a temporary fix, but I'd eventually like to remake that shaft as well as the countershaft spindle.
Which leads me to another question. What kind of material should I use for these shafts? I was thinking 1045 Cold Drawn TGP Precision Shafting would be the right thing for this application.
Anyway, the re-hab continues...
Oh, on a side note, don't bother painting your headstock until after you pressed everything back together, I'm going to have to touch up quite a few scratches!
- Joined
- Sep 20, 2012
- Messages
- 560
If everything is as it should be, the only possible source of noise in a shaft slowly turning in a solid housing is the bearing cage, this has to have some slack to work (it may be slightly worn too) and will rattle a little with only a smear of oil in the bearing, whilst spinning the shaft try giving the bearing a good squirt of oil, it should go quiet.
When the headstock is fully assembled and running with plenty of oil sloshing about it should be just fine.
Bernard
When the headstock is fully assembled and running with plenty of oil sloshing about it should be just fine.
Bernard
First a bone to pick... why do we need to separate the Clausing-Colchester from the Atlas Clausing lathes? And why is this thread in here when my 4914 clearly says on the nameplate, a division of Atlas Press Company. Ok, rant over.
More updates!
I could very well imagine that the noise I'm hearing is a vibration of the bearing cage. I got the headstock mounted on the lathe and got all the belts hooked up and the motor wired to the VFD and finally turned it on! The noise is completely tolerable if not barely noticeable over the quiet hum of the motor.
There is however some more issues that cropped up. This is a bit hard to explain if you are not familiar with these head stocks so bear with me. When I have the motor out of back gear, the back gear shaft floats towards the engaged position and the edge of the small back gear rubs against the spindle gear which starts the back gear shaft spinning and making a heck of a racket. At first I thought it was the back gear selector handle not holding the shaft tight enough in the dis-engaged position. But then I noticed on the outboard end that the large back gear is being pushed in by the gear hub assembly. The gear hub assembly floats on the spindle and when the motor is turning it tends to float towards the headstock pushing against the back gear which is causing the problem. There is a thrust washer that is located between the gear hub assembly and the bearing take up nut, which was quite worn. I'm thinking I need to replace this thrust washer so that the proper spacing is achieved. What was left of my thrust washer was a 1-1/2" ID and 1-5/8" OD and it was extremely thin. I have a piece of brass plate which I think is just the right thickness to keep everything in line, if I could just figure out how to make a washer out of it. I figured I can roughly cut it into a disc shape, drill a hole through the center to mount it on a bolt which I can put in the lathe to turn the OD then mount it in the chuck to finish up the ID.
For now I've attached a bungee cord to the back gear handle that keeps enough tension so that the gear stays quiet.
During the two days I had off from work due to hurricane Sandy I was in the shed doing some machining. :nuts: I had temporarily mounted my tool post using a carriage bolt and washer. And of course like the nutjob I am, I decided my first ever machining would be to accurately machine the blank back plate for my 4 jaw chuck. I had read a lot on this and I was able to sneak up to a very gentle push fit of the snout into the back of the chuck. Once I had my 4 jaw mounted up, I was able to machine the t-nut for the tool post. I figured out how to indicate it, do some facing and turning, etc. It fits into my compound T slot quite nicely. So now I have my 4 jaw chuck and my toolpost mounted!
One thing I learned while making these is that the PO's sloppy fix on the cross slide screw was indeed quite sloppy. I have a major amount of backlash in the cross slide. I can grab the tool post and physically slide the compound a good half inch. So high on the list of things to machine will be a new cross slide screw assembly. This will entail learning to turn acme threads. I had not noticed if the gear on this assembly is pressed on the screw or if it was integrally machined on. I'm hoping I can press it off to put on the replacement screw, or else I'll have to somehow join a new set of acme threads to the existing assembly, much like the current "fix" only less sloppily. I also have to figure out what size acme threads are in the cross slide nut. Is it possible one of you guys with these lathes could measure the diameter of your cross slide screw?
I still don't have the quick change gear box fixed so I don't have power feeds or threading capabilities yet. That's the next project...
I really have to get you guys some pictures, I know how much everyone loves pictures, myself included!
My trials and tribulations must be getting boring. Not too many responses to my last post. It must be the lack of pictures!
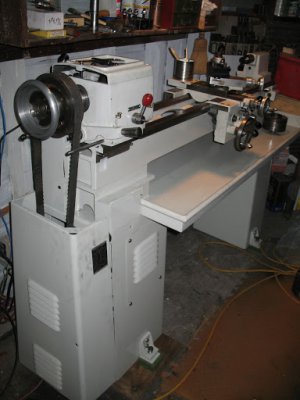
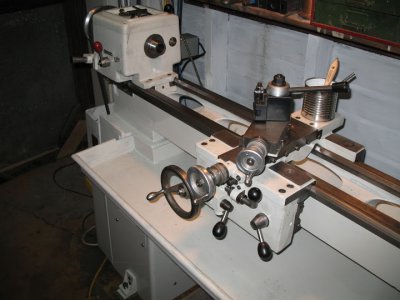
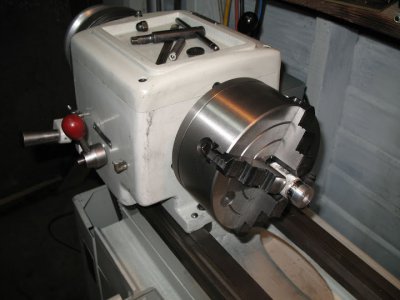
Sadly due to the nature of things broken on this machine it's impossible to get the pristine, completely assembled beauty shots of this machine. So here I present to you what she looks like today. She's missing a few things, badges, leadscrew, QCGB, etc. but shes working. You can also see the grime that has already gotten on her just from assembly and from the first projects. Ken, I don't know how you were able to keep your's looking so pretty with this color! I still like it though. You might not be able to tell but I also can't get the entire thing in the picture since my shed is so small. I literally have about 2 feet in front before my wood rack begins.


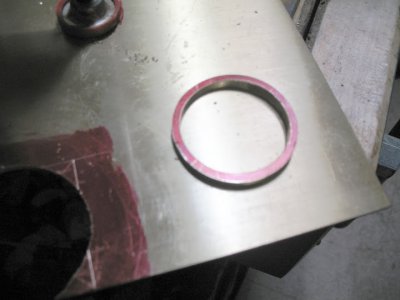
Still a lot of work to be done. I was successful in my attempts to make a new thrust washer from some brass plate to replace the worn one. Once I got everything on the headstock back together with this new washer in place, I have no more issues with the back gear rubbing against the spindle gear when the back gear is disengaged.

The next issue I have is the tumbler gears. When I engage them they make an awful racket. It's much worse, almost unbearable, when it's engaged to feed towards the headstock, its better when feeding in the other direction. It's not an issue with gears grinding, it sounds more like either the tumbler shaft is vibrating or gears are loose while they rotate. Everything is tight though so I don't know where to begin. I might try to get some video so others may hear the noise and help me troubleshoot.
I'm starting to make a few other replacement parts. I'm already having a blast making these parts and I haven't even gotten the lathe fully functional!


Sadly due to the nature of things broken on this machine it's impossible to get the pristine, completely assembled beauty shots of this machine. So here I present to you what she looks like today. She's missing a few things, badges, leadscrew, QCGB, etc. but shes working. You can also see the grime that has already gotten on her just from assembly and from the first projects. Ken, I don't know how you were able to keep your's looking so pretty with this color! I still like it though. You might not be able to tell but I also can't get the entire thing in the picture since my shed is so small. I literally have about 2 feet in front before my wood rack begins.


Still a lot of work to be done. I was successful in my attempts to make a new thrust washer from some brass plate to replace the worn one. Once I got everything on the headstock back together with this new washer in place, I have no more issues with the back gear rubbing against the spindle gear when the back gear is disengaged.

The next issue I have is the tumbler gears. When I engage them they make an awful racket. It's much worse, almost unbearable, when it's engaged to feed towards the headstock, its better when feeding in the other direction. It's not an issue with gears grinding, it sounds more like either the tumbler shaft is vibrating or gears are loose while they rotate. Everything is tight though so I don't know where to begin. I might try to get some video so others may hear the noise and help me troubleshoot.
I'm starting to make a few other replacement parts. I'm already having a blast making these parts and I haven't even gotten the lathe fully functional!


Hi Kent,
This thread is far from being boring, I've followed this for a couple of months. Your tips for moving the lathe helped me because I picked my 4914 up at a freight depot 120 miles round trip by myself with a borrowed motorcycle trailer. I was sweating bullets on every exit on the turnpike because of the banking of the curves, never noticed it before, but with an expensive lathe leaning, it gets your attention. At least the seller crated and boxed it up nice where I could strap it down to the trailer. You have done well with your project, keep up the good work, nice pictures too!
Randy

