Clausing 4914

I probably won't return the gear, I'll just keep it as a spare. The one it is meant to replace isn't totally worn, but it's not in great shape either. I still need the other one I bought as that one is trashed.

I found a mostly complete gear box that I'm waiting to hear back from the seller if I can just buy what I need off of him.

I also got a quote on that shaft from Clausing... $120.

Lets see, I bought the lathe for $600 and now I have over $350 in parts into it. Whats another $120! Ugh.

Would it be that easy to find a suitable replacement for that gear and do as AR1911 suggested? What kind of criteria and measurements would I need to find a replacement? I don't know much about gear geometry yet. I guess I better start reading.
 
that's always a tough pickle to be in. the good news is that you got the lathe for dirt cheap knowing you'd probably have extra expenses to get it all up in order so you are still ahead in the game.

like so many things in this industry and woodworking, there is always more than one way to skin a cat (not that we would ever do something like that of course...) AR suggestion is definitely a good alternative.

I would also look at other suppliers of gears that might be cheaper than going Clausing (original) if you need more than a one-off. there are companies like Boston Gears (spelling?) that can do custom and/or prefab gears for you. it may not always be high quality like some others, but the prices are usually lower. maybe someone on the forum knows more places that can do that and/or makes gears themselves? worth a post on the forums :)
 
Gears are pretty well defined and standardized.
Go to the Martin Gear or Boston Gear websites. they have a tutorial to help you identify your gear.
Find one that matches the tooth count and pitch etc.
Figure on using another lathe to turn the teeth off the bad gear, leaving a hub.
Bore that new gear to a press fit, or fit a key. Or press, loctite and dowel it.
 
Well I must be a glutton for punishment. I said I might have to step away for a while but I can't pull myself away.

So I started looking down the path AR1911 mentioned. Thanks btw, I've found exactly what I needed on Boston Gears website. If you ever need to learn about gears, they have a lot of PDF's in their literature section that offer clear concise explanations of gear specifications.

From what I've read I'm assuming the gears have a 14.5 degree pressure angle since they seem to be the most common. If anyone actually knows let me know, as figuring that out based on an existing gear seems kind of beyond me.

All I need then is the number of teeth (16) and the outside diameter (which I'll measure when I get home) and I can figure out my diametral pitch. I'm guessing the gear is steel since it's integral to the shaft. I doubt its cast iron. I'll be able to tell when I machine the old one off. With all that info I should be able to order a new gear. Taking a few guesstimates to the actual gear I need to order it will be in the $20 range. This could save me $100!

The only other problem I have is attaching it to the shaft. I've tried machining a press fit before and I'm not that good yet. I am thinking a set screw will not be sturdy enough in this case. Would a simple cross drilling of the gear and shaft for a roll pin work?

Also to note, I don't really need another lathe to machine the gear off, since my lathe works, it just doesn't have any power feeds without the gear box.

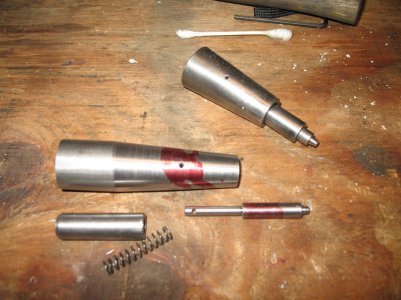
In the meantime I have been successful in making a new tumbler knob (the same assembly that's on the reverse gears and the quick change tumbler bracket) as well as a new cam shaft handle that locks the tail stock down. I haven't gotten a handle for the latter yet, I was going to make one out of metal but realized that in an unheated shop plastic handles do have their place.
 
Again, I wonder if anyone is still following this thread. It must be the longest in history...

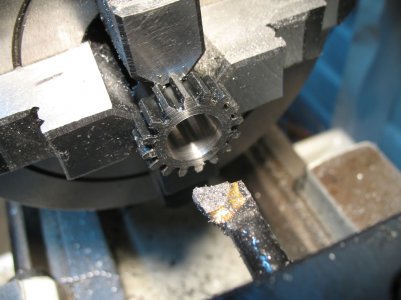
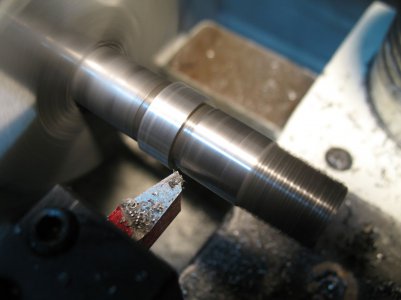
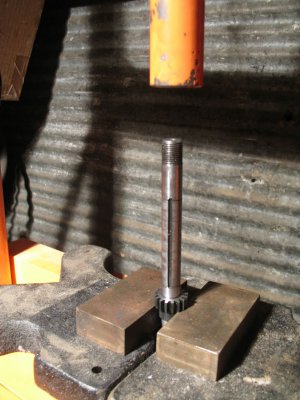
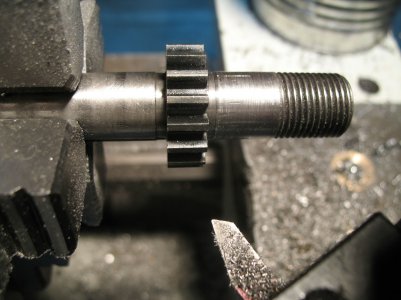
So I figured out the gear I needed. Once I learned the formula's everything made sense. Essentially the gear on that shaft has a diametrical pitch of 16 (as I think all the gearbox gears do) and it's pitch circle is 1" hence 16 teeth. I ordered one from Mcmaster Carr for like $24. The bore was too small and the gear was to wide and it had a hub on it as well. So I faced one side, then bored it too .625" for an perfect fit on the shaft. I did this because I didn't want to press fit it over the threads on the end of the shaft, which would have likely damaged the threads. Then I machined off the old gear, but instead of machining it down to .625" I left it proud about 1.5 thou. So I could slip the gear over the threads but then press fit it onto the original gear location. Then I turned down the hub and faced the gear to match the original width.

I put the gearbox all back together and hooked it up. It worked! I saved myself a $100! Thanks AR1911 for that suggestion! If you notice the posting time you can tell I spend all night after work until about 11:30 getting it all working. I really wanted to try it out and start cutting some threads but I think my neighbors might complain about me running the lathe at midnight! :nuts:

The gearbox and quadrant gears make a bit of noise but nothing worrisome. Now the QCGB tumbler doesn't just randomly disengage and I no longer have any gear slippage. I did notice that the 32 tooth gear was a bit worn. If I have to replace another I'm going this route again. I think that gear I can get for another $30. I'd just have to cut a keyway for that one.

Hopefully over the weekend I can finally finish my spindle plug gage, and then be able to re-thread my 3 jaw chuck backplate. I'm really getting tired of having to dial everything in with the 4 jaw!
 
Wow Kent, sounds like a great fix you did! Where are the pictures?:dunno:
 
thats good news!

when the lathe is engaged in feed gears it will make considerably more noise then when it's not. it's just the nature of the beast - you have metal against metal movement in high speed. just make sure it's lubed properly so that you won't get excessive grinding action on those gears.
 
Again, I wonder if anyone is still following this thread. It must be the longest in history...

...Then I machined off the old gear, but instead of machining it down to .625" I left it proud about 1.5 thou. So I could slip the gear over the threads but then press fit it onto the original gear location. Then I turned down the hub and faced the gear to match the original width.

So, now that months have gone by, did you key this at all or are you relying on the .0015 interference fit to move the carriage? How's it working?

..If you notice the posting time you can tell I spend all night after work until about 11:30 getting it all working. I really wanted to try it out and start cutting some threads but I think my neighbors might complain about me running the lathe at midnight!

I really love working with this stuff, but hours and hours go by. I hope at some point to have wasted enough metal and electricity to be much faster but still work safely.

..The gearbox and quadrant gears make a bit of noise but nothing worrisome. Now the QCGB tumbler doesn't just randomly disengage and I no longer have any gear slippage.

I was really worried about my 4902 popping out of gear sometimes, esp. after I did a little fiddling with set screws and it seemed to get worse. When I finally got almost to the point where you had it, and the box was off the lathe and really getting cleaned, I realized that the ABC knob needs to be pretty snug down on its shaft for the ball detent to engage securely. It had popped out a tad on me when I loosened up the set screw to take a peek. It is impossible to simultaneously push inward on the knob and outward on the other end of the shaft/gear and then tighten up the set screw unless you have the unit off the lathe and can get your fingers in it. I suspect lots of school shop lathes like mine had this happen over the years and suffered damage from it. All works fine now, once you get used to the fact that the feed directions are different for plain turning and threading.

Tim
 
Has it really been months? Well once you get something up and running who has time for forums!

Tim, I got a very good press fit on the gear and didn't worry about keying it in. I can happily report it worked fine. I have the same issues with the abc dial as well. A little adjustment and that is working fine as well.

I finally got some grease on the gear train as the manual says to lubricate it with and this quieted down the gears quite a bit. However the grease doesn't seem to stay on there too long and it just gets loud again.

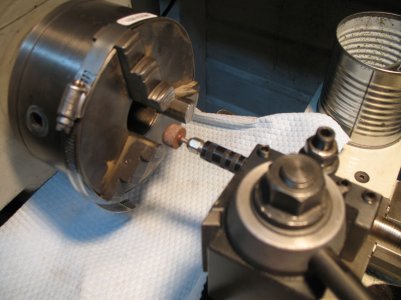
Once I got the gear box fixed I was able to finally thread up my spindle plug gage. Then I commenced re-boring and threading the backplate that was on my 3 jaw. I was using a home made boring bar with an old 1/4" drill bit as a threading bit. That didn't go over too well with the cast iron. I was getting a crappy finish when I realized I had some 1/4" round hss that I picked up at harbor freight. I ground a new thread bit on that and finished up the threads. As soon as the spindle gage threaded in, I was done! Low and behold when go to thread the cast iron backplate onto the lathe, I realize that the hub is too short and the spindle nose is bottoming out against the chuck before it fully seats against the spindle shoulder. :angry:

So after all that effort to reuse the backplate it didn't work. Luckily I still had the backplate that came with the lathe and machined the snout on that too fit the 3 jaw. Mount the chuck and it looks to run very true. That is till I mount some stock and see quite a bit of run-out. From what I can tell the chuck itself is dead nuts on center so I think I have a jaw problem.

I probably attempted something stupid, but I got a big hose clamp and tensioned the chuck jaws, mounted my Dremel flexible attachment in a tool holder and attempted to regrind the jaws. I went through a few tries on this and just can't seem to get the slop out of the jaws. Seems like one chuck screw gets things on center better than the others but still not great. I haven't even attempted to measure the run-out because it's visibly noticeable. I might have to put this 3 jaw away until I can figure out what I'm doing wrong. So for now I'm still stuck dialing everything in on the 4 jaw. Ugh.

Some new issues have cropped up however. When I put the carriage back on I used the shims that were already on it. I've subsequently noticed a lot of slop, so much that I could lift the carriage a bit. I could fit a .016 feeler guage between the worst of the carriage clamps even after taking the shims out. So I ended up having to lap a bit of metal off the front carriage clamps to where I have about a thou of clearance. Now things are much tighter.

I'm starting to practice some knurling and I'm having issues with the carriage hand-wheel clutch. I had no idea how tight it should be when I put it together and with the amount of tension against the carriage from knurling I can't move the carriage without the clutch kicking in. I didn't want to overtighten so now I guess I have to figure out just how tight it should be.

In making my first morse tapers for the tail stock I've come to the conclusion that the taper is pretty trashed. It's grooved considerably. I was using high spot blueing to test the fits and couldn't seem to get the fit right. When I put the same taper in a brand new mt3 to mt2 drill adapter it was an almost perfect fit, so I realized it was my tailstock not my part. It's a minor issue since it still holds well enough but someday I'd like to replace the tailstock ram.

It should have been evident to me when I bought the lathe but if a lathe looks like it has been abused, it probably means it has been abused. I can say however that restoring this thing has been quite fun, I've learned so much, and because of it I know this machine inside and out. I'm not afraid at all to tear an assembly down the second it starts acting up because I know how it all goes back together. Not too mention that collectively I've probably torn down and re-assembled everything on this lathe at least 3 times. TAKE TONS OF PICTURES AND NOTES when you disassemble something like this!

Oh and pictures...

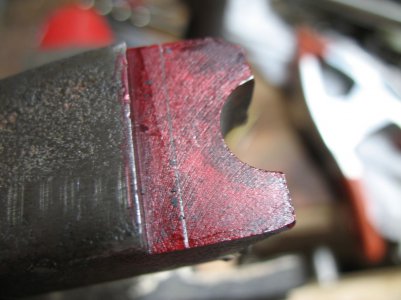
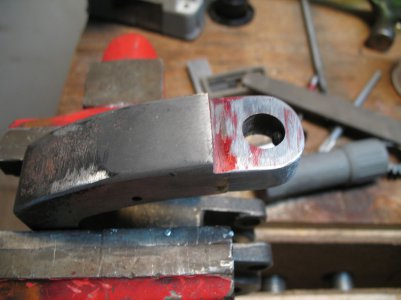
A few things are pictured, the fix of the tumbler bracket and replacement knob as well as the geared shaft fix and a shot of my lackluster jaw grinding setup.
IMG_4882.jpg IMG_4915.jpg IMG_4916.jpg IMG_4967.jpg IMG_4975.jpg IMG_4979.jpg IMG_4982-1.jpg IMG_5009.jpg

IMG_4882.jpg IMG_4915.jpg IMG_4916.jpg IMG_4967.jpg IMG_4975.jpg IMG_4979.jpg IMG_4982-1.jpg IMG_5009.jpg
 
Back
Top