9A renovation

Dave,
Your drilled out collar should be OK for reuse since there is hardly any forces on it
Paul


Thankfully the problem is here and not later. I think I learned my lessons enough to do a better job if I come to another stuck taper.

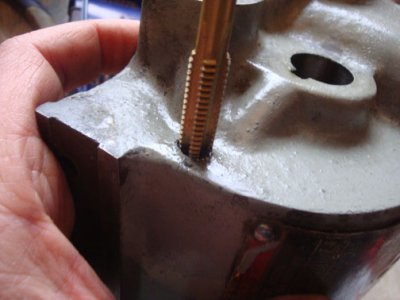
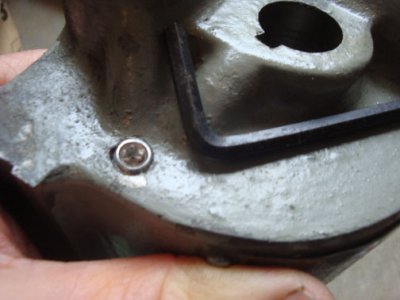
My thought for now is to put taper in hole. In the mistake hole (the extra hole shown), I think I'll stick a thick copper wire in there tight, then heat with torch and flow solder in and cut flush. That should close up the hole nicely, at least cosmetically, and the copper and solder will not harm anything. I don't think the shaft will get hot enough to melt the solder anyway.

Also, appreciate comments on gears and we'll get to more of that when this project is finished.

Appreciate everyone's help. Despite frustrations, I'm actually enjoying the whole process, believe it or not.

Dave
 
It's kind of a "catch-22". If your lathe was up and working you could easily replicate that collar and probably the shaft as well. I guess you could ask if someone could turn one for you. Lots of helpful guys on here.

-Ron
 
The same thought occurred to me. I also could have turned out taper pins and who knows, maybe even a bunch of taper bits if I knew how to do those spirals and hardening. Heck, if I had a mill attachment I could even have turned out another shaft (a channel for the wick would need to be milled)! In fact, it would probably be a good idea once lathe is set up to replicate every part for spares.

This whole thing has been on my mind, making it hard to sleep. I'm thinking that making a new taper hole there might collapse the thin wall between the parallel holes in the shaft and collar and for now, it might be wise to tap that area for a thin, bolt. Driving out another taper pin with a sledgehammer or even a 5 lb deadblow might be the death knell of that shaft. My main concern is that should the pin or anything fall out during operation, it would drop down into the central shaft gearstring and destroy them all.

Wish you knew how miserable life has become all b/c of 1 silly taper pin. I think the reason for the drill not going straight was my lack of experience and the shaft turning during the drilling process. Oh, did I mention that once I finished drilling and drove the shaft out, there were huge scratchmarks on the shaft and bronze bearings caused by the jagged hole? Am I the only one who makes mistakes? When I see other people's posts about restoration jobs, before and after photos, everything looks like it was done so perfectly.

-------------

Question:

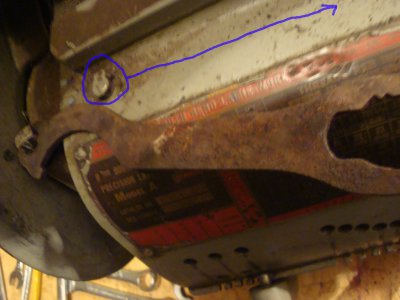
My gearbox contains just one oiling hole unlike the book, which shows one on each side. I circled the lone oiling hole in blue. I sort of traced the channel and it goes all the way to the other side and then down into separate channels to all the bosses which contain the shaft holes. Sorry I didn't take a photo of that area. My plan is to drill out a pressed in plug on the other side (off to the right) and replace it with a small set screw wrapped in teflon tape (as recommended by the book). The book said the reason for doing this is to more easily clean out the passageways (better access for pipe cleaners and flushing with kerosene.

Here's my question: once I've done all of that, are the wicks supposed to extend the entire length of the passageway or only at the entry points. It was a bit hard deciphering that from the book photos.

Thanks again

Dave
DSC01966.jpg
 
Last edited:
Regarding that single oil hole, on mine I drilled another hole at the other end, in line with the original. I got a handful of Gits oilers and reamed out the existing holes to fit on every oil hole in the machine, except the oil holes for the back gear eccentric, which I forgot.:mad: So much for old age. I don't like open oil holes, seems they attract every bit of swarf that comes by. BTW, I also didn't put oilers in the tumbler gear shafts. I think the wicks should extend the full length of the shafts.
 
Thanks, Red, you guys are all so patient with me. I considered doing the gib thing but saw each one on eBay for 16 or $17 a piece so that idea quickly evaporated. I think I read that the wicks are pulled through the holes via wires. So the rule is, whereever a passageway exists, a wick must be there
 
Don't mess around with ebay. Just checked with McMaster-Carr and they have the Gits oilers starting at $ 1.69 each for the plain drive-in type.;)
 
Don't mess around with ebay. Just checked with McMaster-Carr and they have the Gits oilers starting at $ 1.69 each for the plain drive-in type.;)


Thanks, do you recall which ones you got? Look like you just press them in. If you forgot I can measure the holes. I'm assuming they're all the same size.

Here's direct link:

http://www.mcmaster.com/#standard-oil-cups/=gscqfg

-------------------------

regarding that troublesome taper pin, I found an inexpensive source for taper pin bits, and I'm trying to decide which ones I need (I'm thinking I might need more later on). Also, unsure whether to get straight, spiral or helical bits).

http://www.victornet.com/report/Taper-Pin-Assortments/1011.html
and for the pins
http://www.victornet.com/report/Taper-Pin-Assortments/1011.html

My idea is to fill in all the holes with JB Weld and re-drill with the taper bit, holding shaft and collar completely vertical in drill press holder so bit doesn't wander. All work will cease for a while until I get this resolved

-----

I've been told another option is to use spring pins: http://en.wikipedia.org/wiki/Spring_pin


thanks again

Dave
 
The link you posted is the right one,( 1231K1 ). As to the reamers, some of mine are straight and some spiral. I can't tell any difference in the way they cut, both do a fine job. Use cutting oil on the reamers, and be sure not to run them backwards, as that will ruin them in short order.:))
 
thanks for that info, Red.

Good progress, cleaned all the parts, pressed tumbler gears back in, reassembled that troublesome screw gear assembly and this week will be working on reassembling geartree.

In process of putting in new wicks, so many!

The top gear assembly was hard to reassemble b/c keyway on shaft had to line up with it was pressed in. Witness marks don't help as the gear moves around a lot. Did a lot of tapping until I found the entryway. If you press too hard without a shoulder to back it, the fat little gear will push out the bronze bearing. I probably should do a drawing as hard to explain, but it's done.

The copper 12 gauge wire important for removing old wick out of hidden passageways, Pipecleaners too are needed.

Drilled out the pressed in plug, tapped and added set screw so gain access to the right side of gearbox oil channels (photo)

BTW, if you use a spring or roll pin in place of taper pins, they make dimpled punches to self-center the punch. Old farm hand told me about it

cheers

Dave

DSC02279.jpg DSC02280.jpg
 
Hi guys, as promised I began my video series with an introductory one

http://www.youtube.com/watch?v=i-OwNUZesXE

LOL

I'm just learning Adobe After Effects so maybe future ones will have more animation and bling

I'm off to Korea for several weeks so will not be on the forum until late next month. I'm about done with the gearbox so that will be covered in 2 more videos planned

Be patient as it will take time. I'm hoping to document stuff for other dummies (if they exist, LOL), but I think I'm the only dummy on this forum

later
 
Back
Top