What Did You Buy Today?

It seems you've had the gauges apart. What's the basic process? I wasn't able to totally disassemble mine easily. Is there a magic trick? Perhaps I was too gentle - applied too much mechanical empathy?

@WobblyHand

Here is how I did it...

1) Unscrew and remove the locking rod
2 Unscrew the main handle (that the locking rod sldes into
3) Squeeze the two telesoping ends together and CAREFULLY turn the unit upside down to drop the locking pin/restictor out with the external spring. Pay attention to how that locking pin/restrictor is oriented.
4) CAREFULLY AND SLOWLY release pressure on the telescoping sections.

The barrels will come out as separate halves, one slotted, one grooved.

The centre spring **MAY** have a headed pin in the SLOTTED barrel end.

Of course, as the Haynes manuals always state "Rebuilding is the reverse of dismantling".
 
Went to use a 1" O/D die I recently purchased and realised I did not have a die spanner for it.. DOH! Anyway, got the job done using an old hack I know (Not gonna spill that info, lest to say it would be highly frowned upon). Sometimes, you just have to laugh at yourself for thinking you have all the tools you need for a job only to find out that you don't, at exactly the time you need the tool you do not have!

Gave in and ordered a die spanner so at last I have it for when I need it again.

View attachment 495812
A large die spanner can always turn a smaller die, but not the other way around. Just make an insert for the large die spanner to hold the smaller dies. And that way if you bring your big one, you still can thread smaller without bringing both.
 
Oh yeah, and this:

View attachment 495816

Bit of an ugly duckling (the top is my work post-purchase; the original hardboard top was rotten in places and two bits of narrow 1/2" ply were all I had, and I'm not spending money to make a cosmetic improvement to this thing! :grin:) but orher than the top, it's solid (a fair bit heavier than it looks, I embarrassed myself a bit getting it into the back of the car!) and all the drawers move nicely, and it's narrow enough to fit into the space I have planned. Cost £30.
great cabinet. that's worth some love. It seems the joints may be lose, do what you need to, to get that back tight. Those drawer stacks are invaluable.
 
great cabinet. that's worth some love. It seems the joints may be lose, do what you need to, to get that back tight. Those drawer stacks are rkrinvaluable.
Do you mean.the 45° gaps in the front at the top? Those are just hardboard straps acting as a facia over the frame as far as I can tell. This really is no beautiful bit of cabinet making to be honest.

I suspect I was drawn to it by the fact that the maker seems to have followed my philosophy of woodwork:

"as optimally functional as available skills, materials, and fastening methods allow; as solid as available skills, materials, and fastening methods allow; but no concern for aesthetics beyond what comes about by good fortune"

Frankly, I'm rather in awe of those who can make functional and beautiful pieces of workshop furniture.

Wood, as I think I've said before, seems to me to be a petulant and resentful servant. Those who can make it do what they want it to do, with grace and and elegance, are genuine artists in my eyes. ;)
 
Have you disassembled the telescoping gauges yet? If you know how to do that can you share that information. Mine work, but could be smoother. I have partially disassembled one, but couldn't figure out how to remove everything and didn't want to force it. There's something that needs to be done, a step that I'm missing.

I do know that using them takes practice to get decent repeatable measurements.
Not yet but I've watched ToT's YouTube video on doing it with a set of Starret fellas and IIRC it didn't seem that complex and given the simplicity of the mechanism, how different can these Chinese chaps be.

Yeah, I've watched a few videos on using them and I have a handful of ring guages on their way to me so I can practice with my clumsy mitts! :oops: :big grin:
 
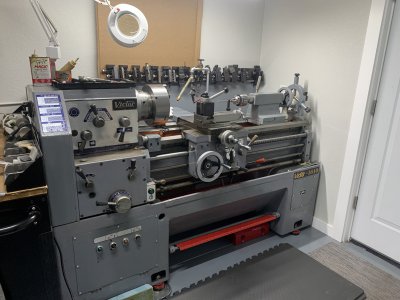
So this happened yesterday....Victor 1640 lathe at an auction not terribly far away (150 miles). I wasn't able to see it in person, it doesn't seem to have any chucks and no steady or follow is pictured, but it does have a taper attachment. I actually have a really nice 3J adjustable on a D1-6 adapter plate that will be perfect for it. I also have an Aloris CXA with 25 tool holders that should be just what it needs. I've got a 10" 4-jaw that would work with a new adapter plate, but I think I'm going to get a 12" 4-jaw to take advantage of the available swing. I don't use the 4-jaw much when I've got a set-tru 3J on the lathe, so I wouldn't have to deal with large, heavy chuck too often. It was from an auction with a lot of other machinery from a lifelong machinist with an extensive home shop....they claim it's in working condition....we'll see. Terrible auction picture:

Victor1640.jpeg
 
So this happened yesterday....Victor 1640 lathe at an auction not terribly far away (150 miles). I wasn't able to see it in person, it doesn't seem to have any chucks and no steady or follow is pictured, but it does have a taper attachment. I actually have a really nice 3J adjustable on a D1-6 adapter plate that will be perfect for it. I also have an Aloris CXA with 25 tool holders that should be just what it needs. I've got a 10" 4-jaw that would work with a new adapter plate, but I think I'm going to get a 12" 4-jaw to take advantage of the available swing. I don't use the 4-jaw much when I've got a set-tru 3J on the lathe, so I wouldn't have to deal with large, heavy chuck too often. It was from an auction with a lot of other machinery from a lifelong machinist with an extensive home shop....they claim it's in working condition....we'll see. Terrible auction picture:

View attachment 495861
I think your going to like that machine!
 
Back
Top