The Voron kit build thread

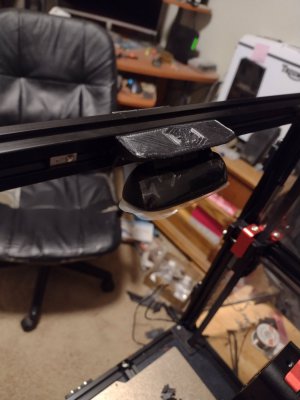
Ok, I got the cam working.

I pretty much posted this same thing over on TeamFDM.com after they couldn't really help.

But, in case you, or more likely @7milesup runs into this issue, since he is using an OrangePI too. Or, anyone else for that matter who happens to be struggling with the OrangePi, Mainsaild and a webcam.


For future reference, since Raspberry Pi's are being scalped for ridiculous prices and Orange Pi's are becoming more common in these type of applications. In case someday, someone is searching the web looking for a way to get their webcam set up with an Orange Pi 4 for Mainsail.

First, after multiple attempts to create webcam.txt files, trying to download and install "Crowsnest", sacrificing a live chicken and then beating it against the side of my Voron, I started taking screenshots of everything, and comparing them to each other when the next failure occurred.

So, crowsnest failed to install because the Orange Pi didn't have an FFMpeg, whatever the f... that is. So i spent half an hour googling "debian install FFMpeg. Found a command line script to install it, and ran the script. That, of course failed, because I neede the following "dependencies".

image.thumb.jpeg.eb40ac7c542b95889c80c649fb005a8f.jpeg

Geat, so another hour or so google searching each of these things by name, until i found a copy/paste command line to install each. After I managed to install some of these things, apparently of them was just the right one, and afterwards I got the option to "accept this solution". I typed Y, hit enter, and it installed a whole bunch of ****.

I went back and tried the "ffmpeg" install command again. For the first time, something actually worked. Oddly, this time It gave me a list of other dependencies that needed to be installed as well. So, I typed Y and hit enter, again, and got this:

image.thumb.jpeg.9f2f5b7fdb61aba03b19339189469ae1.jpeg

Naturally, at this point the cam still wasn't working in Mainsail. So, i went back to the Crowsnest github thing, and copied/pasted the install command into the ssh terminal, and oddly, it worked. Crowsnest installed this time.

Feeling confident, i rebooted the Orange Pi and opened up Sailboat, and it was working! No webcam.txt files. No config files. Just, a webcam image of my assistant, who took care of the sacrificed chicken.

image.thumb.jpeg.a594144a252fe19a15a8b8b5bc790ab5.jpeg

There. Done!
 
And, I made a mount for my Logitech C270 Webcam. Mounts front, top center.

Untitled.jpg
1670992976829.png


Attachments

  • IMG_20221213_204718606.jpg
    IMG_20221213_204718606.jpg
    160.3 KB · Views: 57
Last edited:
I put two of the Amazon RH meters into the Repbox, one into the storage box and one into a single reel printdry clear container. All the units in the Repbox read 10%, as does the unit in the single reel box (which is sitting on the dessicant bottle in the PETG reel core). The one in the 8 reel storage box reads 24%. The documentation indicates they read humidity every 10 seconds, and the accuracy is quoted as plus or minus 5% and the readout range is 10 to 99%. They use a single LR44 cell and have a pushbutton to change the temperature readout between C and F. They each came with a spare cell. Does anyone know how long the battery lasts? They didn't bother to ship with the pre-installed battery disabled so they must last a good while.
 
This is getting a bit off the Voron track, but I'm using the RH meters to test some "recharged" and some "new" silica gel desiccant, and it seems to indicate that neither is reducing the RH. Perhaps they are no longer active. I did the recharge some time back at fairly low temperature, and either the activation was inadequate or the storage, or perhaps a bit of both. It is good to have a way of actually checking on this. I also went through my pile of desiccant packs saved from packaging. I opened a few to see what was in them. Many are not silica gel (about 20%). Some appear to be very low grade Zeolite, others very fragmented silica gel. Some are carbon. some are who knows what powder. I'm separating out the silica gel because those we can probably reactivate while others may require different incompatible activation processes and are probably not worth spending time on. Having the meters is the only way to tell what is actually effective. Tennis ball cans or thick ziplock bags are good containers to do testing in. It is easy to peel the labels off tennis ball cans, and they are well sealed. Ziplock bags are more permeable so they don't protect against moisture long term, but for a quick test they should be ok. I have a pack of new silica gel packs from amazon that came in a heavy zip lock that is not registering RH reduction, so the packaging limits the activity lifetime of the silica gel and this stuff is apparently no longer active.

I see the 8 reel storage box with two Eva dry 333's has dropped to 21% RH. Each Eva Dry 333 has about 330 grams of indicating Silica Gel, and a 20 watt heater. So when they change color you plug them in overnight and reactivate them. Very convenient. I have been using those for my filament storage, both in the rectangular sealed 30L Sterilite gasket box that holds 8 spools, and in 5 gallon buckets that have gamma seal lids that hold about 5 spools of filament each.

Keep your powder and filament dry. :)

I did more wire management on the Voron. The underside of the build plate looks nicer now. Some of the power and ground wires were just too long so I reterminated them. Those crimped ferrules work very nicely in the Wago connectors.

On the Raspberry Pi news front, the Pi Foundation is releasing 100,000 new Pi's to the retail channels now. They include Pi Zero W, Pi3 as well as 2 and 4 Gigabtye Pi4's. All of these are suitable for Klipper. The 2 Gigabyte Pi4 is what I'm using for the Voron Trident. Even 1/2 Gigabyte of memory is sufficient. The Pi Zero W will run Klipper but won't handle Cameras, Input Shaper or Octoprint. The Pi3's will handle everything so are a good low budget choice. So monitor your local Pi supply and be prepared to react quickly to get a real Pi at MSRP.

I see Pi3a+ at pishop.us right now.
 
Last edited:
@Ken226 Gee whiz, guys. For some reason, this forum stops sending me notifications on threads that I am actively involved in. I have brought this up to the admins, but no luck resolving the issue. It looks like I need to go back a few pages and catch up.
 
On the Raspberry Pi news front, the Pi Foundation is releasing 100,000 new Pi's to the retail channels now. They include Pi Zero W, Pi3 as well as 2 and 4 Gigabtye Pi4's. All of these are suitable for Klipper. The 2 Gigabyte Pi4 is what I'm using for the Voron Trident. Even 1/2 Gigabyte of memory is sufficient. The Pi Zero W will run Klipper but won't handle Cameras, Input Shaper or Octoprint. The Pi3's will handle everything so are a good low budget choice. So monitor your local Pi supply and be prepared to react quickly to get a real Pi at MSRP.

I see Pi3a+ at pishop.us right now.
Frankly, trying to track down a Rpi is a joke. Getting one at MSRP is non-existent and a complete waste of time. I have a real Pi, it is just orange flavored. ;)
 
Last edited:
Frankly, trying to track down a Rpi is a joke. Getting one at MSRP is non-existent and a complete waste of time. I have a real Pi, it is just orange flavored. ;)

The only thing I havn't been able to get working on my Orange Pi 4lts is the touchscreen. At this point, the web interface is working well enough that I don't care about the touchscreen any more.

I've since done some digging on routers for one with lots of range. This unit had lots of reviews indicating some very impressive range, and I scored a refurbished one for 130$ on Amazon.:


So, if all goes well it will replace my 1999 era Linksys 802.11b router for the Voron/shop use. I'm hoping it has enough juice that I can still connect to it with the Voron out in the shop, from a laptop in the house. About 50ft and through 2 interior and 2 insulated exterior walls.

I'll find it in a few days, once Amazon gets it to my door.
 
I decided to add the toolhead PCB, to clean up my aliminum cw1 extruder and Stealthburner combo.

The problem is, the Afterburner PCB that fits the CW1 doesn't have the LED connectors for the Stealthburner. The Stealthburner PCB which has all the right headers, won't fit the CW1 extruder.

I'm going to try and modify a Stealthburner PCB to fit the CW1, with a custom standoff.

My aluminum extruder already has two m3 holes, so i created a standoff/pcb mount to adapt the Stealthburner PCB to the aliminum CW1. Here is the standoff, with holes to fit the existing drilled/tapped m3 holes in the CW1 extruder. The upper right hole will be attached to the extruder with a button head screw, and the lower left with a longer m3 screw that passes through the pcb. The larger socket in the middle with get a heat set insert, and be the 2nd attach point for the PCB.


1671120412152.png


Then I'll have to modify the PCB, since the stock Stealthburner PCB has the stepper connector on the backside, between the motor and the board. I'll have to move the connector over to the same side as all the other connectors, so that it will clear the CW1.

Here is the modified PCB. You can see that the top right connector (E stepper) has plenty of room switched over the the front side. In its stock configuration on the backside, there's no way a plug could ever be connected to it.

1671120896207.png


In CAD, everything seems to fit in this configuration. Hopefully, reality matches up to predictions.

Overall, it looks pretty decent:

1671121083522.png
 
@Ken226 Gee whiz, guys. For some reason, this forum stops sending me notifications on threads that I am actively involved in. I have brought this up to the admins, but no luck resolving the issue. It looks like I need to go back a few pages and catch up.
I've had the same issues. No resolution.
 
I just check the alerts periodically as the emails are not 100%, and I have some set up without emails.

I may need to do a similar adapter for the LDO Toolhead PC Board since I'm using the LGX extruder and the hole pattern for the side mount is different. At the moment I have just one screw holding it and it sits too far back.

I decided to try printing some Stealthburner parts on the MK3. I have a portable enclosure for it that should help at least somewhat with environmental temperatures, though the house is pretty cool these days and the garage is even worse. But so far ABS+ hasn't stuck to the build plate at 100C, even with a thick coating of Aquanet. I may try a textured build plate and readjusting the Z offset. Or just wait and get the Voron working before worrying about printing ABS.

I've managed to buy several Raspberry Pi's for my projects during the shortage at list price from US distributors including Adafruit and Pishop. It just required a little effort to learn how and some time to make it happen. Several batches of them have been available today at Adafruit and some European sites. I haven't purchased from Europe but it is possible, of course shipping costs are higher. Each vendor has their own road bumps to reduce sales to bots so there are extra steps ahead of availability that need to be done in preparation. The Pi Foundation indicates that by the middle of 2023 they should be ahead of this problem.
 
Back
Top