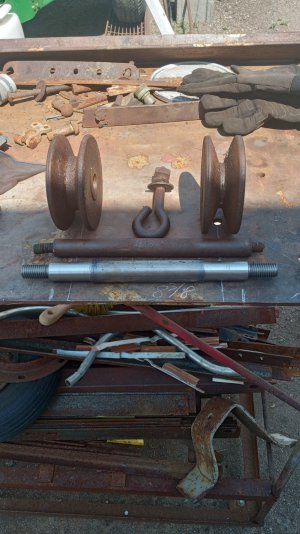
Following Jeff's lead (@Janderso ), thought I would spend part of my Saturday making a floating reamer holder. Neat project. I went rogue early on since my tailstock has an MT4 taper. Once I was in the ditch, I just decided to stay there. The threads are of no recognizable dimension other than 13 tpi. That was stupid of me because if forced me to wait for the threading dial most of the time. An even number would have been smarter. The diameter of the threads was adjusted to allow for the material I was using. All of the material was pulled out of my scrap box. I apologize for the bush league pics, I am on my way out the door.
The "main housing" is made out of what I believe to be 12L14 but I am not sure. I say this because it gave me no trouble. I oversized the ball bearing to .375 because that is what fell out of the bag-o-bearings first.

The chuck has a JT3 taper so the "chuck carrier" is a chunk. It is 4041. I had just enough to make this part and the drive plate. The drive pins are stainless, pressed in.


The "drive plate" has the piece of HSS pressed in at center. The HSS was taken off the back of an old HSS end mill and turned down to interference fit my reamed hole. It is ground flush with the top of the drive plate since the bearing in the main body is proud by almost .030"


Finally, the collar is some sort of stainless I am guessing since it had no rust on it. Here it is all put together with a Jacobs super ball bearing 14N chuck. I chose the 14N size because it closed all the way and opens to a half inch or so.

The "main housing" is made out of what I believe to be 12L14 but I am not sure. I say this because it gave me no trouble. I oversized the ball bearing to .375 because that is what fell out of the bag-o-bearings first.
The chuck has a JT3 taper so the "chuck carrier" is a chunk. It is 4041. I had just enough to make this part and the drive plate. The drive pins are stainless, pressed in.
The "drive plate" has the piece of HSS pressed in at center. The HSS was taken off the back of an old HSS end mill and turned down to interference fit my reamed hole. It is ground flush with the top of the drive plate since the bearing in the main body is proud by almost .030"
Finally, the collar is some sort of stainless I am guessing since it had no rust on it. Here it is all put together with a Jacobs super ball bearing 14N chuck. I chose the 14N size because it closed all the way and opens to a half inch or so.