POTD- PROJECT OF THE DAY: What Did You Make In Your Shop Today?

acrylic sands well with wet/dry paper, and finish it off with a light pass of a propane torch (light keep it moving) it will show thru like the face. practice first on other pieces. Don't overdo it.

That worked fabulously, woodchucker! Thanks for the pointer!

20220707_125605.jpg

And just to see something sitting on it :

20220707_093114.jpg
 
Today after couple of setbacks and losing lots of time looking for tools i managed to paint the walls around the "free" corner, the paint is still wet but should cover evenly. Tomorrow i'll be taking a trip i'm debating should i take a trailer or just go and see.
IMG_20220706_185633_1.jpg
 
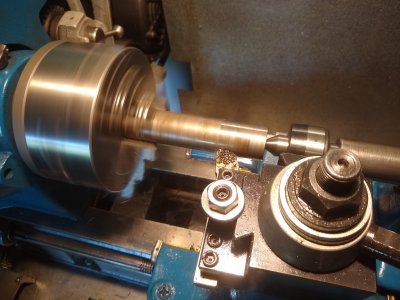
The 450inlb, X-axis, $135 Chinese power feed I had ordered came in a few days ago. The idea was to modify it to fit the Z-Axis on my BP mill. Finished it up today, and it works great. Required making a few parts and modifying a few more, but got her done. Sooo much nicer than cranking that handle, though it can still be used if needed, and the speed control goes right down to a crawl. Probably 95% of it's use will be running it on the rapid button, but nice to have the option. Really enjoyable figuring out how to make work out, and as usual, learned a few things along the way. Cheers, MIke

IMG_20220704_131034457_HDR.jpgIMG_20220704_142741632_HDR.jpgIMG_20220705_174829875.jpgIMG_20220707_130609274_HDR.jpgIMG_20220707_180806404_HDR.jpgIMG_20220707_180819201_HDR.jpg
 

Attachments

  • IMG_20220703_180528859.jpg
    IMG_20220703_180528859.jpg
    355.7 KB · Views: 12
Last edited:
The 450inlb, X-axis, $135 Chinese power feed I had ordered came in a few days ago. The idea was to modify it to fit the Z-Axis on my BP mill. Finished it up today, and it works great. Required making a few parts and modifying a few more, but got her done. Sooo much nicer than cranking that handle, though it can still be used if needed, and the speed control goes right down to a crawl. Probably 95% of it's use will be running it on the rapid button, but nice to have the option. Really enjoyable figuring out how to make work out, and as usual, The 450inlb, X-axis, $135 Chinese power feed I had ordered came in a few days ago. The idea was to modify it to fit the Z-Axis on my BP mill. Finished it up today, and it works great. Required making a few parts and modifying a few more, but got her done. Sooo much nicer than cranking that handle, though it can still be used if needed, and the speed control goes right down to a crawl. Probably 95% of it's use will be running it on the rapid button, but nice to have the option. Really enjoyable figuring out how to make work out, and as usual, learned a few things along the way. Cheers, MIke

View attachment 412951View attachment 412952View attachment 412953
Mike, I am missing what you made.
Did you make the part that the gear attaches to? and provides a stub for the manual cog?
Or did you make the part for the cog... you show the turnings, but I can't tell what the finished part is.
 
The part I made was a threaded adapter to mate the bronze gear to the existing shaft. I reused the piece that I parted off of the bronze gear as a spacer to set backlash on the gear drive. Added some large washers on the hub of the gear to fit the original dial, and reused the original dial lock nut instead of the cheap plastic one that came with the unit. Then I drilled, and taped the original crank handle receiver for two 5/16 set screws, and drilled the shaft to accept them. The backlash is maintained by adding a few thin shims from the assortment that came with the unit between the handle reciever, and the gear hub. Should have taken a little more time to explain, and added a few more pics, but I was pretty bushed when I posted, so kept it brief. Mike
 
Last edited:
Made some shelf brackets out of a piece of 1/8*3/4" steel I had lying around. Mig welded the support brackets onIMG20220704160035.jpg
Then painted them and cut a piece of random wood to size. Attached to the wall next to my millIMG20220707190721.jpg
With my new boring head and some tooling. Might add a brace/ bracket to the cantilevered side but so far it doesn't seem to need it IMG20220707191029.jpg

That's one job off my list, into the next one!
 
I haven’t spent much time in the shop these past few months. Too busy at work to really want to start anything at home so I stick with things I can pick up or put down at any time. Ergo, another sewing machine!

Yup, I’m up to fifteen now and my latest conquest is coincidentally enough another Class 15 machine. It came in a “nothing special” desk that had been painted (somewhat poorly) white by well-intentioned owners in an attempt to smarten it up. But it doesn’t take up a lot of real estate so I decided to hang on to it. The only thing with these small Singer tables is they’re kind of short so a moderately sized male is often knocking kneecaps on the apron. Hoisting the thing up on 2x3’s was about right for height but didn’t do much for my aesthetic, so I came up with this idea for adding some adjustable feet.

I patterned the look after the familiar round-ended sewing desk hinges that appear on virtually every Singer cabinet from the past 100 years. The material is just some 16ga steel from the hardware store that I broke a ninety-degree bend into followed by a few countersunk holes. The actual weight bearing part is a small block of maple tapped to receive the el cheapo adjustable foot, also from the hardware store. Satin black spray paint I had in stock already, and even though it’s not the bronze look of the real Singer hinges it goes nicely with the warm grey that I painted the desk.

1657251533281.jpeg

1657251581649.jpeg

1657251631520.jpeg

1657251720632.jpeg

1657251669078.jpeg

It’s very rare that I start and finish a project in the same afternoon but this one I did. The finished feet give at minimum 1-1/2” of extra height with another 1/2” on top of that to make up for unevenness in the floor or whatnot. And they look like they belong, kind of.

Thanks for looking!

-frank
 
Back
Top