Models for grinding HSS Lathe Tools

Finally got around to grinding a bit from ther on;y HSS blank I had for my fly cutter.
And I have to report I am amazed at the results.

My son gifted me a chunk/ingot of recycled aluminum that he smelts down out of cylinder heads, pistons and what not from scrap cars.
I had been looking at making a small parts fixture pallet for the mill but balked at the $45 price for a small piece of 1" x 6" plate at the local supplier.

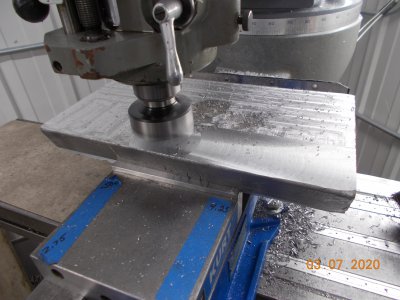
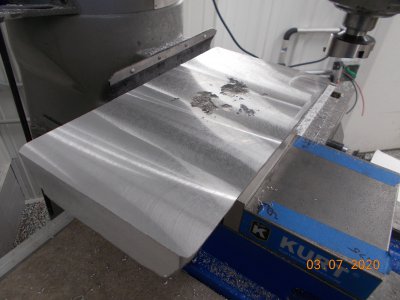
Mounted it in the vise sitting on four 1/2" nuts to make in un-tippy and tight and went to work with an end mill to start with them switched to the fly cutter using the bit I had just ground. Smoothed what's going to be the bottom and cut 2 dado's in the edges then flipped it and clamped it in the vise.

I still have a ways to go as you can tell from the surface. It is at about 1-7/8" right now.

BTW, I still have the models and can send them to whomever whenever.
 

Attachments

  • DSCN7818.JPG
    DSCN7818.JPG
    6.3 MB · Views: 40
  • DSCN7820.JPG
    DSCN7820.JPG
    7.3 MB · Views: 41
My lathe came with several of those craftsman round boring bars where the tip is like an "L" on the end of the bar. Never could master trying to grind one of those things. Until today. I drilled a hole one drill size smaller that the OD of the boring bar in a block of wood. Then forced the boring bar into the hole. It is a very tight fit and the boring bar doesn't move on its own. Yet you can twist it to get it wherever you want. Now I had something to hold onto and had no problem grinding the tip.

IMG_3858.JPG
 
Not sure where to post this, but it is a tool grinding question. Moderators, please move this to the correct place, if I've posted here in error.

I want to make a spindle light for my drill press. Got some circular LED rings that can coaxially go around the spindle. (10 weeks shipping from China, eek!) They mount with little tabs. So bought a chunk of aluminum disk, 1/2" x 3.75" in diameter for the holder. It's too thick, but that's fixable! There will be a 2.090" hole for the spindle (that's easy). Then I'd like to cut a circular undercut slot, so the little tabs could grab on. If nothing else, they'd be used to locate the rings while the epoxy is drying.

Not sure if I need to grind 2 tools or not. The first to do the slot depth and a second to make the undercut. Kind of like an "L".
Here are some pictures to show you what I mean.
IMG_20200412_180341.jpg
These are the LED rings and the faced off aluminum.
IMG_20200412_180420.jpg
Here are the little tabs I'd like to engage. It's not much of an undercut.

Lastly, this is what I was thinking I might grind for tools, and a sketch of what I was thinking.
IMG_20200412_181006.jpg
Tool 1, would cut the vertical slot in the plate. ("The vertical part of the L".) It needs to be about 0.15" deep. Tool 1 might be something similar to a parting blade, but I have no idea if that makes sense. Tool 2, would cut the horizontal part of the "L". The horizontal part of the L only needs to be 0.05" x 0.05". That should be sufficient for the tab to lock.

Is there a simpler tool(s) that might work? I've got lots of 8mm square HSS tooling I can play with. What should the profile or angles on the tool look like? I'm a little unclear on this. Never tried to make custom tooling before. The plate is 6061.
 
Yup, I think you need two tools. Tool #1 to allow Tool #2 to access to cut the Ell. Tool #1 will need to cut a wide enough groove to allow the entire width of Tool #2 to get in there.

Tool #1 will essentially be a parting tool and only needs 7-10 degrees of side relief on both sides. Tool #2 can use the same side relief per side but it also needs front relief. I am thinking maybe 10 degree at least, in a rounded profile.

Both tools would have zero rake and sharp corners.

Dunno', guys, what do you all think?
 
Definitely a two tool job.
I’m far from an expert but is the anything special needed because it’s aluminum?


Sent from my iPhone using Tapatalk
 
Tool #1 will essentially be a parting tool and only needs 7-10 degrees of side relief on both sides. Tool #2 can use the same side relief per side but it also needs front relief. I am thinking maybe 10 degree at least, in a rounded profile.
Thanks on the guide for the angles. A little hazy on what you mean by a rounded profile. Which face is rounded? Top, side1, RHS, LHS, end? I think you mean the top cutting edge is rounded for the Ell?
Ell_tool.jpg
Going to have fun making this 2nd tool. I can hog some stuff out with the belt sander. After that, the only thing I have that might work is a dremel or a die grinder. Have grinding stones and small diamond bits for it. Going to have to clamp that bad boy down and sort of do this by eye. Safety goggles for sure... I'm diving in...
 
The part touching the wall being cut must be curved to avoid contact. Only the top cutting edge should touch.
 
So making this tool #2 is kind of hard with what I have. Really need to NOT hand hold the dremel! That being said, this is what I have so far. Having a difficult time getting the right shape. Really want a sharp edge rather than a rounded one. In other words, the inside corner needs to be sharper, or the little tab won't engage. Tool #2 looks like a "P" now. I'd like the angle the the rounded part intersects with the vertical part to be a lot sharper and closer to 90 degrees. I used the band sander to narrow things down. The in cut was made with some diamond bits and a lot of fumbling. The cheapo diamond disks did not have sharp square edges.
Tool #2 is on the left, tool #1 on the right. Have to be careful when I put #2 on the lathe to make sure the undercut is on the correct side. Just checking... the tabs are on the inner side, luck that it's on the correct side!
IMG_20200413_132211_topview.jpgIMG_20200413_132239_sideview.jpg
Not sure how to hone tool#2 with the 2"x3" diamond cards that I have. Definitely testing my abilities :) Still, I'm a bit closer.
 
Back
Top