Logan bed wear?

If I am understanding correctly, you changed 2 things:
1) You went from between center to one end held in chuck and other in center
2) You moved the tailstock

Hard to say which of these 2 things or something else caused the change in diameter.
In my experience, I would think 0.0025" is pretty good. I just assume I will need to tweak the tailstock every time or use a file. Its nice that the centers appear to line up but I know my eyes would never be able to tell if they were off by 0.00125"
Are you just cutting at the collars or the entire length?
Yes, you’re understanding correctly and yes, just turning 2 collars.
When turning between centers and I have it cutting straight, doesn’t that mean the two centers are aligned? I just assumed that if was cutting straight then the centers were aligned.
The test work piece is about 10” long between the collars so maybe like you say I’m just asking too much of this 75 year old lathe. But I’m not quite ready to accept that.
 
Help me understand what going on here with my lathe. I’ve had a problem with the lathe cutting a taper (by mistake) when work is held in a 3 jaw chuck with a dead center.

Kind of tough to do what without seeing the machine, but here's my thoughts.

A little background. It’s a Logan 10” model 815 lathe that is fairly new to me. Headstock is non adjustable for alignment, except by scraping. I have the lathe bolted to a concrete floor with leveling pads under it. I’ve leveled the lathe with a .0005 over 10” level. It’s dead center across the vee ways when measured at both the chuck end and the tailstock end. Also measured at midpoint- dead level.

This is mostly a starting point. To use the level as an absolute answer, you'd have to make and custom fit (scrape in) a bridge that held the level on the actual sliding surface of the ways where the carriage rides, and another to fit the actual sliding surfaces where the tailstock rides. That is not the top where you'd rest a level across it, or lay a parallel, or whatever other method you may have used.

I can eventually get it to cut without a taper ,with work in chuck and dead center, by adjusting the tailstock screws. But, if the next workpiece is a different length then it cuts a taper until I readjusted the tailstock again for that spot on the lathe bed. So, I have to adjust the tailstock to a different alignment at different spots along the bed in order to cut straight.

You have three points at play there. The chuck, the tailstock, and the carriage. The chuck is what it is. The carriage, on it's ways, is a whole set of it's own variables. The tailstock on it's ways, is a whole set of it's own variables. And depending on the diameter of the work you're turning, the cross slide and/or compound each are their own set of their own variables.

Is this a sign of bed wear and if so, is there much I can do about it?

It certainly could be. It's very real. Even on a brand new lathe, right out of the box, if you assume it was perfectly made and perfectly set up, after the first cut, there is "some" wear. It's gonna happen. You've got to manage it more so than worry about it. (Unless it's horrible).

Could it just be a worn tailstock that perhaps I could scrape back into alignment. I could do the physical scraping.

You don't need to. You moved the tailstock with the screws. Scraping is going to do the same thing, except that it will also lower it in the process. You don't want that without a good reason. That would be another managable error, but there's no reason to introduce it if there's no benefit.


Once the bed is "leveled", that's the step in the process where you get the test bar. The final step in "leveling" a lathe is almost always to lock the level up in another room, and forget completely about it. You've got one adjustment on the tailstock to shift it left to right, and NONE of the sliding ways on any motion of the lathe can be adjusted with any practicality. The next step is to dial the tailstock in dead center in it's adjustment screws. This is best done with a center (any pointy thing) clamped in any chuck you like. Only centered enough to get a pointy end cut on it. That cut end (at any angle you like) will be, by the power of geometry, dead nutz on centerline, at whatever length you cut it to. The closer to the chuck, (or spindle nose) the better. That's a datum you can trust.
Next, you'd bring the tailstock, with a center (preferably a dead center) all the way up to the chuck. Extend the quill some, but not a lot (kind of where you'd prefer it to be when you're cutting). That's another possible source of error, so bring it out to where you'll use it most, and go with that... Lock it in place, and bring the centers together. Adjust the tailstock screws until the two points are lined up dead nutz in the X direction (the cross slide direction). Up and down does NOT matter at this time. That just puts it centered at the same point in space as the center you just cut in the chuck. Then slide the tailstock back, and don't touch the screws again. (For now). You're keeping the "measurement". Don't touch the screws.

Take your test bar, set it up between centers (proper ones now, not the one you just cut, unless you cut it to proper dimensions, then it's fine). Cut the end of the test bar at the chuck. Set up a dial indicator on the cross slide, tool rest, somewhere, anywhere on top of the carriage, and dial it in to zero. Flip the test bar end for end, and set it back up. Crank the carriage back to the tailstock where the fresh cut end of the test bar is. Check your reading on the dial indicator. This is your taper in that distance.

How long is the test bar? How much taper did you get?

Assuming it's not a gross error, your next step in "leveling", after the level has been locked away, is going to be to dial enough "twist" back into the lathe to make those two dial indicator readings be identical. Not measuring, but indicating and flipping the bar is a huge tool. There is no tool pressure, there is no anything really to add more variables than what need to be added.

In the end, you will probably find some points on the lathe where the error isn't totally linear. But if you dial it in this way in the areas that you work the most, odds are you won't care about any deviations at the extreme's of the range.

If you can dial it in to a half a thousandth or a thousandth over five or six inches, you've got a good working machine. If you're making nasa parts, or just pushing limits for your own satisfaction, you can do WAY better. In practice, tool pressures, different materials, different shaped parts, different diameter parts are ALL going to put "some" degree of deflection in the machine. You'll always have to be careful about hitting dimensions, and managing errors. it's just the name of the game. But if you can hit that accuracy, you're into press fits/bearing fits, running journals, and generally getting fussy fits inside of reasonable tolerances, and you're going to be more worried about work deflection than you are about the lathe deflection and errors combined.
 
Next, you'd bring the tailstock, with a center (preferably a dead center) all the way up to the chuck. Extend the quill some, but not a lot (kind of where you'd prefer it to be when you're cutting). That's another possible source of error, so bring it out to where you'll use it most, and go with that... Lock it in place, and bring the centers together. Adjust the tailstock screws until the two points are lined up dead nutz in the X direction (the cross slide direction). Up and down does NOT matter at this time. That just puts it centered at the same point in space as the center you just cut in the chuck. Then slide the tailstock back, and don't touch the screws again. (For now). You're keeping the "measurement". Don't touch the screws.

Take your test bar, set it up between centers (proper ones now, not the one you just cut, unless you cut it to proper dimensions, then it's fine). Cut the end of the test bar at the chuck. Set up a dial indicator on the cross slide, tool rest, somewhere, anywhere on top of the carriage, and dial it in to zero. Flip the test bar end for end, and set it back up. Crank the carriage back to the tailstock where the fresh cut end of the test bar is. Check your reading on the dial indicator. This is your taper in that distance.

How long is the test bar? How much taper did you get?

Assuming it's not a gross error, your next step in "leveling", after the level has been locked away, is going to be to dial enough "twist" back into the lathe to make those two dial indicator readings be identical. Not measuring, but indicating and flipping the bar is a huge tool. There is no tool pressure, there is no anything really to add more variables than what need to be added.

.
This seems like a good plan, I would probably adjust the tailstock to get the 2 readings to the same when the bar is flipped instead of trying to twist the bed by messing with shims under the feet (in my case anyway). I know there are proponents of both ways so whatever works for you. I do not trust my eyes to get the 2 sharp points dead nuts aligned to better than 0.005 or 0.010" What do you consider to be a gross error?

You can also see how much the reading changes depending on how much you tighten the clamps on the quill and tailstock and how far the tailstock is extended.
Always rotate the test bar to to see how it varies.
The chuck jaws are not used to hold the part, that will never be as accurate as a freshly turned center.
Once you have a test bar that is machined accurately, there is no need to cut it again if you are using the dial indicator.
 
Kind of tough to do what without seeing the machine, but here's my thoughts.


This is mostly a starting point. To use the level as an absolute answer, you'd have to make and custom fit (scrape in) a bridge that held the level on the actual sliding surface of the ways where the carriage rides, and another to fit the actual sliding surfaces where the tailstock rides. That is not the top where you'd rest a level across it, or lay a parallel, or whatever other method you may have used.


You have three points at play there. The chuck, the tailstock, and the carriage. The chuck is what it is. The carriage, on it's ways, is a whole set of it's own variables. The tailstock on it's ways, is a whole set of it's own variables. And depending on the diameter of the work you're turning, the cross slide and/or compound each are their own set of their own variables.


It certainly could be. It's very real. Even on a brand new lathe, right out of the box, if you assume it was perfectly made and perfectly set up, after the first cut, there is "some" wear. It's gonna happen. You've got to manage it more so than worry about it. (Unless it's horrible).


You don't need to. You moved the tailstock with the screws. Scraping is going to do the same thing, except that it will also lower it in the process. You don't want that without a good reason. That would be another managable error, but there's no reason to introduce it if there's no benefit.


Once the bed is "leveled", that's the step in the process where you get the test bar. The final step in "leveling" a lathe is almost always to lock the level up in another room, and forget completely about it. You've got one adjustment on the tailstock to shift it left to right, and NONE of the sliding ways on any motion of the lathe can be adjusted with any practicality. The next step is to dial the tailstock in dead center in it's adjustment screws. This is best done with a center (any pointy thing) clamped in any chuck you like. Only centered enough to get a pointy end cut on it. That cut end (at any angle you like) will be, by the power of geometry, dead nutz on centerline, at whatever length you cut it to. The closer to the chuck, (or spindle nose) the better. That's a datum you can trust.
Next, you'd bring the tailstock, with a center (preferably a dead center) all the way up to the chuck. Extend the quill some, but not a lot (kind of where you'd prefer it to be when you're cutting). That's another possible source of error, so bring it out to where you'll use it most, and go with that... Lock it in place, and bring the centers together. Adjust the tailstock screws until the two points are lined up dead nutz in the X direction (the cross slide direction). Up and down does NOT matter at this time. That just puts it centered at the same point in space as the center you just cut in the chuck. Then slide the tailstock back, and don't touch the screws again. (For now). You're keeping the "measurement". Don't touch the screws.

Take your test bar, set it up between centers (proper ones now, not the one you just cut, unless you cut it to proper dimensions, then it's fine). Cut the end of the test bar at the chuck. Set up a dial indicator on the cross slide, tool rest, somewhere, anywhere on top of the carriage, and dial it in to zero. Flip the test bar end for end, and set it back up. Crank the carriage back to the tailstock where the fresh cut end of the test bar is. Check your reading on the dial indicator. This is your taper in that distance.

How long is the test bar? How much taper did you get?

Assuming it's not a gross error, your next step in "leveling", after the level has been locked away, is going to be to dial enough "twist" back into the lathe to make those two dial indicator readings be identical. Not measuring, but indicating and flipping the bar is a huge tool. There is no tool pressure, there is no anything really to add more variables than what need to be added.

In the end, you will probably find some points on the lathe where the error isn't totally linear. But if you dial it in this way in the areas that you work the most, odds are you won't care about any deviations at the extreme's of the range.

If you can dial it in to a half a thousandth or a thousandth over five or six inches, you've got a good working machine. If you're making nasa parts, or just pushing limits for your own satisfaction, you can do WAY better. In practice, tool pressures, different materials, different shaped parts, different diameter parts are ALL going to put "some" degree of deflection in the machine. You'll always have to be careful about hitting dimensions, and managing errors. it's just the name of the game. But if you can hit that accuracy, you're into press fits/bearing fits, running journals, and generally getting fussy fits inside of reasonable tolerances, and you're going to be more worried about work deflection than you are about the lathe deflection and errors combined.
Wow, I’m totally blown away by such a helpful, informative, detailed answer. I read it 2 or 3 times to be sure I absorbed it all. Thank
you for taking the time to do that.

I like the idea of flipping the work piece end over end, using a dial indicator and then twist the lathe straight. I hope to try that later today and I’ll post the results. I see that Makintrax73 also mentioned a similar approach of twisting the lathe as a final step and had about the same sense as to how accurate the lathe can get.
I might have been expecting too much of this lathe so it’s very helpful to hear what others find to be acceptable/typical. Right now before doing the suggestions mentioned I’m about .0015 over 5” off
 
t. I hope to try that later today and I’ll post the results. I
Happy to report the results. Using Jake M’s method, I was able to dial it in pretty close to zero after swapping ends. That test piece is 10” long and when I made an actual test cut on the two collars they were within tenths of each other!
I wondered what would happen on a more typical workpiece for me of about 5” held in a chuck with dead center. Under a 1/2 thousandths so I’m really happy ! Just out of curiosity I wanted to see if the centers were still aligned. So, before I took the fresh cut center out of the chuck, but after twisting the lathe I checked. Still looked aligned under 10x magnification and using the ruler trick.
Many thanks to all who responded and provided so much helpful info! You guys probably saved this lathe’s life.
 
Thanks for posting your results, excellent news. Did you end up needing to twist the bed? What is the ruler trick?
 
Thanks for posting your results, excellent news. Did you end up needing to twist the bed? What is the ruler trick?
Yes, I had to twist it a little. After twisting it I did put my level back on to see how much and it only moved one line on the bubbles scale.
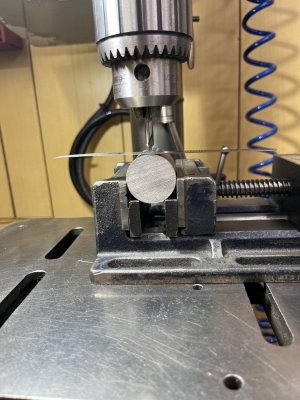
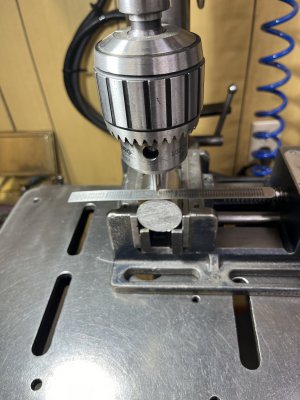
If you look real close on the past pics I posted of the centers touching each other you’ll see that a small ruller is between the points of the center. It’s hard to see on the pics and you might have to enlarge it. If the points are off create the ruller will show it by deflecting. Same idea can be used when you want to drill a hole thru the center of a round piece in a drill press. I’m talking about drilling on the circumference. Put the ruler on top of the spot you want to drill at and press it lightly with the drill point. If the ruler moves off horizontal, you’re not on the center point. After typing that I realized a pic is with a thousand words
 

Attachments

  • IMG_6016.jpeg
    IMG_6016.jpeg
    239.8 KB · Views: 2
  • IMG_6017.jpeg
    IMG_6017.jpeg
    290.1 KB · Views: 2
I would probably adjust the tailstock to get the 2 readings to the same when the bar is flipped instead of trying to twist the bed by messing with shims under the feet (in my case anyway). I know there are proponents of both ways so whatever works for you. I do not trust my eyes to get the 2 sharp points dead nuts aligned to better than 0.005 or 0.010" What do you consider to be a gross error?

Be careful there. There are "proponents of both ways", but they're solving different problems. Dialing twist out of the ways fixes a carriage and tailstock that do not travel along a straight path. Shifting the tailstock moves the tailstock quill axis to one side or the other of the lathe spindle axis, and it will follow that exactly, straight, crooked, wherever it goes.

How far out are you before you use the tailstock? Depending on what you're building, five thousandths might even be close enough. I'd like to see it dead nutz friggen zero, but in the real world that's not gonna happen. The floor moves and twists enough with seasonal changes that you've got to be aware in the back of your mind at ALL times, when you measure something, does it need attention again? Is that close enough? Is it time to take a quarter or two out of one front leg and move it to the other?

Basically, "perfect" means that it's close enough so that the error from that gets buried into the other errors that you're NEVER going to get rid of, and does not get in the way of you getting your part to whatever tolerance it needs to be. Of course there's ten thousand other things between you and that goal, all of which are gonna have to be managed to some degree, but "perfect" is when the tailstock position is close enough to get lost in the noise.


You can also see how much the reading changes depending on how much you tighten the clamps on the quill and tailstock and how far the tailstock is extended.

Exactly. It "shouldn't" change anything, but if you measure close enough, it kinda changes everything... At what point in all that "mush" is the "correct" position for shifting the tailstock?

It's not a number or a dimension, it's when it's close enough to get lost in the noise, and let you make good parts, without having to single out that one source of error.

The chuck jaws are not used to hold the part, that will never be as accurate as a freshly turned cente

That's why I sugested using ONLY the "left hand" collar on the test bar. Because it's between centers, it's going to transffer that accuracy to the opposite end when you flip it. And also why I suggested using the dial indicator to measure the difference from (effectively) the toolpost to the left hand coller. That rules out most of the variables that could mess this up. The only ones left are the ones that are probably more practical to work around and live with than it is to try to straignten them out.

Once you have a test bar that is machined accurately, there is no need to cut it again if you are using the dial indicator.

Mark which collar you're using, or make one for use only by that method, that has only one collar.
 
Back
Top