2021 POTD Thread Archive

Fixed the wheelbarrow today. The plastic body ripped off where the bolts went through, which is ironic because I bought plastic thinking it wouldn't rust, and thus would last longer.
20210828_091604.jpg
Cost - $0.40 (had to buy two fender washers. Already had the aluminum)

Cost in terms of my time...probably more than the cost of a new wheelbarrow.

Value: Considering the therapy/medication avoided because I can't work in the OR right now due to Covid restrictions... priceless.
 
I have a tiny high speed drill press which started running slowly. Not optimal... opening it up was challenging, as you cant separate it without pulling the brushes, and the brush covers are STUCK. One came out in three pieces, the other was merely cracked and boogers. Bleah.
Turns out Dumore still makes them and sells parts! Ordering noises...
BUT, the brush covers they sent are tiny and don't fit.

Despite test fitting on the lathe I still had to pick up the thread and make it smaller :-(

But, all better now!
7c2d0c804dd72602e42225b849235bf9.jpg
8e928605644fc2be1108a86f7651ccc8.jpg


Sent from my SM-G892A using Tapatalk
 
Today after work i got streit back to work on the blue 206, i wirebrashed all the loose rust and spray all the places with anti rust acid the inspection pit was a real mess from all the mud and rust. So i drove the 206 outside so the acid can work and pressure washed the inspection pit, all the water and debris collects in the bucket at the bottom so i empty it and was surprised how much dirt and rocks there was in it. Took a lunch break and drove the 206 back over the pit, removed the rear wheels gave all the place one last wirebrashing and sprayed them all with my undercoating gun this time i used black undercoating. I still have many ting to fix and install on this car but is comming along.
IMG_20210822_094504.jpgIMG_20210822_094530.jpgIMG_20210822_205622.jpgIMG_20210822_205619.jpgIMG_20210822_205615.jpgIMG_20210822_205633.jpgIMG_20210822_205650.jpgIMG_20210822_205823.jpg
 
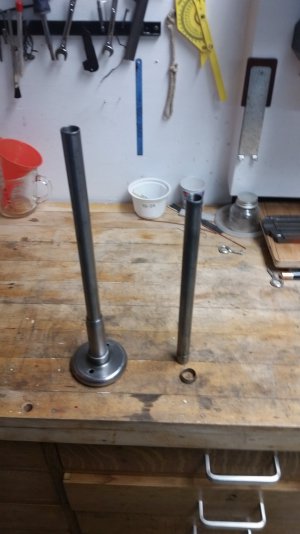
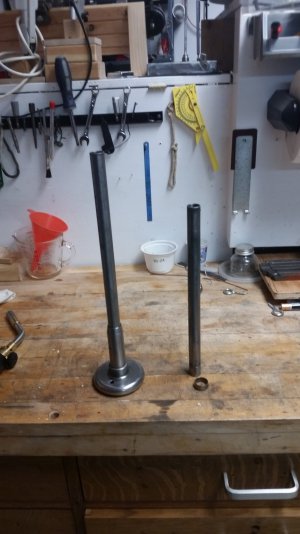
ordered some 3/4 x 0.095 DOM tubing last Wed, got a great price on https://stockcarsteel.com/, shipping was totally reasonable unlike many others. Made a new draw bar for my SB9... the old one required me to open the gear cover to run. And there was not enough room to grab the wheel. I bought the original on EBAY marked as a SB9 draw bar, but it was way to short, I had to add a stub to it when I got it, so it was time to replace it. Made the outer sleeve too to give me good room.
Next on to resolve my ER32 so I can slip rods through.
 

Attachments

  • 20210831_160533.jpg
    20210831_160533.jpg
    253.1 KB · Views: 21
  • 20210831_160549.jpg
    20210831_160549.jpg
    267.5 KB · Views: 22
Piddly, but useful stuff. Got tired of never having enough outlets at hand, so ran some more conduit, and wired up more outlets. Also cut a 50' extension cord in half, and put a 4x4 metal box with two outlets each on the ends. Used to do this back when I was contracting, and they had a way of walking off job sites. Should be able to hang on to these. Mike

IMG_20210826_144640986.jpgIMG_20210826_144715262.jpgIMG_20210826_144741414.jpgIMG_20210826_144819683.jpg
 
ordered some 3/4 x 0.095 DOM tubing last Wed, got a great price on https://stockcarsteel.com/, shipping was totally reasonable unlike many others. Made a new draw bar for my SB9... the old one required me to open the gear cover to run. And there was not enough room to grab the wheel. I bought the original on EBAY marked as a SB9 draw bar, but it was way to short, I had to add a stub to it when I got it, so it was time to replace it. Made the outer sleeve too to give me good room.
Next on to resolve my ER32 so I can slip rods through.
Seconds on Stockcar Steel. Good pricing. I met the owner at a bar here. Great guy.
Robert
 
I recently bought an Edge Technology lathe chuck stop "spider."

Screen Shot 2021-08-31 at 7.21.10 PM.jpg
As is true of the other accessories I've bought from Edge, it's almost perfect. What I think this one is missing is some way to grasp it and remove it from the lathe chuck when you're done using it. Them thar magnets is purdy durn strong, and the body of the spider is nicely smoothed and the edges radiused. Looking at it, I found that the magnets are retained by 8-32 setscrews. It was a simple matter to replace the setscrews with socket head screws. Now I have the necessary handles. I chose screw lengths to give me good purchase, without extending past the body of the chuck.
kHPIM0885.jpg

The set of parallels they supply is very nice. But I can't use some of them because they're taller than my lathe jaws. That's in no way an objection - Edge did a great job of making the set useful for a wide variety of chucks.

As with mill parallels, the actual height of the parallel is nowhere near as useful as knowing how much of the jaw remains exposed with the parallel in place. So I made a handy stand to hold the spider, the (usable) sets of parallels, and a ball driver to fit the screws on the chuck stop. The "jaw exposure" for each set of parallels is written next to the set. The actual size of the parallels is written on the board underneath each set.

kHPIM0886.jpg

As is the case with the "xylophone" I made for my mill vise parallels,
and post #12 at https://www.hobby-machinist.com/threads/about-parallels-the-holes.89258/page-2#post-805490
I need to give kudos to Phillip Hurst, who wrote a "Reader's Tip of the Month" in the January, 2020 (#289) issue of Model Engineers' Workshop. It was his idea to label parallels by jaw exposure.
 
That looks a lot easier than propping mill parallels in there. Probably more accurate too.
 
Back
Top