2021 POTD Thread Archive

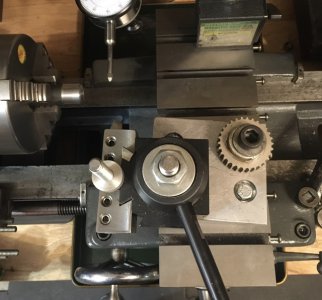
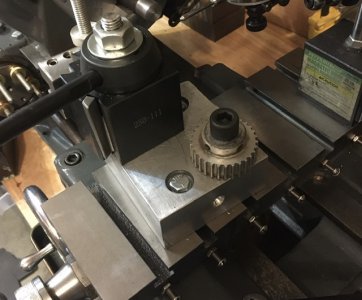
Well as can plainly be seen, I failed spectacularly in any efforts towards precision with this solid block to mount my qc tool holders. I'm posting it in hopes that someday I get that part right, and can look back on this as a learning experience. In the meantime, this terribly out of square, held on with two bolts monstrosity is rock solid. I believe I just achieved the finest finish ever of any lathe I've used.
And the timing gear? It's just covering up a threaded hole... don't worry about it. Ha!
 

Attachments

  • 60C22F3E-EF5D-4EF5-BC54-AC8E319FA125.jpeg
    60C22F3E-EF5D-4EF5-BC54-AC8E319FA125.jpeg
    112.7 KB · Views: 64
  • 7692C9D9-3530-4772-9C03-386CB6735FAE.jpeg
    7692C9D9-3530-4772-9C03-386CB6735FAE.jpeg
    103.7 KB · Views: 63
Looks like an MLA cross slide on an Atlas/Craftsman lathe? I have the same set up on mine, and it was a huge leap forward in rigidity. Big improvement in surface finish, and I can now use my parting tool. I dig the timing gear!
 
You're exactly right. It's a TV36 change gear Atlas. Not the strongest horse in the barn, but she sure is a looker.
 
Small up date, last few weeks i've been staying out of my garages, letting my injured back hield. I've been using my 605 to communicate to work more because it has a softer ride. On a different note, the blue 206 did check out on the inspection pit, it has one hole to patch up and the passenger side sill needs to be changed also the front jacking point is rusted. So it's repairs has begun, most of the work, especially sending the body filler will be done by my brother. I did strip most of the outside so he won't have much to destroy. The sill, roof and both quarter panels need lots of work. But first step was to remove the front wings, hood, bumper they all are damaged and to ones on the parts car are in much better shape, then my brother pressure washer the entire car, to get all the dirt and dust out of all the holes., then i did some prep work for him, by grading and sandblasting some of the damaged areas. One thing to take note is how little steel there is in the front end in case of a front impact. Wouldn't want to hit anything in it, at last is easy to take apart and everything is light.
IMG_20210516_184238.jpgIMG_20210516_184347.jpgIMG_20210516_184655.jpgIMG_20210516_184711.jpgIMG_20210516_184737.jpgIMG_20210516_184754.jpg
 
Back in February i started work on an old 4 drawer toolbox that was my grandfathers (great uncle) tonight i finally finished it by attaching the tapped handle with brass screws from the back side of the drawers. Once tight i took my jewelers saw and cut into bolts and then filed them down smooth and flush with the handles. Now that that project is finished i must decide what i would like to use it for. I was thinking of putting my taps and dies in it at first but idk if that is a good fit for it.96C3DCD8-85A9-4F5C-A419-D6A3E7409D7E.jpeg5F9589A9-1A9D-443B-8138-29B2C5AC3D86.jpeg143F039B-715F-47FD-8D35-B06F860AF034.jpegD7C24591-1CF1-411D-9D47-84D11CDE6250.jpegA09FA3C8-BF18-4EF6-A13A-337FDFD87818.jpeg58328C74-B6DE-4E2F-A3AE-C97DD324F76B.jpeg0ADEC4C3-02CD-437E-B146-6E0AF59B8F16.jpeg957E774C-77FE-4688-818C-244B9E23F4F2.jpegB327562A-DB01-418C-9722-C1C170EBDDE8.jpeg
 
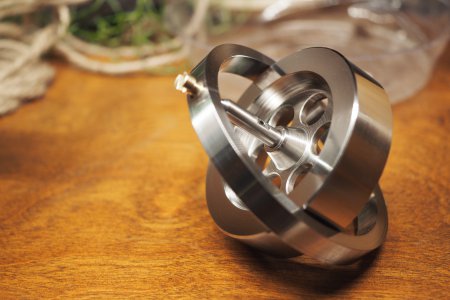
I finished up the gyroscope on Monday, although I wasn't able to get it glued up until today due to Reasons.

PXL_20210603_003426519.jpg

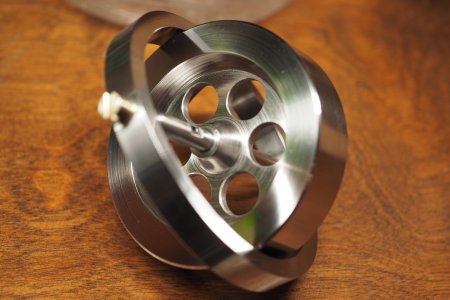
I think it turned out pretty well! There's a little bit of vibration when it spins which is down to the central shaft being machined in an... interesting way. It should work perfectly well as a little desk toy though. Now I need to make a nice box so I can ship it off.

I took some more photos with my mirrorless camera, so I figured I'd throw them in as well. They were shot with a pretty wide-open aperture using a prime lens with a relative long focal length, so the depth of field is quite narrow and shows less detail. I'd call them "arsty-fartsy."
 

Attachments

  • P6021400.JPG
    P6021400.JPG
    7.1 MB · Views: 33
  • P6021401.JPG
    P6021401.JPG
    6.9 MB · Views: 33
Last few days i've been helping my brother with the body work on the blue 206, the roof is starting to take shape, i welded the holes where the licence plate mounts, also had to cut and weld on the drivers quarter panel because it was stretched. And the new sill panel arrived, i'll have to fit it. I also had to do some painful work on the orange parts car. The fuel pump after years of seating died, i tried hitting it it won't come back to life, i went bought about 20l of fresh 100 octane fuel it didn't help, so i had to bend my back and remove the pump, it come back to life out side but still it wouldn't make good pressure, so i went to my parts and found a replacement and just replaced it. To relieve some of the pain and headache i took a good long walk in the mountain near me, there was a bicycle race. This walk seems to help my injured back more than laying down.
IMG_20210519_154611.jpgIMG_20210519_154634.jpgIMG_20210519_154641.jpgIMG_20210520_175150.jpgIMG_20210520_175158.jpgIMG_20210522_185256.jpgIMG_20210522_185304.jpgIMG_20210522_192559.jpg
 
Made a new left side glove box for the ’36 Chrysler. The originals are made of cardboard and they are reproduced even today. The original had been cut and chopped by previous owners to install a radio and clear the non original parking brake assembly.
Bent up and had neighbor spot weld the 4 sides and then fitted a shelf to cover a radio below and store stuff like gloves above. Still need to paint it on the inside.
Pierre

B7F5D51C-3A38-40E6-BC75-3D27AC480225.jpeg0B1AB1B9-4A96-4939-8167-7C8242CB221D.jpegE726A197-D020-4AC3-86F8-8DE31124AE4D.jpeg6E1701CB-BEF5-4ED9-8306-55BA86A3DFF0.jpeg074AEDD8-0879-445B-87E1-6C371139EDAC.jpeg49944E44-8180-4408-A4A8-75933C615386.jpeg
 
Back
Top