2020 POTD Thread Archive

Perhaps a submission for the most overkill and cost ineffective use of the equipment in the shop. A few thousand dollars worth of machines, tooling and material which can make almost anything up to a certain size (not real big, I largely try to make model steam engines. But I am not angry or disappointed.
This, of course, involves grandaughters. Gunsmiths, take note - the bubble making squeeze gun locked up. Failure to fire. This reduces the number of unicorn and rainbow moments to an unacceptable level. The small stub shaft of the gear driven by the curved rack on the trigger sheared off due to what I believe to be extreme enjoyment. While I should have used stainless, the rest of the life of this toy and rather generous tolerances on a 2mm nominal shaft, I turned down an 0.093 steel rod and drilled an appropriate hole in the gear, removing all of the old shaft. This will likely wear out the exquisite molded bearings. it is on the larger gear visible near the middle of the bubble-arm. They are now ready to defend their princess castle.
And grandpa becomes a SUPERHERO! Nice job!

Bruce
 
With the vise v-jaw finished, I could finally start the original project of modifying my EBay Armstrong boring bar holder. Like I said, I bought the damned thing over a year ago but it didn’t fit either of my lathes. And after looking at the Armstrong catalog on Vintage Machinery....there’s a foot note on the holders in the catalog which says “must be fitted to lathe.
And the one I purchased appears to have a t-slot cut into the body which makes it impossible to adjust once it’s on a lathe unless I would rotate the compound. It just was goofy in my opinion.

I couldn’t find fitting instructions but I just didn’t see the need for the body of the bar holder having a sort of t-nut slot cut into it which would prevent rotating the holder itself. Seems to me that the nut should be sufficient, so that’s what I did.

I had to make a spacer to raise the holder so that the boring bar would be close to centerline of the workpiece in the lathe chuck.
And then needed a stud which appears to be 3/4”-10tpi thread diameter on one end and the 1/2”-13tpi on the end which screwed into the t-nut I made ...which will then fits my lathe compound. A76D99D4-91B2-43EB-ABE4-261C34769B63.jpegC60655F8-1CA1-4739-98CB-FEFC288B55D5.jpeg10B3BB4C-E19B-4548-B530-459AB1B2863B.jpegDB9C076A-7D17-4732-A56C-0C03F92D9439.jpeg
 
Last edited:
Tried my hand at Nickel plating from scratch:

1588042627908.png

I used hydrochloric acid and a nickel electrode. Worked out well. I am going to try again with a mix of HCl and H2SO4. Maybe throw in some boric acid and saccharine.

Robert
 
Just a tid-bit of a project in which I kind of thought it was neat. I’ve been cleaning up my Rhodes shaper crank and lead screw mechanism. Lots of little issues as it appears it was hobbled together at some point. Not butchered because I don’t intend to say who ever fixed it was to blame. Just that sort of thing of an old machine.... especially when we’re in the middle of a project using something like this old shaper and something on the machine breaks. I know when this happens to me....I want to get the damned machine working so I can finish the main thing I was working on.
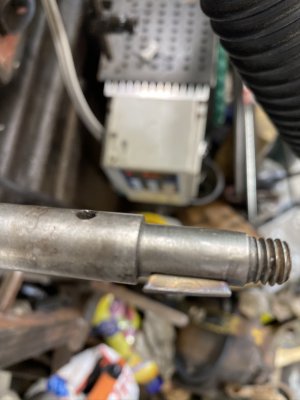
Anyway after repairing the end with the nuts opposite the crank handle( had a bent 5/16” stud on far end of lead screw, opposite the crank in which there were two nuts and these locked the screw into machine. Being bent, caused a tight spot ) and putting some delrin washers so it was smooth operating.....I had to fix the handle itself. The handle had a set screw jammed into a bushing to allow fit to a smaller shaft end of the lead screw.
Made a little brass bushing to fit the shafts 7/16” End at handle and fit the 1/2 bore of the handle which was on the machine.
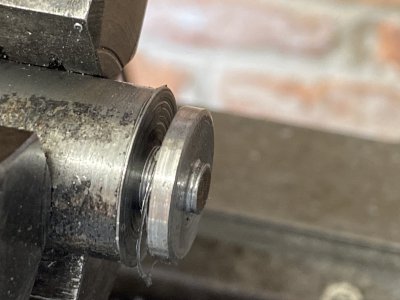
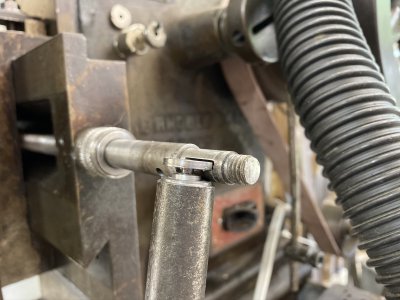
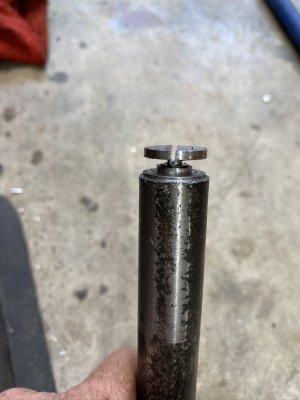
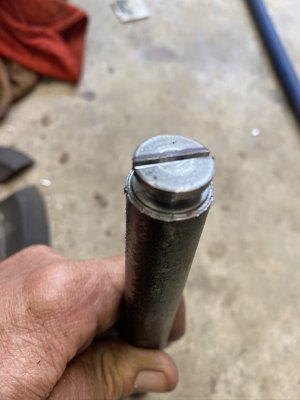
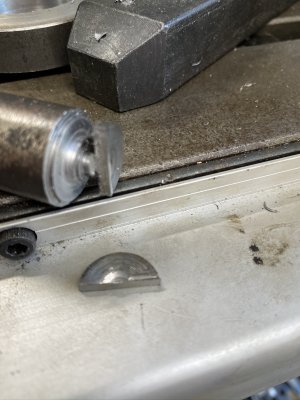
That was straightforward but the part I thought was cool was when I needed a woodruff key. Mind you, hardware was open and proper repair would be for me to get in the car and go get the proper keyway woodruff key.
But....being lazy and just seeing if I could....I decided to try and make a woodruff key.
I’m sure it’s been done before....or maybe no because it’s a hack. But see below. I chucked it so scrap I had laying around and trimmed out a little disc making sure not to fully part it. Pretty much eyeballed every thing since I don’t think I even needed one. I don’t thing one was there to begin with.
Plus, I have another excuse not to go to the hardware...the pandemic4BAA4D03-35A4-4A79-A2C0-8AE13FE45238.jpegF4109A4D-24BF-4E25-8D35-B841ED28B61F.jpeg683B60FE-C0E9-4115-97A4-EF13AF58A90A.jpegE98EA796-2A1B-4B91-9C1C-B55739A577D2.jpeg
 
Last edited:
And here’s the key being made. I did make it a bit too thin and could easily make a better woodruff if this was something like a motor pulley. But this is a crank on a shaper. The machine doesn’t get used much and when it does, the hand crank doesn’t get much use. Even a sloppy woodruff plus the set screw will last two lifetimes.
 

Attachments

  • 7E5BB562-BCAD-4292-8E7E-F22BC7313572.jpeg
    7E5BB562-BCAD-4292-8E7E-F22BC7313572.jpeg
    463.4 KB · Views: 19
  • 8BB9315A-1DCC-4FD0-8059-4949500FF824.jpeg
    8BB9315A-1DCC-4FD0-8059-4949500FF824.jpeg
    586.5 KB · Views: 19
  • 8D90B9C5-2D6D-4BF0-B3E7-C3882E09C99E.jpeg
    8D90B9C5-2D6D-4BF0-B3E7-C3882E09C99E.jpeg
    456.5 KB · Views: 19
  • D5FFDDDA-9D22-4A35-AFF0-FF9EF43AF19E.jpeg
    D5FFDDDA-9D22-4A35-AFF0-FF9EF43AF19E.jpeg
    376.2 KB · Views: 19
  • 5E8A9B9E-3E46-488A-861A-F7996C52EDF8.jpeg
    5E8A9B9E-3E46-488A-861A-F7996C52EDF8.jpeg
    635 KB · Views: 19
  • 7F538A4B-BC07-49F2-8E22-4E901552BF58.jpeg
    7F538A4B-BC07-49F2-8E22-4E901552BF58.jpeg
    477.7 KB · Views: 26
Robert. I also tried it because I’m just so worn out trying to prevent all of theses shiny tools rusting. Yah...call me anal but I can’t help it. Anyway I did a quick test on some cold rolled steel parallels in which I had made....kind of surfaced them...and then heat treated them using the pack heat treatment method. Well I’ve been using them for about two months now to see how well they hold up. I was concerned because I had peeling in a couple of small areas.
I was looking at them yesterday and using them too. I’ve been very pleasantly surprised at how well the nickel plating is holding up. It’s a go for me. When I get a chance....think I’ll set aside a week and plate some of my shop tools like angle blocks and calipers and stuff like that. It’s a neat thing in my opinion
 
  • Like
Reactions: rwm
Please show us when you do it!
Robert
 
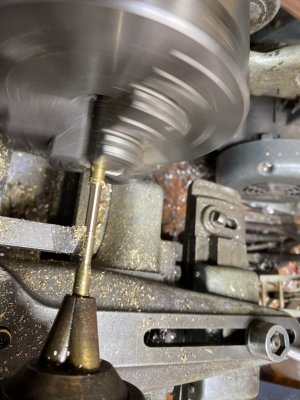
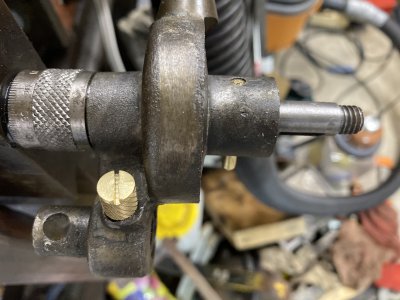
So... still working on the shaper. I must have misplaced a lot of small parts when I began working on this lead screw. So I had to make a tapered pin....about 1-1/4” long....0.189 big side...0.173 small end. First time I ever used the taper attachment. Reading how to run a lathe and machinery handbook had my head spinning. So I winged it.
I used the armature Jacobs chuck with the brass jaws in the tailstock. And used brass stock for the pin material. I just measured 1-1/4” distance and then used a feeler gauge to gauge the 16 thousandths. Worked like a charm. Ended up 0.188 on the big side and 0.174 small end. Being brass....just knocked it in. Still need to cut one end of the tapered pin flush with the ratcheting gear. Then made a brass set screw for part of the adjustment mechanism.

Still need to broach the keyway in the handle. That’s next
 

Attachments

  • BF42E8C9-A3FA-4022-88EE-87360E1207A6.jpeg
    BF42E8C9-A3FA-4022-88EE-87360E1207A6.jpeg
    626.8 KB · Views: 22
  • F1B535D8-207E-4CD6-8465-9F41C5E0612F.jpeg
    F1B535D8-207E-4CD6-8465-9F41C5E0612F.jpeg
    3.4 MB · Views: 21
Last edited:
I will document my plating Rob. I’m planning on getting to it soon. Seems something else is breaking or needs to be finished first. Thank Goodness I finally put the shaper back together....considering I had already lost a few parts. If I would have waited a few more weeks, I might have lost the bronze nut or even the lead screw.
But I’m planning on doing some anodizing and nickel plating soon and I’m going to do my best to take some pics and document what I do. I know I have ton of notes and some formulas from when I was researching plating about 2 or 3 months ago. Like I said, I was really experimenting last go round and wanted to see how it holds up in the shop. Not that parallels get super abused, but they do get clamped in the vise so that’s where my head was at. So far, they’ve help up ok. The peeling was probably from not etching and wearing gloves. So next go round...I plan on getting everything set up better.
 
Last edited:
Back
Top