Wells-Index 847 Milling Machine - Ownership Thread

The quill does seem pretty tight, and it sounds like your just about to the bottom of it.
 
The quill does seem pretty tight, and it sounds like your just about to the bottom of it.
Yes. It should be smooth... It is not....

I have been trying to go over each area to eliminate components... I do not think that it is the quill... because I can remove it and install it without much effort... Is like the effort is from the actual mechanism that the lever is attached to...

I also thought that maybe the splines have burrs in them... but again, when I removed the quill assembly, it came out easy...

A bit reluctant to disassemble the lever mechanism... not sure how the spring is setup in there. But looks like I will need to do so... Maybe is debris in the actual gear/pinion that moves the quill...

@paulymorph are you around? You did this already. Could sure use some help/guidance taking that apart.

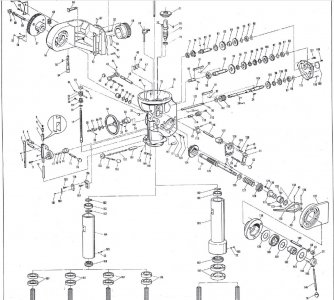
Let me review the parts diagram and see what I am going to find as I take it apart...
 
Found a recent video, from Steve Watroba, on the auto down feed mechanism... He has a playlist on the work he has done with his 847. Video does not help me for what I need to check, but wanted to place it it because it explains how the auto down feed is used.

Still looking for one for the manual down mechanism...

 
On the shaft... order placed for Part #111-346-202 - Elevating Shaft. Should be here in a couple of days.

And now I am kicking myself... I had them on the phone! I could have asked for guidance on the issue with the quill... argghhh :bang head:...

I will call them tomorrow and ask.
 
Back in Orlando, so this will have to wait until I am back in Ocala... researching for now...

Wells-Index 847 Head Diagram.jpg


Documenting what I am thinking of doing (feel free to comment):

  1. Remove the quill/spindle assembly so I can look inside the head. Already positioned everything so I can take it out without having to tilt the head again...
  2. Test the lever and see if I feel any resistance.
  3. Clean the gear that moves the quill up and down. Guessing that is the gear on the cross shaft (part #125 in the diagram). I had the quill assembly out before... and did not think about cleaning the gears visible inside...
  4. Reassemble and test

Not sure what else to look for... trying to fix it with the minimal amount of disassembly... My only concern with disassembly is that spring... I will wear safety gear when I get to that part, I do not want to take any chances...
 
@wachuko
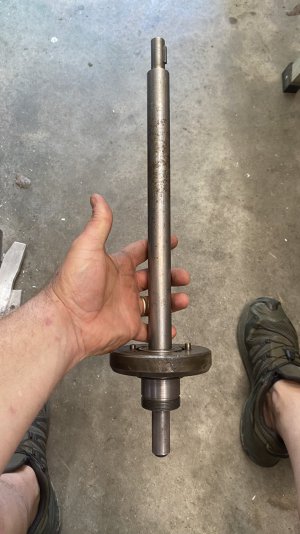
I have taken the knee crank apart on my mine. It's actually just a couple of screws and it's out in no time. From the looks of your vid, my guess is that your shaft is bent just at the end (where it protrudes from the knee). I took some pics of mine with some measurements and glad to take any more that might help. I'm sure this is something you could remake yourself if you were inclined to try. Can't imagine this needs anything other than 1in cold-rolled steel. It's just a shaft with keys on the ends and a bearing pressed on.

But if it were me, I would first see if I could straighten it in a press if you have access to one. You should fairly easily be able to take it out and indicate where the bend is on the shaft and then apply pressure, remove and re-measure to check the straightness. Certainly worth trying...


IMG_3304.jpeg
 
@paulymorph, you rock!! I already order the part... My concern was having to disassemble the table and all that to get to where I could remove that shaft...

So the only concern would be to make sure the key is in the up position to avoid that falling when reinstalling... cool!!
 
@paulymorph, you rock!! I already order the part... My concern was having to disassemble the table and all that to get to where I could remove that shaft...

So the only concern would be to make sure the key is in the up position to avoid that falling when reinstalling... cool!!
So funny you mentioned this. I didn't check but i'm not sure if the keys toward the front align with the keys on the back but maybe they do. I shoulda checked. grrr... However, in disassembling yesterday to take those pics, I pulled it out in about the 4 o'clock position and I dropped the key 5-6 times when trying to put it back in. :cool: . It just fell in a small dish right below the opening and I was able to retrieve it with one of those little 4 claw spring-loaded grabber tools. Should also be easy enough to shim the side of the key with a small piece of paper if it's too loose though.
 
So funny you mentioned this. I didn't check but i'm not sure if the keys toward the front align with the keys on the back but maybe they do. I shoulda checked. grrr... However, in disassembling yesterday to take those pics, I pulled it out in about the 4 o'clock position and I dropped the key 5-6 times when trying to put it back in. :cool: . It just fell in a small dish right below the opening and I was able to retrieve it with one of those little 4 claw spring-loaded grabber tools. Should also be easy enough to shim the side of the key with a small piece of paper if it's too loose though.
Shaft arrives today to Orlando... I will be able to check if the keyways are aligned and plan ahead when removing/replacing.

Thanks again. I will reach out when I start to tackle this task.
 
Back
Top