Tips For Dialing In And Indicating Tube With Steady Rest?

Perhaps you could make a sleeve to fit over the OD to support the tube while threading (your steady rest would run on the OD of the sleeve).

@John Hasler that is some great inside-out thinking! :encourage:
I will have to remember that.
-brino
 
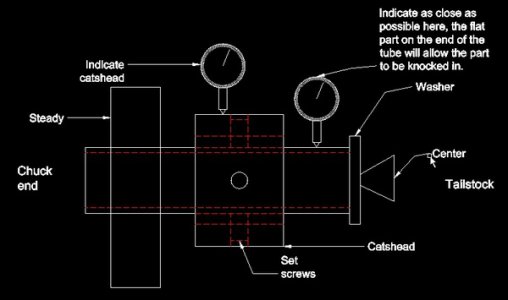
I will give you a step by step description of the process, I do not have the inclination to make a video and if I tried would probably get fired for showing Customer parts. With an illustration however.

Steps
1 Place steady on ways well towards the chuck

2 Place part in chuck through steady, if worried about marring the part with the hard jaws buy some cheap aluminum flashing that may be cut with scissors from Home Depot and wrap a few layers around it, you are using a 4 jaw.

3 Indicate the part at the chuck

4 Place a flat something with a hole against the end and apply the center with little pressure at this time, it does not matter if the end is saw cut and not square as this is not what you are measuring. Indicate this end and knock it into the least run out that you can get with a bit of wood or plastic, and a hammer if it is a large heavy part, you may want to indicate at the chuck again but I mostly find this unneeded if the work at the TS end is short

5 Once minimum run out is gained tighten the TS quill on the part and lock it

6 Either cut a band for the steady (even without a plug the tail stock will hold the part for the light cut that a band requires), if this is prohibited install a cats head and indicate as close a possible using the 4 set screws that you cleverly installed just like a 4 jaw chuck, place some of that cheap flashing under the set screws so as not to mar the finish

7 Move steady into position and set the fingers or rollers gently, I have only used steadies with bearing rollers for the last 25 years I rotate the spindle until the rollers begin to rotate.

8 remove TS

9 Face, turn and thread

The chips will not roll under the solid fingers, when running a steady on a finished surface it will leave a mark rollers or fingers, keep that in mind.

This will consume a bit of time but you are a hobbyist and have plenty of that.

I do it for a living and have time quote constraints, could do the above mentioned work in 20-30 minuites on 1 1/2" DOM tubing, however I do not have to obsess over the dimensions, with a few exceptions most of the +2" tube parts that I make have -.005 +.000 if an inside part and +.000 - .002 if a bearing bore.

Good luck
catshead_zpsck9ohjkh.jpg
 
Last edited:
shooter 123456,
Assuming you have your Approved Form 1 for this build, I'd recommend using round stock over tubing. You'll be miles ahead in time and frustration.

I've got a lot of experience with factory cans and DIY. If I was to build one today it would be similar to these

http://www.griffinarmament.com
 
Last edited:
Checkout www.speedymetals.com
Decent selection of meals at reasonable cost. They have thick walled pipe you could turn. That would give you more wiggle room so to speak.
 
At this time there is no plan to turn down the OD of the tube. I dont want to dance the edge with pressure and risk it failing.
Ok. How about an aluminum sleeve? You can use heat to put it on with a light shrink-fit and then use heat to get it off again. It can also aid your facing operation.
 
I may have some heavier walled 13-8 about that size if you don't mind some tough to cut material. I could cut and true up a length of it if you wanted it. It larger on the OD, so you would end up turning it, but it would allow you some room to play with runout, etc.

You mentioned pressures. What range do you expect this to see and did you do the engineering to determine that 316 will do it? It's not particularly high strength, as ss alloys go.
 
shooter 123456,
Assuming you have your Approved Form 1 for this build, I'd recommend using round stock over tubing. You'll be miles ahead in time and frustration.

I've got a lot of experience with factory cans and DIY. If I was to build one today it would be similar to these

http://www.griffinarmament.com
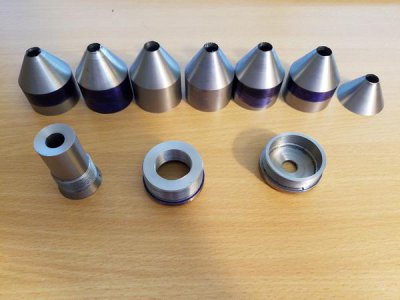
I have the form 1 in hand for this one. I have the endcaps, baffles, and spacers finished already. Just have the tube and blast baffle left.

u8F02n9.jpg

It mounts directly to the muzzle brake and should suppress 300 BLK very well and 308 relatively well. The cone baffles are supposed to perform best with lower pressures.

I considered going with round stock for it but it added considerable cost and when I did this with my first suppressor on the 7x12 harbor freight lathe, it wasn't too tough.

What do you mean it would be similar to the griffin cans? They have a very diverse product line...
 
Ok. How about an aluminum sleeve? You can use heat to put it on with a light shrink-fit and then use heat to get it off again. It can also aid your facing operation.
It sounds like this is probably the best way to go. I will try a catstail first because I have a few other projects it would work well for too.
 
I may have some heavier walled 13-8 about that size if you don't mind some tough to cut material. I could cut and true up a length of it if you wanted it. It larger on the OD, so you would end up turning it, but it would allow you some room to play with runout, etc.

You mentioned pressures. What range do you expect this to see and did you do the engineering to determine that 316 will do it? It's not particularly high strength, as ss alloys go.
I appreciate the offer but wow that stuff is expensive. I think I would struggle to turn it well though and wouldn't want it to go to waste.

The can will be going on a .308 rifle, 300 blk SBR, and a 16" .223 rifle. I don't remember what pressures it would be put up against off the top of my head but I did the math, ran it past the people at silencertalk and we were good to go. With the .065" wall, there was a decent safety margin as well.
 
shooter 123456,
Very good. I'm active duty military with a background that provided me with a lot of experience with factory cans and then I started machining after taking classes at my local tech school. I've had students as well as hobbyists ask me about making suppressors. So not a big deal as long as we educate people to keep everyone out of trouble.
I've used AAC, Gemtech, KAC, SWR, and AWC cans on various rifles (select-fire & precision), sub-guns, and a few pistols. Things I liked and disliked about every model. For home builds I like good knurling and spanner pin holes on the end caps. I like the way Griffin adds cut outs on the end of the tube itself to provide a grasping point. Having multiple endcaps for different center-fire calibers is the way to go if you are making a multi-caliber can. But not for .22.lr. I recommend a dedicated .22 l.r. only can. Much lighter weight wise for construction.
New users are shocked at how much fouling/blowback they get in their AR style rifles the first time they use a can. Each can is different. So don't burn thru a bunch of magazines to find you have an unacceptable level of fouling & buildup. I've seen some baffles almost welded together from the fouling. On that note it is worth the time to polish your baffles and the inside of the tube as much as possible. I also use Bostik brand anti-seize grease on the threads of the endcaps.
Shooting a select-fire gas operated gun will increase the cyclic rate (i.e. boost effect). Number your inner baffles! Helps with re-assembly and rotating them so they wear more evenly.
Is the .308 a semi/auto or a bolt gun? If you make a dedicated can for a bolt gun you can get away with a easier to machine material for the blast baffle. For all around use I would use 17-4.
 
Last edited:
Back
Top