Precision Level Build

twhite

H-M Supporter - Gold Member
H-M Supporter Gold Member
Joined
Sep 10, 2022
Messages
929
This time of year at work it is a bit slow. So I decided to make a precision level. I will be buying the vile for a Starrett 98 6”. Only $25 on Amazon. In the meantime I had a section of 1”x1-1/2”x about 6-1/2”. Of CRS.

I am just roughing out the base right now. I have the bottom flat and the 1/2” ball slot cut
cu
204aeaa8a01480d0dbaea022d6163a89.jpg

651098e4d4f3ab64aba09770a0909da3.jpg

7410e3edfe8bdd310299defffa3670be.jpg

Next up is cutting the 45 off of the ball cut. Then setup an angle to remove so me excess material from the top.


Cutting oil is my blood.
 
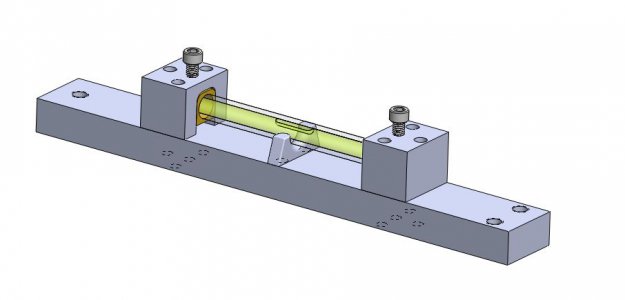
A while back, I had the plan to make my own precision level. I was planning on making the vial by slightly bending a glass tube. I bought some 5ml glass pipettes on e-bay and planned to cut one to the required length, seal one end, and put a fitting for filling on the other end. For a fluid, I was looking at using butane as it has a low viscosity and would settle faster. The beauty of the design is that it doesn't take much deflection to create the curvature for a sensitive level. The curvature was achieved by means of two adjustment screws and a center fulcrum. The adjustment screws allowed for adjusting both sensitivity and centering of the bubble.

I ended up buying a precision level which short circuited the project but it would be a fun project just for kicks some time in the future.


Level 1.JPG
 
A while back, I had the plan to make my own precision level. I was planning on making the vial by slightly bending a glass tube. I bought some 5ml glass pipettes on e-bay and planned to cut one to the required length, seal one end, and put a fitting for filling on the other end. For a fluid, I was looking at using butane as it has a low viscosity and would settle faster. The beauty of the design is that it doesn't take much deflection to create the curvature for a sensitive level. The curvature was achieved by means of two adjustment screws and a center fulcrum. The adjustment screws allowed for adjusting both sensitivity and centering of the bubble.

I ended up buying a precision level which short circuited the project but it would be a fun project just for kicks some time in the future.


View attachment 429858

I have an old Stanley precision level. It is good to .012 per foot. Just thought I would give it a go. Just winging the design at this point. Need to get some Brass tube after I receive the vile. I will order it tonight. Might come to a standstill soon until I get everything.


Cutting oil is my blood.
 
A while back, I had the plan to make my own precision level. I was planning on making the vial by slightly bending a glass tube. I bought some 5ml glass pipettes on e-bay and planned to cut one to the required length, seal one end, and put a fitting for filling on the other end. For a fluid, I was looking at using butane as it has a low viscosity and would settle faster. The beauty of the design is that it doesn't take much deflection to create the curvature for a sensitive level. The curvature was achieved by means of two adjustment screws and a center fulcrum. The adjustment screws allowed for adjusting both sensitivity and centering of the bubble.

I ended up buying a precision level which short circuited the project but it would be a fun project just for kicks some time in the future.


View attachment 429858
Pretty neat. A lifetime or so ago, I was experimenting with making my own glass ampules for liquids, some of which were flammable. I needed "calibrated" samples for injecting into a test chamber, where I was passively measuring their IR spectral response. I couldn't find anyone to supply me with these samples so I made my own. Was fun working up a viable way to produce them. Using fire to seal flammables in glass, at work, I had the time of my life. Loads of fun figuring it out. The thing that worked the best was liquid nitrogen immersion of one end which greatly reduced the vapor pressure of the flammable stuff coming out the other end. A little torch work and the small ampule was sealed and gas tight. Worked a treat. Thanks for reminding me of that!
 
All roughed out. It only moved out .006. I will let it rest today. Then start all over with some skim passes everywhere.
bc687876ff1ee694445f340958dffe2e.jpg


Cutting oil is my blood.
 
A sketch of what you are working to would help us to visualize your project. I'm having difficulty seeing the need for a circular groove on one face.
 
For a fluid, I was looking at using butane as it has a low viscosity and would settle faster.
I was wondering if butane would be a good choice. As the tube heated up, wouldn't the pressure inside the tube increase, thus shrinking the size of the bubble?
 
Nice work! Would it be worth going through a few heat cycles to stress relieve it?

It would if I had a oven. I will see how it goes in the raw state. I cleaned up all surfaces and it is pretty good. I also made the pivot nuts and washer. I added a curve to my solid mount side. Just to not put any undue stress on the vile body. I need to wait to make the body and end caps. Once I have the vial I can move forward again. Not sure I can source brass tubing to fit and a cover tube. I might just turn them both up.
f705d64fe51c492eb01945358091a900.jpg

b6a1c9f6025b9bb720031948a1aa3a41.jpg

aa2bcbc00cad5f28216ce499237d5977.jpg


Cutting oil is my blood.
 
Back
Top