Backstory:
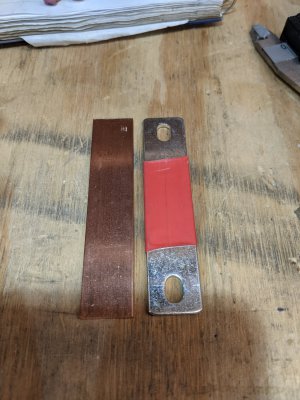
I'm building a Lithium LiFePO4 battery as part of my Airstream rebuild.
In making this battery came the need to have thicker busbars to connect the cells together. So, I bought some 1/8" x 3/4" x 36" copper bar stock. I decided it would be less wasteful if I cut the copper to size using the bandsaw. To prepare and figure out the best way to do it I cut some closely sized scraps of wood first. This lead me to discover alignment issues. I quickly saw that squareness was a problem.
Anyway, thanks to advice from several knowledgeable people on this forum, also from a few folks in Shopsmith Facebook group, also Scott Markwood's and Doug Reid's YouTube videos concerning Shopsmith bandsaw alignment and the Shopsmith Bandsaw Manual and lots of perseverance, I got the darned thing properly aligned. Including re-saw aligned.
At that point I cut my first few bars to size using the Shopsmith miter gauge to hold and guide the copper bar stock and an offset, I made, clamped to the bandsaw fence before the blade to keep my cut length consistent (3-1/2"). I cut three bars that way. The cuts were square-ish and the lengths were pretty uniform, but not as precise as I wanted. There were also other problems. To me, it felt dangerous, I could not work with lengths shorter than about 9" and I did not feel I had the ability to really control my cuts. My last note on that method, it wasn't very fast.
Here's a couple of pics.


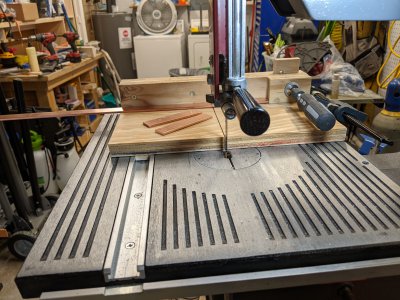
That got me wondering if it was possible to use a crosscut sled on a bandsaw. I went to YouTube for inspiration and found a few videos on bandsaw sleds. One in particular on the Makify1 channel looked simple and fairly easy to make. I had some decent 3/4" scrap plywood (construction grade) I sanded it with a 240 grit disc and made the sled body out of it. I made the runner out of a small scrap of pine lumber. So, I broke a lot of YouTube woodworker taboos by not using Baltic Birch plywood and a hardwood runner.
I'm truly not a woodworker, more of a project guy, so I don't have furniture or cabinet grade lumber scraps, yet. That's okay though because this doesn't need to be beautiful or last forever.
In making this sled I did use the Shopsmith 4" jointer, table saw and bandsaw. I do love my Shopsmith!
I also really like this little crosscut sled. It's great for small square crosscuts. It really has fulfilled my hope for it. It's accurate, fast and definitely feels safe to use.


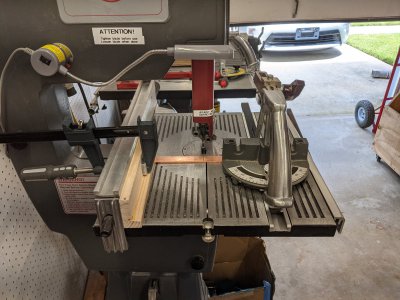
Using the bandsaw to cut my busbars allows me to get 10 slightly longer than 3-1/2" bars out of my 36" stock. I did the math before hand and learned that I could not do that with my table saw or my miter saw. The 1/8" blade kerf would not have allowed it. Here's a picture with calipers in it showing how little waste was left over.

There's still more work to be done. I still need to add slotted holes to these busbars like some thinner ones I have. The information I recieved here will be very useful. I have the end mill bit I need and I'm set up to use a milling machine locally at place called 757 Makerspace. I should feel right at home.
Here's a short video of the sled in action. Apologies for the shabby condition of the hand model in the video, he was all I could afford. He was willing work for wood chips and copper dust.
I'll post new updates as I progress.


 Before the rebuild began we took her back and forth across the US several times. We're longing to get her back on the road. There is still a lot to see and many places we'd like to revisit.