Newbie here, Project advice needed.

Why are you making the buss bars?

These things come with most commercial batteries.

Check with local battery supply, NOT batteries and bulbs or other consumer target place, instead look up ener-sys or GNB batteries then look for a local dealer.

They usually have boxes of them as leftovers.

Everybody has different style regarding how things are done.

The elongated holes are simply a one-size fits many approach.

A 160 Amp battery is slightly wider than a 120, the 180 a bit larger still.

Result is the posts are just a further apart when batteries placed in strings.

Look at the manufacturer data sheet.

It should specify minimum spacing between cells.

Also be sure to get a good torque wrench, battery fasteners do need to be tight but not excessive.

For repeating cuts on a band saw, that is easy.

Most have a device to set for length, if missing still easy.

First, does the saw cut square?

Does not need to be exact but does look better square.

If not square then you can square them up in the mill.

Determine the cut length and cut ONE.

Mark it with a sharpie.

Lift saw and slide material, place your marked one on top of the material aligning the end.

While holding the saw where the blade is just above the uncut stock, slide the material to where the cut end just touches the blade.

Tighten the vice and make the cut.

Repeat, use the marked one for all parts.


Sent from my SM-G781V using Tapatalk
 
Last edited:
You seem to be missing the point of slots for expansion. You keep stating that the slots are for expansion. Once you tighten down the nut the slot becomes meaningless. There will be no possibility of the slot moving to allow for expansion or other movement. The nut will hold it solidly in place. It will be no different than a bar with tight fitting round holes.
 
To take things as they are in my mind, (backwards as usual) a "green wheel" grinder stone MAY be available as a "flap disk", I don't know. They are normally configured as grinding wheels, same as what comes on a bench grinder. I'm sorry, I'm half asleep as I write this. I don't think clearly this time of day.

The material of a regular grinding wheel is good for steel(iron) but when used for softer metals, the metal tends to melt off little pieces that imbed in the wheel. The end result is when the wheel builds up heat and/or grinding effiencey gets lower, the wheel will crack internally. In a worst case scenario, the wheel will come apart. In a less dangerous scenario, small bits of the soft metal are thrown off. The green wheel is of a different material that grinds down the surface as it is doing "its' thing". In a commercial setting, OSHA requires green wheel use for grinding any "non ferrous" metal.

Now, on spacing and the buss bars, and other miscellaneous details of the batteries. . . The buss bars have elongated holes probably because they fit many different configurations. There must be a little space between the batteries. Just ambient temperature will have the usual side effect of expansion when hot. When they are racked up, temperature is near ambient. As they are working, discharging or charging, the internal temperature tends to rise above ambient, hence pressure. The batteries can stand being pressed together, they're plastic and there is some give as they expand. But if they expand that last little bit, the plastic tends to fuse. A pain in the wazoo to break things down for maintenance. And dangerous. . .

There is a "seperator" sheet sold for that particular purpose. Sort of like a cardboard box, but a rubber like material. Crushable so expansion is taken up. For my own projects at home, I just use a little spacing. Things like that usually aren't a problem until that unhappy time when you do need them. Then they pay off, with interest.

As far as UniStrut goes, the aluminium is somewhat deformable. If you use a steel nut, it will deform the strut somewhat as it is tightened. That is the reasoning behind that little "curl" along the edge. The big issue there is the galvanic corrosion between the aluminium and the steel. Aluminium nuts are the quick answer for that, but aluminium nuts won't stand near as much torque as steel. Some form of resistance between the two metals is vital. If nothing else, a grease between the two will slow the process considerably.

Unless you live near salt water, then all bets are off. In the '80s I worked overseas, on an island, for the US government. The local engineer had specified aluminium rigid conduit (Sched 40) for electrical installations. But the normal installs involved couplings and other fittings that the purchasing agent, who didn't know any better, had bought steel because the price was lower. The conduit only lasted a couple of years, then corroded to the point where a storm would rattle hanging conduit, cutting the wires. I only worked the job a year or so, but had to make repairs to many installations where galvanic corrosion had taken its' toll.

In 2005, I was badly burned when an industrial UPS (USSteel) caught the batteries on fire. A salesman convinced my boss that the new, miracle batteries would work fine. They didn't. . . When a power failure transferred the UPS, it attempted to start a few hundred HP worth of hydraulic pumps. The battery bank (seriesed for 240 volts) blew up and caught fire. Right next to where I was working. My only way out was through the battery room. I had other routes, but when the power failed I headed for the substation, not a safety point.

I didn't get my skin burned, but my lungs are shot from the acidic smoke. Ces't la Vie ($#|t happens) Safety is one thing, but when one is dealing with a couple hundred tons of molten steel, safety regulations go out the window. You do what you gotta do to keep the steel contained. The bottom line is I personally don't trust those miracle batteries when they take a heavy load. The 3-71 Detroit finally started and took the load. But the batteries melted. . .

I could go on and on about "web ex-spurts"(has been drips under pressure) and their lack of foresight. But this tretease has gone on far too long already. Just think ahead for worst case situations and set aside what little makes sense.

.
Wow Bill, What a horrible experience! (The battery explosion) Very sorry to hear that it damaged your health.

Thanks for all of this information and for the clarification on the grinding wheel. Mostly I think my confusion was the result of my mistaken thinking. For some reason I went immediately to side grinders which I've had quite a lot of experience with. I do not own a bench grinder and I was unfamiliar with that type of grinding wheel, I've used and have grinding wheels, but honestly haven't paid to much attention to what they're made from. I have noticed and I am familiar with "flap disks" (which is what I meant to say previously, hahaha) that have those properties.

As for the galvanic action between the stainless steel and the Aluminum Channels, I am aware of the possible problem and I'll be keeping an eye on them. Like you suggest I may use some grease of maybe even something thin that I may be able to add as a separator. I'm pretty sure stainless steel is even worse than plain or galvanized, but I was equally worried about rust. The SS nuts I'm using are 316. So rust should not be a problem, he says. hahaha
More Below:


Is this for a lithium solar power storage battery? If so I'd imagine the cooling requirements (or risk of expansion) are lower than in a high drain application like a car, so packing them in probably won't cause any issues. Wouldn't hurt to do a power draw analysis though. I'm curious why you're making the bus bars from thicker copper - are you worried about the current capacity of the interconnects?

More Below:

Why are you making the buss bars?

These things come with most commercial batteries.

Check with local battery supply, NOT batteries and bulbs or other consumer target place, instead look up ener-sys or GNB batteries then look for a local dealer.

They usually have boxes of them as leftovers.

Everybody has different style regarding how things are done.

The elongated holes are simply a one-size fits many approach.

A 160 Amp battery is slightly wider than a 120, the 180 a bit larger still.

Result is the posts are just a further apart when batteries placed in strings.

Look at the manufacturer data sheet.

It should specify minimum spacing between cells.

Also be sure to get a good torque wrench, battery fasteners do need to be tight but not excessive.

For repeating cuts on a band saw, that is easy.

Most have a device to set for length, if missing still easy.

First, does the saw cut square?

Does not need to be exact but does look better square.

If not square then you can square them up in the mill.

Determine the cut length and cut ONE.

Mark it with a sharpie.

Lift saw and slide material, place your marked one on top of the material aligning the end.

While holding the saw where the blade is just above the uncut stock, slide the material to where the cut end just touches the blade.

Tighten the vice and make the cut.

Repeat, use the marked one for all parts.


Sent from my SM-G781V using Tapatalk

Thanks for this advice. For cutting I have many options. All of the ones in my personal arsenal will allow me to make nice square cuts and I can set up stops for repeatable cuts. To answer your first question: I did not know about the option you've presented me with, I looked online and did not find what i wanted. I belong to DIY Solar Power Forum and a lot of the members just make their own, but didn't really have a handle on effectively making slots. At this point I have the copper stock for the busbars and I get to learn and do something new.
More Below:


You seem to be missing the point of slots for expansion. You keep stating that the slots are for expansion. Once you tighten down the nut the slot becomes meaningless. There will be no possibility of the slot moving to allow for expansion or other movement. The nut will hold it solidly in place. It will be no different than a bar with tight fitting round holes.

Okay, Here is some information about the battery I'm building and what it will be used for. I'll also try and clear up a couple of my previous statements.

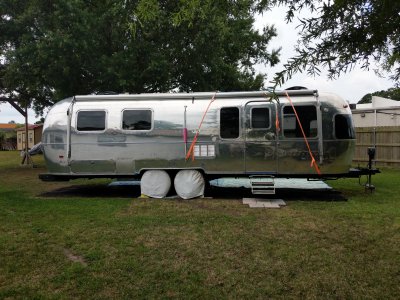
The battery will be composed of (16) LiFePO4 280AH cells. The configuration will be 8S2P, creating a 24V battery (actually more like 27V based on 3.4V per cell) with 560AH or 15,000W. It will be the heart of my off grid electrical system in an Airstream Trailer that I'm rebuilding. Naturally, there is a lot more to it, BMS, Hybrid Inverter, etc. The trailers AC electrical system will be 120V, 30A, as it was originally. The DC system will be largely 12V, but I'm making the battery 24V to place less strain on the inverter.

These cells are made by Keheng. Here's a link if you would like more info and specs. The cases of these cells are not plastic they are aluminum, if they melt together I hope I'm not around. As I mentioned before, it is recommended that they are configured in an enclosure that will keep them compressed. Gaps between cells are not recommended. One of the functions of a quality BMS is to monitor the battery's temperature and shut it down if it exceeds a safe temperature. I follow lots of folks that are doing this and compression is not a problem. Several of them are electrical engineers.

I am aware that the slotted busbars are made to fit different sized cells. As has been correctly said LPO cells can swell. I also agree that once tightened down (properly torqued to spec) the expansion room that a slot provides is meaningless. If the nuts securing the busbars are properly torqued nothing should give and thus provide proper conductivity. The reason I want the slot is because if these cell swell slightly, or if I need to replace a cell, having the slot means that if I need to take them apart and put them back together, for any reason, my busbars should still fit.

The reason I'm making them out of 1/8" thick copper is exactly as has been mentioned because of the current capacity this battery will provide. 1/8"T x 3/4"W is what it spec'd out to. I had some very expert help on this one.

Thank you all for all of your advice and questions. It's all very helpful by either filling a knowledge gap or challenging me to reexamine what I'm doing and why.

I spent the entire day cleaning up and rearranging my tiny single car garage workshop. So, I stayed up pretty late to respond to all of you helpful folks. For that reason I have no doubt there are missed typos, and probably stuff that makes no sense. ;) Hopefully in the next couple of weeks this project will be in the rear view mirror thanks to the cofidence I'm feeling because of all of your help. At this point I'm waiting on my endmill bit, but I'll probably get the busbars cut to size now that I feel more prepared. I will furnish some pictures once I've done something note worthy, Good or otherwise.
:p
 
Sounds like a really neat set up! Lipo batteries do swell but lifepo4 batteries are much more stable. I imagine the compression in this case (ha!) is to help with getting the heat out of the inner cells by conduction to neighboring cells.

I'd really liked to see the build process when you start, it would be fun to follow. I've built batteries before but nothing that large. Even made a small back up lifepo4 battery for a colleague's van that she lives in.
Hi Matt, I'm guessing you're totally correct on the best wicking ability. I'm pretty sure that is why most companies have gone to aluminum cases on their bigger lipo4 cells. Also, although compressed they will not be sealed up in a way that prevents them from coming and I am considering including some small thermostatically controlled low voltage fans to help keep them cool in the warmer climes we'll be visiting and living in.

When I start building the battery in ernest and documenting it, I'll try to remember to post a link, maybe here for that. Sounds to me like you could offer some good advice on that also when they time comes. Which hopefully will be soon.

Over all, this airstream rebuild is a huge multi faceted project. Lots of important details. And made none the easier by incorporating the newest tech that makes sense ( to me at least). I'm also installing an hydronic heating and hot tap water system. Pretty much stretching my poor little brain to the max.

As she sits today.
16588542673767749117698950147197.jpg
 
Super super cool, looking forward to reading about your project! Not sure I have much to offer as all my battery builds have been much smaller and it sounds like you have a pretty good idea what you're doing, but I'm happy to offer suggestions if I can
 
Super super cool, looking forward to reading about your project! Not sure I have much to offer as all my battery builds have been much smaller and it sounds like you have a pretty good idea what you're doing, but I'm happy to offer suggestions if I can
Thanks. I've appreciated your input. As I proceed with the busbars. I'll keep posting. I'll be surprised if something doesn't pop up.
 
Just a thought; keep as much material as "universal" as possible. When traveling and something breaks, you will pray that a replacement is easy to find. Bumming around on a motorcycle a few years back put that in good perspective.

The copper buss bar stock, at 3/4 X 1/8 is a fairly common size. A few years back, I put a rectifier bridge on a Lincoln buzzbox. The buzzbox was rated at 225 Amps, I used 500 Amp diodes. And 3/4 X 1/8 copper buss bars. The buss bar stock is a good choice, of sufficient size to take abuse. And abuse there will be. . .

.
 
Back
Top