Lathe tool height

RJ, I don't follow this. Given that the tool is set at whatever height it is and the center line of the part doesn't change then the angle of attack should not change as the diameter of the part decreases; at least that's what my intuition tells me. Can you clarify?
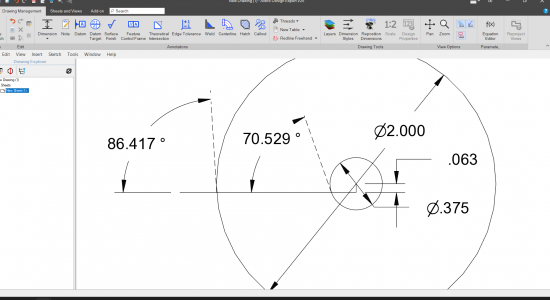
If the tool is set below centre. When at the centre of the part the " angle of attack " is directly below the centre ie. perpendicular. The further from the centre the tool is - the " flatter " the angle.
 
1665348436694.png

The dashed lines are constrained tangent to their respective circles and represent the angles of attack relative to a tool positioned 1/16" below the center of a 2" circle, and a 3/8" circle.

An exaggerated example, but it makes things easier to visualize.
 
Last edited:
define "nub"
That little bit of a high spot at the center of a part that is left over when making a facing cut. Much larger if the tool is too low. Just as present, but pushed over if the tool is too high.
 
To the OP, better slightly low than high.
ok. my gut says that too, especially on small diameter parts.

I guess if tool height is measured on the leading edge, the cutting edges would be slightly below centerline. Splitting hairs here, of course. The difference is only a couple thou.

I made the Jo Pi height gauge years ago. Set the point to be exactly at height by scrapping a blade across it. I almost never see a nub on a facing cut. Where this comes into play is after you do a touch up on a HSS bit. It will still cut OK for most applications. Then when you do your facing cut, the nub shows up. Just bring it up a half thousand or so at a time till it disappears and you will be on the money.

Where the height gauge is good is that you can change tool bits in the middle of operations and get them set right. You don't need to do a facing cut or match the tip to the tail stock or head stock point.

Reading your post, when I touch up a radius, it is the highest point. If it is lower then you are cutting with negative rake. Pretty much, all of our cutting is done with positive rake. Takes less power. Look at the pictures of HSS tools. They show the front, side and top angles. The point (radius) should be up, not down or flat.

Trying to understand negative rake comment. The tool top surface is flat (but not horizontal) over the whole surface. Rake is zero in x-direction because no back rake. The surface slopes down away from headstock in y/z direction - so positive rake there. Where is the negative rake?

A radius just moves the leading contact point down the y/z slope. Shouldn't change any of the rake angles.

What am I not seeing?

Sorry, I'm not going to get in between you and Chewy with regard to "negative rake". He can elaborate on the meaning at his convenience. I did want to put in my two cents on your zero back rake thing.

Using a turning tool with only side rake and no back rake is, at least in my opinion, a tool that functions sub-optimally. Yeah, I know all about the "sharpening" benefit but that is a weak argument if you really understand tool geometry.

Back rake is a critical angle that really aids in reducing cutting forces, cutting temperatures, thinning the chip, enhancing and optimizing chip flow, enhancing finishes and focusing the cutting forces in the area where the tool is strongest. Side rake all by itself is really good but if rake were considered in percentages then side rake would contribute about 60% of the rake benefit and back rake would provide the other 40%. Why would you deprive yourself of that 40%? The only lathe tools that do not require side and back rake are turning tools for brass/bronze/copper, form tools used at low speeds and thread cutting tools.

Now, a tool with both side and back rake will have the nose radius at the highest point. A height gauge or height setting tool is used to adjust the tool post to put this nose dead on center height. I use such a tool every time I put a lathe tool on the tool post. I know QCTP are supposed to "repeat" but I have found that to be BS, and I own and use Aloris and Dorian tool posts and Aloris tool holders. Every time you replace a tool it will be a fraction off and that is a fact. Anyway, I use a tool to get the nose on center height and my tools cut accurately and well.

I would encourage you to incorporate back rake into your general purpose lathe tools. You will see a significant increase in performance, I assure you.
 
@mikey , I hadn't thought about how tool height contribute to accuracy.
Looking at picture shared by @RJSakowski , say I have my tool low and want to take 10 thou off the diameter. I would dial 5 thou forward on my Sebastian. But, based on the angle formed by the part diameter and height error, I would be dialing in some measurable amount less than the 5 I was aiming for, and the error will be double for the diameter.
 
As an apprentice I had to conduct tool trials on multi spindle auto's. Cardide was a relatively new product and while extremely hard it was too brittle to use a positive rake. The cutting tools used a negative rake where the steel chip deformed due to the high friction and high temperature as a result. Very high power was required and good finishes were obtained along with decent tool life.
With high shear angles on parting tools the forces on the machine are not enough to lock everything tight like the old negative rake tools. This suggests to me that decreasing the top rake angle on parting tools will increase the load on the machine ways. The primary cause of chatter is the ability for some part of the machine setup to be allowed to move ( vibrate ). So my suggestion is to try a neutral top rake to increase the load on the machine and to eliminate any chance of the tool being pulled in. The tool won't start to cut until a relatively high force is applied by which time the slop is taken up.
 
@mikey , I hadn't thought about how tool height contribute to accuracy.
Looking at picture shared by @RJSakowski , say I have my tool low and want to take 10 thou off the diameter. I would dial 5 thou forward on my Sebastian. But, based on the angle formed by the part diameter and height error, I would be dialing in some measurable amount less than the 5 I was aiming for, and the error will be double for the diameter.
Quite frankly, I don't get too technical about this stuff. I get my tool at center height because that is where they cut most accurately and where the geometry seems to work best. My suggestion to you is to make a tool height setting gauge for your lathe that is dead on the spindle centerline for you specific lathe and use it every time you place a turning tool on your tool post. This applies to all turning tools, carbide and HSS. Once the tool is set to the proper height then what you measure is what your tool cuts. That is, if you measure the work and then dial in 0.005" DOC then you should have a 0.100" reduction in diameter.

If you think about it, if the tool is too high then you are rubbing the work with the area of the tool just under the cutting edge; in order to cut you must force the tool into the cut. If the tool is too low then the work will try to climb onto the work, again not good. All this can be avoided with a little care in mounting the tool.
 
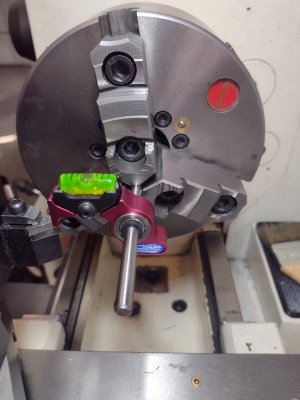
I use one of these things. It's quick, easy and accurate enough for what I do.

A tool height change of about .01" moves the bubble one line. I havn't had seen a facing cut nub in a couple years.
 

Attachments

  • IMG_20221012_111449697.jpg
    IMG_20221012_111449697.jpg
    186.9 KB · Views: 20
Back
Top