Lathe tool height

again, give me a lot bigger break; half or a quarter thou is less than measurable on tool height; this is a seat of the pants thing!
I could have said just adjust a twitch at a time,,,,, but who knows, your twitch might be different then mine. :)

To the OP, better slightly low than high.
I read that, but found out that I got a better surface finish with the bit at dead center to about one thousand high. About 4 twitches.

I have found that when parting on a smallish lathe that setting the tool height .003 below the centre line reduces chatter a lot.
I found that if I went that far below center, small diameter parts, especially softer material had a tendency to ride up over the tool. I leave mine set at dead center for everything. I am collecting parts to make a speed reduction for my lathe. I think the chatter I get on larger steel stuff is from the motor, not the tool bit.
 
@Chewy Everyone's experience varies. All my parting is on 1" steel and above, so the .003 works for my case.

Chatter is never from the motor, no matter how unbalanced it is. Loose gearing clearances in the headstock can initiate the seed of chatter, much like striking a tuning fork. 90% of the energy in the chatter is from the entire setup - tool bit to lathe bed - resonating. Every contact surface has to have clearance, and it is that clearance that allows chatter to happen. And the fact that everything bends a little.

That is why removing the compound and using a solid post significantly reduces chatter in small lathes.
I part 2" 1018 with the tool set at center all the time. I run into problems and chatter when I go larger diameter. Below around 500 RPM the brush less motor doesn't have the torque to handle the cutting. Some times, I even have trouble at the lower speeds with regular turning. It will be turning nice chips and then stop the piece from turning at all. I have to do an emergency shut down and restart parting, first removing the chip or bulge left from the stoppage.

It does not appear to be a rigidity problem at this time. I am planning to make a speed reducer that was shown in this blog. I would like to get the motor up to 800-1000 RPMS with cutting-tapping speeds down to 100 without the piece stopping. Looking at the list in your post, your machines are bigger then my PM 1228. You are right that all machines and experience varies. I just turned a lot of small diameter brass, less the 1/2". On center the parting tool cut perfectly. Below center the brass rode up at the last little bit and ruined the work. After I make the speed reducer, if I have chatter and not work stoppage, I will make a solid tool post.

I follow the posts here. If somebody says they have a way that works, I try it. If it works, I keep it. If not I go back to what does work. I constantly try to improve what I'm doing.
 
@Chewy For small diameter parting, *absolutely* you have to be on the centre line - I made a lathe centre height standard to make sure I could be on centre within a tenth. On my 12 X 37 I could never part - even in aluminum - without chatter, even at 50 RPMs, heavily lubricated, until I lowered my parting tool a smidge.

It's kind of funny that way. My 1440 doesn't part half as well as my 12X37, even though it weighs 2.5X as much... the 15" parts like a dream, however (not surprising)...
 
I should add that for small parts I always reach for the 'hacksaw parting tool'...
 
Just did a bunch of small diameter Delrin. When I get down to where it looks like the part is closing up, I stop and use a box cutter. I have spent the last few years trying every solution that is posted. Tried parting from the back side with machine in reverse. Worked OK, maybe a tad better, but the set up time was a PIA. After all the fuss, I settled on a cutting angle of 5 degrees from vertical and dead on center. IF the piece keeps spinning, I get real good parts with little chatter. Works with all the steels, aluminum, brass, plastic and wood. Don't know about stainless, haven't turned any. Problem is right now I want to do some projects with 5" diameter cast iron. Steam Donkey parts and Lautards' Octopus. I am waiting until I finish the speed reducer. I can't remember turning faster then 1K in the last few years. So a lathe that goes to 2800 RPM just doesn't mean much. I want power in the 2-600 range. I set everything with a height gauge that is probably within a couple of tenths and that alone solved all sorts of problems.
 
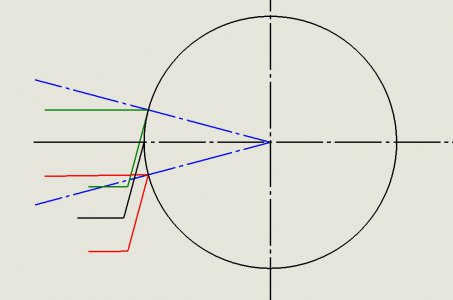
It is all about what I will call the angle of attack for want of a better descriptor, which is the angle the cutting face to a perpendicular to the work surface at the point of contact. A positive angle will result is less deformation of the chip resulting in less curl and requiring less energy. TA negative angle of attack will result in tight curls and require more energy.

The angle of attack will depend on two factors, the rake of the tool and the cutting edge height with respect to the centerline of the lathe. TGhe following illustration shows this. The illustration is exaggerated for purposes of demonstration.Lathe Tool Height.JPG
It show a tool with zero rake and a 15º clearance angle. The tool in black is contacting the work on the centerline and the angle of attack is 0º and the effective rake remains zero. The tool in green has an angle of attack of +15º and an effective positive rake of 15º. In contrast, the tool in red has an angle of attack of -15º and a 15º effective negative rake.

Unless the tool cutting edge is on the center line, the attack angle will change as the diameter of the work is reduced. When parting, as the diameter is being reduced. I have seen a sweet spot where the parting seems effortless and chips are coming off in nice curls, only to run into problems as I progressed further. If the tool is above the centerline, there will be a point where the relief angle goes to zero. If is is below the centerline, at some point the effective rake will go negative.

Of course, this doesn't take into account machine rigidity and available torque. A large machine can bull its way through without much concern while a small machine with limited torque will struggle.

I once tread an early book on farming and there was a whole section dealing with properly tuning a plow. Back then, plows were literally single horsepower. The book dealt with getting a multitude of angles just right to cut a uniform furrow with minimal load on the horse.. Modern agriculture uses tractors with fifty to one hundred times the horsepower and little effort needs be applied to tuning the plow.

IMO, this is a big reason why some people have little difficulty parting cleanly while others struggle. One has to understand the idiosyncrasies of their machine and come to a realization of what works best for them. Other people's solutions are only a starting point.
.
 
RJ, I sorta knew what you were saying. But damn, I like your answer! I have saved it to be included in my files on cutting bits. The first few years I couldn't part to save my life. Tried everything posted. Then somewhere in a post it said to check the angle of the cutter in relationship to the piece. Most of the articles and help are for flat turret style cutters. The AXA on the other hand tilts the tool upwards. So you take a tool at 7 degrees and then tilt it 7 degrees and all of a sudden you have a 14 degree sharp point contact that digs in. I changed that to 5 degrees in place on my machine and overnight, I could part anything. Good chips, little chatter. And that is what I keep going back too.
 
The centre height lowers relative to the part with increasing feedrate, especially on small parts. This is because the "harder" you push the tool - the more upward deflection, which increases as the diameter decreases. Setting tools to " tenths " is futile with so many variables, especially with parting operations.
 
Unless the tool cutting edge is on the center line, the attack angle will change as the diameter of the work is reduced. When parting, as the diameter is being reduced. I have seen a sweet spot where the parting seems effortless and chips are coming off in nice curls, only to run into problems as I progressed further. If the tool is above the centerline, there will be a point where the relief angle goes to zero. If is is below the centerline, at some point the effective rake will go negative.

RJ, I don't follow this. Given that the tool is set at whatever height it is and the center line of the part doesn't change then the angle of attack should not change as the diameter of the part decreases; at least that's what my intuition tells me. Can you clarify?
Of course, this doesn't take into account machine rigidity and available torque. A large machine can bull its way through without much concern while a small machine with limited torque will struggle.

I agree that big, rigid and powerful overcomes a lot of problems but small doesn't mean it can't. My Sherline will part stuff from the rear at near the max capacity of the chuck without any issues whatsoever so there is a lot more to parting than size, rigidity and power.
IMO, this is a big reason why some people have little difficulty parting cleanly while others struggle. One has to understand the idiosyncrasies of their machine and come to a realization of what works best for them. Other people's solutions are only a starting point.
.

Well said!
 
Back
Top