Lathe leveling - do you do it with the lathe fully dressed or just the headstock and ways?

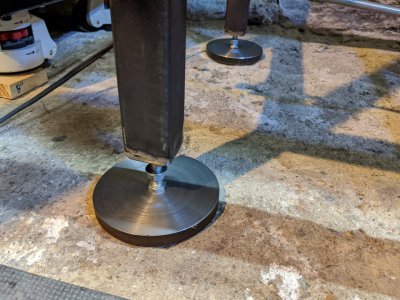
Had a chance to deal with this again. Replaced the hockey puck feet with 1/2" thick, 4" diameter steel disks with a 140 degree dimple in them. Machined some screws with a matching 140 degree point. Did this on this lathe. Came out ok. With the solid feet it was easier to start to dial in the level. There was a strong correlation between screw angle change and markings on the level, yay! One good thing I noted was the levelness change as a function of carriage position is significantly less with the steel feet. However, I still saw 2 divisions of change from moving the carriage from the HS to TS. (0.02 mm / m) level.

Finding that adjusting the opposite end is strongly affecting the previous adjustment. By that I mean, I make the HS level. Then I go measure the TS and find it off. So I adjust it some. Go back to measure the HS and find it further off than the TS was. It doesn't seem to converge. Had to walk away from it, since the session wasn't going well. There seems to be an art to this, which I seem to be missing. Went back to leveling later, but it is more of the same, kind of like playing whack-a-mole at the carnival. Seems like there should be a better way to do this.
Remember you are trying to get level in plane. Read: no twist.....

Be sure that your levels are calibrated. Place the level on the flattest most level surface you have. Mark the corners of the level on the plate. Flip the level 180degrees. If it doesn't replicate your level is it of calibration. Even if it's new doesn't mean it's calibrated.

Level as best you are able the length of the bed. Both sides. Then span the bed and measure for twist. Don't worry about the level along length anymore. Do a little at each end at a time. That means moving the level, allowing it to settle, adjusting, then moving. I prefer to use two levels. Place and don't move them until the job is complete.

The two collar test will then be for adjusting the tailstock.

Daryl
MN
Thanks for the synopsis. Yes, the measurement I was writing about was for twist. A comparison of level across the ways between the headstock end vs the tailstock end, with the level on the ways and perpendicular to the spindle axis.

This evening, looked at the level and swapped ends. It read different. I thought I had calibrated it. So I will do that tomorrow. Have a small surface plate that I can use for that. Can see how having two levels would be extremely handy.
 
TL;DR but I wanted to clarify some stuff:
  • I agree you're trying to take the twist out of the lathe BUT the stand has an effect so you need to take care of that first. I suggest you adjust the feet of the stand so it is fairly level along and across the stand. While this is not critical, most precision lathe makers will ask you to do this first when setting up a lathe.
  • I suggest you calibrate your level carefully. If it is a precision level then be very careful and very patient to get it dead on. Bubble movements can take from several minutes and up to 15 minutes to truly settle with any changes to adjustment. I am attaching a doc that might help.
  • I know the norm is to place your level across the ways; if you do this, make sure the level is precisely at right angles to the ways. I prefer to set the level on the cross slide instead. I remove the compound, clean and stone the cross slide table to make sure it is oil and burr-free and I set the level with a machinist's square so it is aligned with the cross slide bed and about an inch in from the edge (right around where my QCTP would sit). I also place my Starrett 98-6 adjacent to (but not touching) the precision level. The 98-6 is used to get me close and the precision level is used to get me dialed in. From this point on, the levels are not touched until I am done leveling the lathe.
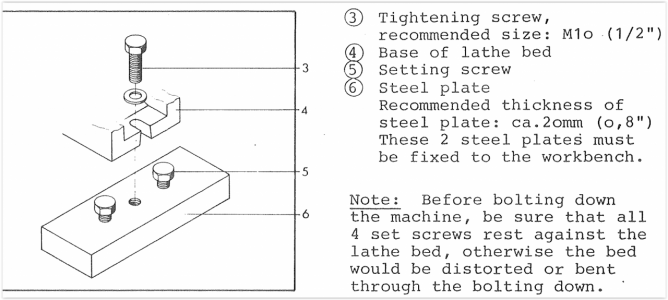
  • In order to adjust the level of the lathe (take any twist out), one end has to be locked down and the other end adjusted or twisted until both ends are in the same plane, right? To do this, you must have some mechanism that allows you to adjust each end. That is, there must be a central lock down bolt to lock each end to the stand and adjustment bolts for height adjustment that bear on the front and rear of each foot that is under each end of the lathe. If you lack these adjusters then you are left with shimming the lathe (a major pain) or bolting the lathe down solidly and using the adjusters under the stand. I'm attaching an example that Emco uses for this purpose; works good.
  • I suggest loosening the lock down bolt on the tailstock end and then focus on leveling the lathe at the headstock end first. Assuming you will set the level on the cross slide table, move the cross slide up close to the headstock end and use the fore and aft adjusters to get the bubble centered. Remember that it can take several minutes for the bubble to stop moving; be patient. When the headstock end is leveled, lock down the bolt that holds that end to the stand and make sure the bubble didn't move. You can now move to the tailstock end.
  • It is likely that the tailstock end will be way off. Tweak the adjusters under the foot and get the bubble centered. It may take some time to do this depending on how much twist there is in the bed. I've worked on lathes that took days to get the twist out. I would get it close and then leave it alone while you go have a beer or a cup of coffee. Come back and see where it is. Adjust again and again until you get it to settle on center, then lock it down. Come back the next day and see where it is and adjust until it stays level. Yeah, lathes can be like that. It took who knows how long for the bed to twist and you are not going to get it to untwist in a few hours so be patient. Eventually, the lathe will settle and the bubble will stay centered. When it does, go back and forth to each end of the lathe to be sure all twist is out of the bed. You may need to make fine adjustments but it should be pretty close at this stage.
  • Once the lathe is leveled using your level (you really only need one good level), you are ready for the 2-collar test. The 2 collar test is used to achieve a final level on the lathe. I am not going to tell you how to make the test bar; you can read up on that. I am attaching a doc with details on how the test is done. On my Super 11 lathe, I do not mess with the adjusters under the lathe once I get it leveled with the precision level. I adjust the feet under the cabinet instead and this works well for me. See the doc.
I follow a specific sequence when setting up or checking the alignment of my lathe. I always check my headstock alignment first to make sure the headstock is aligned with the ways. Then I level the lathe as discussed above, followed by a 2 collar test. Then I use a test bar to align the tailstock. When my lathe is adjusted well, it cuts zero taper on a 6-8" bar held in the chuck.

Hope this helps.

EDIT: when doing the 2 collar test, use a sharp HSS turning tool, not carbide. When taking fine cuts of 0.001 - 0.003" deep, you need the tool to cut and not deflect. The nose radius of a carbide insert is not fine enough for this test so use HSS.
 

Attachments

  • Engineers-Level-Calibration-Instructions.pdf
    38.8 KB · Views: 9
  • Emco lathe leveling config.PNG
    Emco lathe leveling config.PNG
    331 KB · Views: 8
  • The 2 Collar Test.pdf
    82.2 KB · Views: 5
Last edited:
Couple more thoughts. After taking a cut on the test bar shut off lathe and return the carriage and take a spring pass.
A slightly larger tail stock end is acceptable but never smaller than the head stock end. I believe it is .0002"/foot but I'd have to double check. No time now.
 
Remember your adjusting a lathe. Specs on a lathe is .0002 in 12" on a new machine . If you had a super precision lathe like a Harding or Monarch EE the spec is .00005 in 12" . Trying to get it better then that, you will go nuts and it's a wasted effort, especially if the machine is used. If the lathe doesn't settle down it may have been crashed. You should use a bronze or brass hear hammer and tap the casting to make it vibrate to stress relieve it. I would also eliminate any rubber and go strictly metal plate on concrete. There might be crud under the plates on the floor. also tap on the stands and on the leveling screws. Make sure you always stop leveling screws going up to the weight is on the top of the thread.

it's not needed to get a plane old lathe so accurate. Some epoxy the plates down or slide in some thin leather. I spot face a hole in the middle of the plate and don't worry about the dimple degree. Your not inside a laboratory are you? a regular heated machine shop. Also set the level on the cross-slide or compound. and fasten it down with a Mag base. then crank the saddle HS end to TS end stopping now and then. This follows the tool path. Measuring the bed HS to TS on top of ways can give you false readings if you don't set the level down the same way. Oh and a .0005/12" level is all you need, If all you have is a .001"/12" should be fine too. Some folks go nuts trying to get it perfect when the machines weren't made to be. How thick is the floor under the stand? You need at least 3". Is there a rail road near you? that could screw up leveling. Is the machine to on concrete slab? on 2 slabs won't work....some use anchor bolts too...I seldom if ever do that.
Made these feet, per your advice. Whole floor is crud. The floor is uneven, lower towards the middle of the room and slightly thicker near the walls. The thickness and properties of the floor are totally unknown, as it was probably built somewhere between when the hole was dug in 1875 to maybe 1890 or so. I believe the floor is lime cement, not portland. So it is relatively soft, compared to standard portland cement. The cement floor is continuous, so not two independent slabs. You can see a toolbox that I leveled sitting on leveling feet. Had to add a block of wood because I ran out of adjustment. (I do not recommend those feet at all, the rubber is incredibly soft and bouncy!)

Railroad is about 0.6 mile from here, using a map. Not a high traffic line.
PXL_20211226_215324842.jpg
I will try tapping the feet to make sure the screws are more level (vertical). Used about a 140 degree angle on the screws to make sure there was still some flats left that a wrench could turn. There wasn't much more thought than that. When one is new to this stuff, nothing is obvious, as I have no experience to draw on. So a beginner stumbles on (or belabors) the easiest things.

Thanks for the advice on using the level on the cross slide. That makes sense. Place the level and leave it there.

I'm not trying to make this perfect. Good enough is more of the goal. Getting close to 0.0002" in 12" would be really great. Even 0.0005 is very good. My level is 0.02 mm/m or 0.00024" / 12". ( 0.02e-3 m / m = 0.02e-3 in/in. 0.02e-3 in/in x 12 in/1 ft = 0.00024" / 1 ft )
 
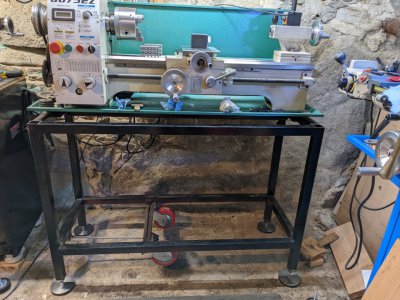
That floor is a dandy. You May want to epoxy the steel pad on the floor. Lock the jam nuts. You need to spot face a hole in the plates where the leveling bolts go and be sure to use the jam nuts into the frame. Then set the level on the bed zero it. and take a brass hammer and tap on the pads, on the legs. Don't move the level and see what happens. If the floor is weak and you might have to make pads bigger. Also do an experiment and c-clamp some cross members to the frame /// or \\\\ Your floor and frame look weak. You can't make a silk purse out of aa sows ear... Lets see the rest of the frame again with the lathe on it. If you don't have some, weld or clamp some diagonal braces on it. A good test is to set the level in the middle and don't move it over night. The floor looks weak and you may have to live with it. Or chop up the soft floor and pour in some new modern concrete with steel in it. I just saw a post somewhere. They poured concrete pedestals that the lathe set on.
 
You need to spot face a hole in the plates where the leveling bolts go and be sure to use the jam nuts into the frame.
Forgive me, what does "spot face a hole in the plates" mean? Drill a hole through? Part way? Something else?

Right now, there's a 140 degree dimple in there. The screw has a 140 degree point which just fits in it. If that's not a good thing to do, please let me know. Might as well do the right thing.
 
That floor is a dandy. You May want to epoxy the steel pad on the floor. Lock the jam nuts. You need to spot face a hole in the plates where the leveling bolts go and be sure to use the jam nuts into the frame. Then set the level on the bed zero it. and take a brass hammer and tap on the pads, on the legs. Don't move the level and see what happens. If the floor is weak and you might have to make pads bigger. Also do an experiment and c-clamp some cross members to the frame /// or \\\\ Your floor and frame look weak. You can't make a silk purse out of aa sows ear... Lets see the rest of the frame again with the lathe on it. If you don't have some, weld or clamp some diagonal braces on it. A good test is to set the level in the middle and don't move it over night. The floor looks weak and you may have to live with it. Or chop up the soft floor and pour in some new modern concrete with steel in it. I just saw a post somewhere. They poured concrete pedestals that the lathe set on.
PXL_20211227_174141156.jpg
Appreciate the help. Yep, the floor is a real winner.

I've been deciding if the frame is salvageable, or I just should make a new frame. If I have to drag a welder down in the basement (and rewire my panel for a 220 V circuit [for the welder], and add a neutral bar because my electrician used up all the neutrals in the main panel and didn't tell me,) I might as well make a new frame. (Electrician used up the grounds on the ground bar, too, but I fixed that already.) Reluctant to put a ton of effort into the existing frame, when I could build a decent one for close to the same effort. Still, if it's just a couple of tweaks, yeah, I'd try them.

I will try leveling the headstock end and lock the jam nuts into the frame. And I will tap the pads and legs with a brass hammer and report back.
 
TL;DR but I wanted to clarify some stuff:
  • I agree you're trying to take the twist out of the lathe BUT the stand has an effect so you need to take care of that first. I suggest you adjust the feet of the stand so it is fairly level along and across the stand. While this is not critical, most precision lathe makers will ask you to do this first when setting up a lathe.
  • I suggest you calibrate your level carefully. If it is a precision level then be very careful and very patient to get it dead on. Bubble movements can take from several minutes and up to 15 minutes to truly settle with any changes to adjustment. I am attaching a doc that might help.
  • I know the norm is to place your level across the ways; if you do this, make sure the level is precisely at right angles to the ways. I prefer to set the level on the cross slide instead. I remove the compound, clean and stone the cross slide table to make sure it is oil and burr-free and I set the level with a machinist's square so it is aligned with the cross slide bed and about an inch in from the edge (right around where my QCTP would sit). I also place my Starrett 98-6 adjacent to (but not touching) the precision level. The 98-6 is used to get me close and the precision level is used to get me dialed in. From this point on, the levels are not touched until I am done leveling the lathe.
  • In order to adjust the level of the lathe (take any twist out), one end has to be locked down and the other end adjusted or twisted until both ends are in the same plane, right? To do this, you must have some mechanism that allows you to adjust each end. That is, there must be a central lock down bolt to lock each end to the stand and adjustment bolts for height adjustment that bear on the front and rear of each foot that is under each end of the lathe. If you lack these adjusters then you are left with shimming the lathe (a major pain) or bolting the lathe down solidly and using the adjusters under the stand. I'm attaching an example that Emco uses for this purpose; works good.
  • I suggest loosening the lock down bolt on the tailstock end and then focus on leveling the lathe at the headstock end first. Assuming you will set the level on the cross slide table, move the cross slide up close to the headstock end and use the fore and aft adjusters to get the bubble centered. Remember that it can take several minutes for the bubble to stop moving; be patient. When the headstock end is leveled, lock down the bolt that holds that end to the stand and make sure the bubble didn't move. You can now move to the tailstock end.
  • It is likely that the tailstock end will be way off. Tweak the adjusters under the foot and get the bubble centered. It may take some time to do this depending on how much twist there is in the bed. I've worked on lathes that took days to get the twist out. I would get it close and then leave it alone while you go have a beer or a cup of coffee. Come back and see where it is. Adjust again and again until you get it to settle on center, then lock it down. Come back the next day and see where it is and adjust until it stays level. Yeah, lathes can be like that. It took who knows how long for the bed to twist and you are not going to get it to untwist in a few hours so be patient. Eventually, the lathe will settle and the bubble will stay centered. When it does, go back and forth to each end of the lathe to be sure all twist is out of the bed. You may need to make fine adjustments but it should be pretty close at this stage.
  • Once the lathe is leveled using your level (you really only need one good level), you are ready for the 2-collar test. The 2 collar test is used to achieve a final level on the lathe. I am not going to tell you how to make the test bar; you can read up on that. I am attaching a doc with details on how the test is done. On my Super 11 lathe, I do not mess with the adjusters under the lathe once I get it leveled with the precision level. I adjust the feet under the cabinet instead and this works well for me. See the doc.
I follow a specific sequence when setting up or checking the alignment of my lathe. I always check my headstock alignment first to make sure the headstock is aligned with the ways. Then I level the lathe as discussed above, followed by a 2 collar test. Then I use a test bar to align the tailstock. When my lathe is adjusted well, it cuts zero taper on a 6-8" bar held in the chuck.

Hope this helps.

EDIT: when doing the 2 collar test, use a sharp HSS turning tool, not carbide. When taking fine cuts of 0.001 - 0.003" deep, you need the tool to cut and not deflect. The nose radius of a carbide insert is not fine enough for this test so use HSS.
Thanks for the well written thoughtful explanation. It is interesting to me the finesse that is required to do all this. Apparently my approach to proving the level was off. Need to go back at it again.

Probably also need to get a coarser level just to get in the ballpark. The difference in sensitivity is kind of amazing. 98-6 class = 0.005"/ft, 199 class = 0.0005"/ft, higher end level = 0.00024"/ft. That's a factor of 20:1. My relatively inexpensive level is 0.00024"/ft (supposedly).
 
Back
Top