Gene Weber's PM-728VT CNC Conversion

Well, that's as far as I am for now. I'll add posts as I make more progress. I'd like to lubricate the Z ballscrew before I continue assembly so suggestions for the correct lubricant appreciated.

IMG_20221227_150841032.jpg
 
New mechanical lesson for the computer guy, ANGULAR CONTACT BALL BEARINGS.

YINSH was very responsive to my email about torquing their YSR-M12×1.75P ball bearing locknut. 31 in-lbs (3.5 N-m) is actually the setscrew torque. As far as the locknut torque goes, various torques result in different axial force applied to the bearing. 67 in-lbs (7.6 N-m) results in
2860.6 N of axial force. 89 in-lbs (10.1 N-m) in 3814.1 N, and 114 in-lbs (12.9 N-m) in 4882.0 N.

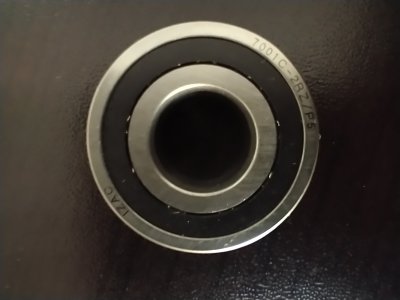
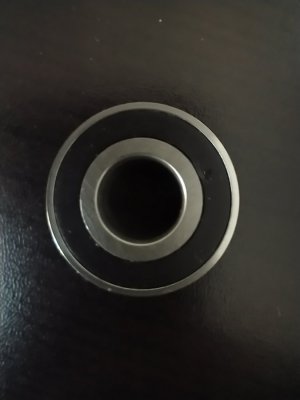
After reading their response, and thinking about how only 31 in-lbs of force had made the Z axis ballscrew shaft difficult to turn, I searched for some information on the bearing, 7001C-2RZ/P5. As soon as I saw a cut-away view of an angular contact bearing I understood the problem. These bearings have a right and wrong installation direction! Upon closer inspection one can see that the two sides of the bearing are not the same.
IMG_20221228_091442213.jpgIMG_20221228_091519595.jpg
Based on the cutaway drawing, I believe the side with the thicker outer race should face each other. I haven't pulled apart the assembly, but I'm sure I have at lease one facing the wrong way. Since I only torqued the locknut to 31 in-lbs, and didn't spin the bearing I'm confident I did not damage them. However I did crank down on the locknut setscrews, so the torque information for that particular locknut is out the window since it's now no doubt deformed out-of-round.

Which leads to the final question, how much axial force should be applied to the bearings by the locknut. A quick search on this bearing number didn't find any recommendation, but I'll continue to search and post if I find anything.
 
Here is a specification for a 7001C bearing. Dynamic Load Rating (Cr) = 5,000 N, and Static Load Rating (Cor) 3,000 N. If I'm understanding the definitions of Cr and Cor correctly, Cr is a constant force and Cor is an abrupt force. Accelerating the head from a dead stop would be an abrupt axial force. I weighed the head including the steel mounting piece, and it was 77.2 lbs. In this thread the Teknic Servo Systems Engineer said the servo being used could accelerate the head at 1/3 G. To be safe, assume 1/2 G which is 4.9 m/s^2. That would result in an abrupt axial force on the bearing of 172 N. Pretty small compared to the Cor of 3,000 N.

I'm not completely sure how the Cr and Cor ratings relate to each other. (Is there a bearing expert in the house?) Are they independent, and irrespective of the constant axial load, it can take an abrupt application of up to an additional 3,000 N? If that's the case the locknut could probably be torqued to 89 in-lbs. Or it could mean that if there are any abrupt axial loads taking place, use the 3,000 N Cor limit in instead of the 5,000 N Cr limit. To be safe I'm going to use the latter. The range of applied torque for axial load suppled by YINSH and listed in the previous post is fairly linear (376.3947 N/N-m - 378.4496 N/N-m), so one can calculate torque needed for a desired axial load. I'm going to go with 2,500 N max. 2,500 - 172 = 2,328 N. 2328/376.5 = 6.183266932 N-m = ~55 in-lbs. So unless I hear from someone who knows this area well I'm going to torque to 55 in-lbs.
 
Unless I hear some other wisdom / experience I'm planning to use Blaster Advanced Dry Lube with Teflon, or something similar for the ballscrews. Dry and teflon both sound like a good way to go.
 
One of the Z axis bearings was facing the wrong way. While it didn't damage the bearing internals, it did deform the bearing seal. These 7001C sealed bearings don't appear to be readily available / inexpensive. So I managed to flatten the seal and re-installed it correctly. An exploded parts diagram is an insufficient assembly guide when items need to be installed in a specific direction. :mad: I torqued a fresh locknut to 55 in-lbs and the ballscrew shaft turns with some resistance, but easier than before. I have not torqued the set screws on the locknut yet. Deciding if I want to stay at 55 or back off a bit.
 
Love your thread, particularly how nicely you document the quantitative aspects of the bearings.

Highly recommend the IPC-5 and POWER4-HUB auxiliary you connect the motors into.

I will follow your thread with great interest and good luck!
 
Is anyone interested in buying some YINSH YSR-M12×1.75P ball bearing locknuts? Re-torquing the locknut after you have tightened the setscrews is inaccurate. So I inquired about purchasing a replacement directly from YINSH. The part is $4.75, but if the order is less than $1,500 there is a $68 charge to share the FOB cost. I'm too cheap to pay $72.75 for one locknut. But if the order were for say 10 locknuts, it would drop to $11.55 per locknut. If there is interest I'll coordinate an order.
 
I have no desire to do a CNC conversion but I do appreciate the time and effort it takes to do it plus the extra effort to document the process and help others avoid problems. Well done.
 
Is anyone interested in buying some YINSH YSR-M12×1.75P ball bearing locknuts? Re-torquing the locknut after you have tightened the setscrews is inaccurate. So I inquired about purchasing a replacement directly from YINSH. The part is $4.75, but if the order is less than $1,500 there is a $68 charge to share the FOB cost. I'm too cheap to pay $72.75 for one locknut. But if the order were for say 10 locknuts, it would drop to $11.55 per locknut. If there is interest I'll coordinate an order.

Yes please put me down for 3 locknuts Gene. Thanks.


Sent from my iPhone using Tapatalk Pro
 
Last edited:
Thanks @koenbro and @DiscoDan. Well, I'm embarrassed. Right aside of the parts diagram is a rather large exploded view of the bearing assembly showing installation direction. Hmmm, I don't think I had a recent head injury. I can't really explain how I focused so intently on the parts diagram that I was blind to the bearing detail information on the same page. My apology for grumbling about installing the bearing the wrong way. That's all on me. :frown:
 
Back
Top