Bad surface finish 6x12 surface grinder spindle disassembly questions

I did it myself. Honestly, it never occurred to me to rewind as three phase. Mostly because I do not have three phase in my shop, which means phase converter, rotary phase converter, or VFD. All of which seemed like overkill for this. But then again, I did not think about the potential implications in surface finish. I'll wait and see how the new bearings do after I put it all back together.

The $120-ish is what I have into copper, nomex paper, varnish, and tools (made a winding machine). The replacement motor from Grizzly is $450 plus shipping, and you really have no idea what you're going to get. It might not even fit. I called around to the few shops that still to motor rewinding locally. The general answer was "it would not make economical sense". For me that boiled down to re-wind it myself or junk it. In terms of what I literally put into the rewind, just the copper, nomex and varnished I used, It's more like $60 and I have a bunch of supplies left over and a winding machine.
Nice rewind. Where did you get the coil winding fixture, is that totally home built?
What was the trick to remove the stator from the cast iron motor housing? I see some grinding of what I assume was a rivet. I assumed it was pressed into the cast iron spindle housing.
I see 24 slots marked, I think that is easy to wind as three phase. I saw an article a few months back about the increase in HP winding a single phase to three phase. And yes using a VFD in my opinion is the only way. You have a much smoother motor from a pulsing stand point, and if you do use smaller worn wheels, you can increase their speed to maintain a constant SFM.
You have a very nice shop from seeing all the background in the photos.
 
So this morning I was fixing a 3/4" diameter 82 degree counter sink using the surface grinder.
The 5C spin indexer is handy. You can also put flats on drill shanks every 120 degrees. But hardened things can be machined to smaller diameters.
I had the outer wheel guard off, as the grinding hub was a recent purchase from eBay, and is deeper then the one that came with the machine. My voice is muffled as I'm using a face shield just in case something bad happens. It would be the ricochets that I'd worry about.
 

Attachments

  • 5C spin index on surface grinder1.mp4
    1.8 MB
  • 5C spin index on surface grinder0.mp4
    3.4 MB
This was the file that was posted on a different site about 3 phase motor rewinding.
From this web page:
 

Attachments

  • 3phase rewiring of single phase motor HighSpeed-1.pdf
    1.8 MB · Views: 3
Last edited:
Fascinating article. I suspect I would not have been able to pull this off with the stator core I have. While my core does have 24 cavities, notice that 4 of them are small than the others. This is to accommodate the start windings only. My motor is a 2 pole run winding and 90 degree two pole start winding motor. As you look at the picture of the stator with the first loop of windings laid in slots 5 and 8, the smaller cavities are 6, 7, 18 and 19.

The main windings consist of 5 loops each, comprising two poles. The two poles occupy slots 5-8, 4-9, 3-10, 2-11, 1-2 and 17-20, 16-21, 15-22, 14-23, 13-24.

The start windings consist of 4 loops each, also comprising two poles that are 90 degrees to the run windings. These two poles occupy slots 3-22, 4-21, 5-20, 6-19 and 15-10, 16-9, 17-8, 18-7.

So the only windings in 6,7,18, and 19 are start windings, and they are significantly lighter windings. That is why the cavities are smaller, and also why the core has "flats" on the outer diameter at those positions. So it would still be possible, but I would be limited by how many circular mills I could fit in the smaller cavities, with whatever size wire I ended up on.

Maybe I'll go work on that new thread and stop stealing yours......

You have a very nice shop from seeing all the background in the photos.

Thanks! It's messy right now, but fairly well equipped for a home gamer. I've also been fooling around with zinc plating for fasteners. I plan on plating everything for this grinder, I'll post more pics as I go.

Nice rewind. Where did you get the coil winding fixture, is that totally home built?
Also, thanks! Third time's a charm ;) The winding fixture is made from this wire winding mold on Amazon, a NOS Veeder-Root mechanical counter from eBay, and scrap I had lying around. I could have made it far more intricate. But, as it is, it worked really well... all three times.

I see some grinding of what I assume was a rivet.
Nope, no rivet. Just really poor quality

What was the trick to remove the stator from the cast iron motor housing?
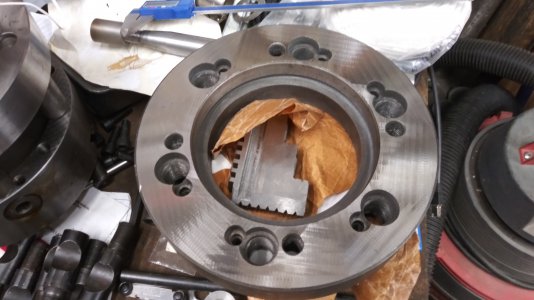
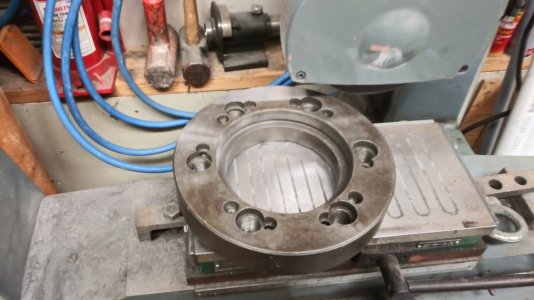
Hah! Yeah, that was tricky. As you may have noticed, the main section of the motor housing and the tapered end bell housing are one casting. From there it is machined and the stator pressed into the blind hole. Normally the housing would be heated to 500 degrees or so and then dropped onto the stator, but that would involve a fixture and is more expensive in general. If I get the other thread started I will go into more detail, but the punchline is: I drilled holes in the shoulder of the tapered bell housing, tapped them, and drove the stator out.

So this morning I was fixing a 3/4" diameter 82 degree counter sink using the surface grinder.
The 5C spin indexer is handy.
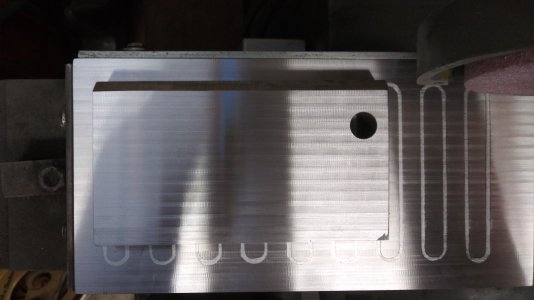
That's funny, my 5C spin indexer (straight off the boat) showed up today! I have a few items I would like to do a similar operation on.
 
If I get the other thread started I will go into more detail, but the punchline is: I drilled holes in the shoulder of the tapered bell housing, tapped them, and drove the stator out.
I have no issue with you putting that information here. Or a link to your new post. I was looking for anyone that had a similar machine, and how they improved the surface chatter that I'm still plagued with. It's better, but not good enough. Although in earlier posts on this, the suggestion was to just use very fine wet or dry sand paper and lap any surface to removed the ripples.
Even with surface ripples, this machine has fixed many things around my shop. The one thing I still notice when I put a tenths indicator on it and sweep the magnetic chuck, it still is flat. And I ground it over 20 years ago. A method of coolant would help, but I'm thinking making a 5 sided sheetmetal box, mount that on the table, and bolt the mag chuck down through some holes that can be RTV sealed. Then use oil as a coolant and that should capture the mess.
What started this desire to improve surface finish was I mounted a smaller 3 jaw chuck on a D1-8 used backplate I got of eBay. I wanted to true the spindle side of that adapter, and did not like the surface finish. I now see that most of the issue was the bearings not being angular contact, and low quality in the ABEC tolerance. I still see that wheel balance is important in this light of a machine, even though I see many posts on the web that there's no need to balance the wheels.
I found this article;
But I can't find an app for my Android phone that will display anything greater then 20Hz of accelerations.
 
The D1-8 adapter was too large for the 6 inch travel, so I had to rotate it. Which seemed like a good idea per Surburban Tool;

I was happy with the results outside of the finish look. But it's darn flat, and fixed the corrosion issues of the previous owner.
 

Attachments

  • 20201201_184324.jpg
    20201201_184324.jpg
    2.3 MB · Views: 15
  • 20201201_151959.jpg
    20201201_151959.jpg
    2.6 MB · Views: 15
  • 20201201_152004.mp4
    46.5 MB
I reground the chuck on the surface grinder. The finish is better then previously, but still has some ripples from wheel balance, I believe.
I found this needed (grinding the mag chuck) as I was grinding a 1" plate flat, about 4x8 rectangle. I need this to stand a part (the top slide off the lathe compound) off the mill table.
I was measuring 0.9411 to 0.9416. I did find a shallow part on the magnetic chuck. So I reground the plate and now have 0.9382 everywhere I can reach the micrometer in from the edges. It took over 8 grinding passes on the chuck to make it flat. As I'm grinding without coolant, I have to keep the material removal to less the 0.0002, or it will get hot and swell, and leave burnt iron.
And yes I need to install the feet that came with the surface grander and sitting on the bottom shelf, as I see the thing is rocking.
 

Attachments

  • first grind of chuck 32X speed comp.mp4
    1.5 MB
  • eighth grind of chuck 32X speed comp.mp4
    2.4 MB
  • 20210213_100411.jpg
    20210213_100411.jpg
    2.7 MB · Views: 11
Back
Top