A Possibly Very Short Restoration Thread

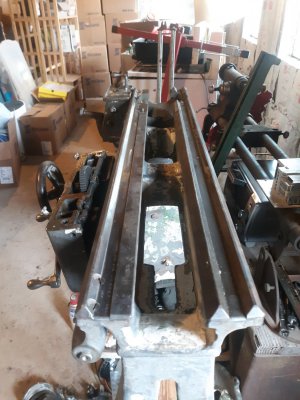
@matthewsx , thanks for the suggestion. I had planned to bolt the base to the cart with 3/8x2" lag screws, or even bolts with nuts on the bottom, but haven't yet done it. At 900-some-odd pounds, I don't see it 'slipping' anywhere. And considering the base is only 20" square with the wheels directly below it (to prevent leverage cracking by outriggering the wheels), there really isn't a whole lot of unsupported span. The beam from the main frame to the front legs is really only to keep the one under the legs located securely to the cart, it doesn't impart any real support.

@gard , I'll put a handle on the cart to wheel it around, good idea.

This is not a long-term solution- as I said, this doesn't make it useful to work *at* the lathe, but allows me to work *on* the lathe, until it finds a place to live.
 
Just so I’m clear. What I was suggesting is another board mounted transverse to the lathe bed to prevent tipping forward or back.

If lag bolts seem excessive you can just wrap a ratchet strap around the works when moving. Might be overkill, but as someone who previously owned a lathe that had been dropped on its face (not by me) it’s something you really want to avoid.

John
 
That's a good idea too. I am however going to leave it off just for now, because it's out in the basement floor, and my wife is not known for her agility. She already tripped over the legs of the engine hoist clearly sitting right next to the machine. I will push the lathe up against the wall so it is not disturbed, and when I go to move it, I will definitely bolt on another board to be used as a tip preventer.
 
That's a good idea too. I am however going to leave it off just for now, because it's out in the basement floor, and my wife is not known for her agility. She already tripped over the legs of the engine hoist clearly sitting right next to the machine. I will push the lathe up against the wall so it is not disturbed, and when I go to move it, I will definitely bolt on another board to be used as a tip preventer.
The biggest problem with swivel casters is the swing. When you are pushing sideways they swing under the load which narrows the footprint.
 
More technically, it shifts. When one caster is swinging in board, the opposite side is swinging outboard. Therefore, the footprint is not narrowed, merely shifted 2" from one side to the other. And since I mounted them astride the actual base on wide boards, the footprint remains the same.

I don't like that it's taller, but it's what I had for now. If I were going to have it on casters permanently, I would make a frame out of 2x2x1/4" angle steel with outrigger wheels on the same but inverted and welded to the outside, so the base of the unit is functionally only an inch or so off the floor.

For now, parts gathering. The VFD I brought home from work isn't designed to operate on 240v single phase like some are, so I'll have to revisit that idea. Not inclined to build a RPC just for one device, so I'll either find a single-phase-capable VFD, or get a 1hp motor from HFT.
 
[QUOTE="n9viw, post: 1094934, member: 77334

For now, parts gathering. The VFD I brought home from work isn't designed to operate on 240v single phase like some are, so I'll have to revisit that idea. Not inclined to build a RPC just for one device, so I'll either find a single-phase-capable VFD, or get a 1hp motor from HFT.[/QUOTE]

The old saying “ Build it and they will come “

If you build the RPC, then you will have more options to get more 3ph equipment in the future more easily.


Sent from my iPhone using Tapatalk
 
Took the head off today, and this was hiding behind it. Anyone know what it's for? 20240103_125214.jpg20240103_125202.jpg
 
Finally got it all stripped down. Using the cheap and questionably accurate framing square as a straight edge, I can fit a 0.010 feeler gauge between it and the front ways, and at least a 0.004 at the back ways, at a point about a third of the way down the bed (where it appears most of the cutting was done). I know a true straight edge would be best, but I'm using what I have for now.

The back plate i ordered from Lost Creek should be here this week. Next week is payday, I plan to get a chuck and some cutters, possibly a couple centers. In the meantime I'll get the ways cleaned up and put the thing back together. When I get all the bits together I'll do the two-collar test and see what happens.
 

Attachments

  • 20240104_105858.jpg
    20240104_105858.jpg
    363.8 KB · Views: 12
  • 20240104_102255.jpg
    20240104_102255.jpg
    262.4 KB · Views: 13
  • 20240104_102413.jpg
    20240104_102413.jpg
    184.4 KB · Views: 12
  • 20240104_102438.jpg
    20240104_102438.jpg
    187.3 KB · Views: 14
@n9viw - the 2 collar test won't tell you what you will hope to tell you until you do a few steps first...
Before doing the 2 collar test, you will be better served by turning a piece of soft steel for about 4-6" from the chuck to "round". This is best done with 2" stock, as 1" will deflect a little too much. Check every 6mm(1/4") with a micrometer to see what your diametric profile is first. If you notice a progressive taper in either direction direction, you need to align your headstock.

This will get you to the basics. Without headstock alignment, other measurements will be off.

A LeBlond lathe has the headstock rests on the veeway. When I reassembled my LeBlond lathe after a move, the headstock alignment was the first thing I checked. It was off .0012 in 6". So I removed it, re-cleaned both sides of the veeways, stoned them using a precision stone, and reassembled. The taper in 6" was then under .0002. THEN I leveled the ways, and continued the alignment and set up.

This shows that even for headstocks resting on veeways, the head alignment needs to be checked first.
 
Last edited:
Just added a few more things to my "gotta have" tools list... thank God it's not a mill, I'd really be up a creek.
 
Back
Top