

-
Welcome back Guest! Did you know you can mentor other members here at H-M? If not, please check out our Relaunch of Hobby Machinist Mentoring Program!
You are using an out of date browser. It may not display this or other websites correctly.
You should upgrade or use an alternative browser.
You should upgrade or use an alternative browser.
A Possibly Very Short Restoration Thread
- Thread starter n9viw
- Start date
")
- Joined
- Oct 11, 2016
- Messages
- 3,864
My friend's Colghester looked much worse. I'd be interested in that front veeway, and the ridge at the top. I haven't seen that before, and may be extreme wear? What does the mating surface look like? There will be a virtually unused surface on the veeway right at the headstock, behind the chuck. This, bridging across to near the tailstock, with a straight edge and feeler gauges will give you a good map of each surface of the veeway.Your latter point is one of my concerns:
From the pictures, it doesn't look all that bad? Perhaps with a straight edge and a light behind, the wear will be more apparent.
Frankly, with those cast iron legs and curves, it will clean up to be quite a looker. If the carriage/veeway has worn a lot, you can use Moglice to build the carriage back up. It well wear very well, and help with the alignment for the lead screw. As Matthew said, it had to be running in the condition as you found it, and someone didn't finish the rebuild. If someone else thought it was worth taking apart (to rebuild) it looks promising.
I have been slowly working on a 10L of about the same vintage, I got a test strip from the hardware store and none of the paint layers had any lead. I think my bed looked a little worse than yours, the tops of the Vs had worn slots into the bottom of the saddle. Having the bed planned and adding rulon was a relatively easy fix. I agree with the idea of getting everything clean, a light stone to remove burrs and sharp edges, new felts and lots of oil and put it to work.
Even if you end up parting it out the parts will be worth more if they are clean and working.
Even if you end up parting it out the parts will be worth more if they are clean and working.
- Joined
- Dec 25, 2023
- Messages
- 94
I AM SO STOKED! I had so much fun today!
Took the grinder with a twisted wire cup to the lathe and blew paint all over the place. I was surprised how much stuck, but some did stay firmly attached. Rather than take the time to grind it all down, I left it so long as it promised not to pop off later. I found the top coat of white, then Kelly green, then in some places a cream layer, then that ubiquitous industrial grey that may be the original color, may be primer. The cream intrigued me, though, and now I'm thinking of painting it in Ford Jubilee colors.
I then strapped it back down to the bed and drove it around to the basement patio. Got the tractor and carried my engine hoist down with it, and put the engine hoist thru the door into the basement. I used the loader and bale spikes with lifting slings to pick the lathe up out of the bed and carry it over to the door. I had to set it down and take off one spike, then re-sling it and pick it up end wise to get it thru the door. Used the engine hoist on the sling to get it the rest of the way in and off to one side until I can put some casters on it.
Lots to do... I started by installing the compound that came yesterday, and went around and lubed every Git cup and reservoir. Some of them were actually PAINTED SHUT. All oil ports with screws were painted over. Every word "OIL" was painted over. It's no wonder they didn't lube this thing- they couldn't!
I took the spindle bearing caps off and took the spindle out. The back side isn't near as bad as the front, but neither is great. The oil return galleys were plugged with grime, and the oil wicks predictably filthy, but they'll do until the new set gets here. I cleaned it all, lubed the hell out of everything, and put it back together. And even with the bearing caps torqued down, I can spin the spindle with one hand, so that's promising.
Thanks to the power of WD40, I was able to free several completely frozen stuck items: The back gear lever. The tailstock hand wheel. The tumbler lever lock pin. The spring pins on the cross feed control and change gear control levers. The belt detensioner arm. The lock knob on the motor cabinet door. All absolutely stuck solid before, all moving freely now.
I still lack any sort of tooling. I did find a back plate at Lost Creek Machine; it's only 3-13/16" but it's literally the only plate I could find in 1-7/8"-8. I doubt anyone makes a chuck for it, but I'm still looking. Once I get a tool post and some cutters, maybe I'll make a face plate for it and fab up a 4-jaw. I want to be able to grab a solid bar on a tailstock center and see what the run out is along the bed.
So, this morning it was a frozen, sticky pile of flaking paint and rust. Now it's freed up and cleaned somewhat. Next step is getting a new flat belt, rewiring the motor and hooking up the VFD to see if it works, and ordering some Chicom tooling and centers so I can do something.
- Joined
- Jan 2, 2019
- Messages
- 6,541
Now you’re cookin.I AM SO STOKED! I had so much fun today!
Took the grinder with a twisted wire cup to the lathe and blew paint all over the place. I was surprised how much stuck, but some did stay firmly attached. Rather than take the time to grind it all down, I left it so long as it promised not to pop off later. I found the top coat of white, then Kelly green, then in some places a cream layer, then that ubiquitous industrial grey that may be the original color, may be primer. The cream intrigued me, though, and now I'm thinking of painting it in Ford Jubilee colors.
I then strapped it back down to the bed and drove it around to the basement patio. Got the tractor and carried my engine hoist down with it, and put the engine hoist thru the door into the basement. I used the loader and bale spikes with lifting slings to pick the lathe up out of the bed and carry it over to the door. I had to set it down and take off one spike, then re-sling it and pick it up end wise to get it thru the door. Used the engine hoist on the sling to get it the rest of the way in and off to one side until I can put some casters on it.
Lots to do... I started by installing the compound that came yesterday, and went around and lubed every Git cup and reservoir. Some of them were actually PAINTED SHUT. All oil ports with screws were painted over. Every word "OIL" was painted over. It's no wonder they didn't lube this thing- they couldn't!
I took the spindle bearing caps off and took the spindle out. The back side isn't near as bad as the front, but neither is great. The oil return galleys were plugged with grime, and the oil wicks predictably filthy, but they'll do until the new set gets here. I cleaned it all, lubed the hell out of everything, and put it back together. And even with the bearing caps torqued down, I can spin the spindle with one hand, so that's promising.
Thanks to the power of WD40, I was able to free several completely frozen stuck items: The back gear lever. The tailstock hand wheel. The tumbler lever lock pin. The spring pins on the cross feed control and change gear control levers. The belt detensioner arm. The lock knob on the motor cabinet door. All absolutely stuck solid before, all moving freely now.
I still lack any sort of tooling. I did find a back plate at Lost Creek Machine; it's only 3-13/16" but it's literally the only plate I could find in 1-7/8"-8. I doubt anyone makes a chuck for it, but I'm still looking. Once I get a tool post and some cutters, maybe I'll make a face plate for it and fab up a 4-jaw. I want to be able to grab a solid bar on a tailstock center and see what the run out is along the bed.
So, this morning it was a frozen, sticky pile of flaking paint and rust. Now it's freed up and cleaned somewhat. Next step is getting a new flat belt, rewiring the motor and hooking up the VFD to see if it works, and ordering some Chicom tooling and centers so I can do something.
I still lack any sort of tooling. I did find a back plate at Lost Creek Machine; it's only 3-13/16" but it's literally the only plate I could find in 1-7/8"-8. I doubt anyone makes a chuck for it, but I'm still looking. Once I get a tool post and some cutters, maybe I'll make a face plate for it and fab up a 4-jaw. I want to be able to grab a solid bar on a tailstock center and see what the run out is along the bed.
Excellent progress
The long cut on a part held between centers is a good test. I find most of my use of the lathe is shorter parts held in a chuck so another good test is to mount a couple inch long part in the chuck and see how the diameter changes along the length. Its relatively easy to take a couple of thou off with a file so look for a "lathe file" when you are shopping. Over 40 years I have never gotten around to ordering quick change tooling, just the lantern post and a tool post block..
Making new backing plates to adapt whatever chucks you get to fit your lathe is a good project. You can buy unmachined cast iron blanks or just round steel cookies of whatever size.
I made a sturdy movers dolly that fits under my lathe with some blocking, I have found it useful to move it around to different areas of the basement when working on it. I threaded the lathe base and added adjustable swivel feet to lift it off the dolley and level the lathe.


- Joined
- Dec 25, 2023
- Messages
- 94
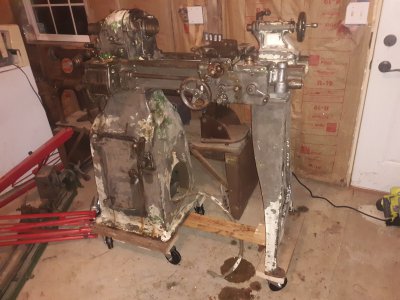
I've not had a lot of time or money to spend this weekend, but I got a cart made to facilitate the lathe's movement. Six 330-lb casters, four under the motor cabinet and two for the legs. Wife said it looked like it needed a seat and steering wheel. It makes the unit too tall to work at, but easy enough to work *on*.
Attachments
- Joined
- Jan 2, 2019
- Messages
- 6,541
Be real careful moving that around. I assume you’ve fastened the lathe to it, if not get a strap around it so it won’t slip off.I've not had a lot of time or money to spend this weekend, but I got a cart made to facilitate the lathe's movement. Six 330-lb casters, four under the motor cabinet and two for the legs. Wife said it looked like it needed a seat and steering wheel. It makes the unit too tall to work at, but easy enough to work *on*.View attachment 472842
Since you built it from wood it won’t hurt to add some outriggers to make sure it won’t tip when moving it.
Can’t be too safe when moving a lathe around, that base should help keep center of gravity low but little wheels like that can get jammed with the smallest crack or stone.
John
I am not a rigger but have noticed that pushing or pulling down low greatly reduces the tendency of things to tip over. For example pulling on a rope or board attached to the dolley is much safer than pushing on the headstock.