Here are some pictures on my lathe. I just did one, for the heck of it. I have a few tool holders (bought used along with the lathe) that were ground off with a grinder. I just turned one of the them. Pretty straightforward, even for someone like me, who has a whopping couple of years experience at this.
Remove the screw from the top of the holder. I unscrewed mine using a 5 mm hex wrench. Open up two opposite jaws of the 4 jaw up pretty wide, the other jaws not so wide. Kind of like this. Try to get it roughly centered using the rings on the chuck as a guide. You want the horizontal jaws (in this picture) to end up at the same ring spacing for both jaws. It also helps to tap the tool holder into the lathe chuck so the top of the tool holder (not shown) is flush with the face of the chuck.
View attachment 408905
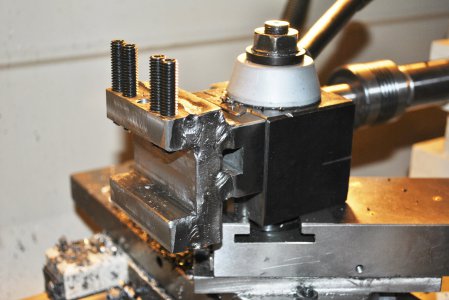
You want to make sure that the workpiece is supported on the narrow side by both edges of the chuck, as in these two pictures.
View attachment 408906View attachment 408907
Make sure the workpiece is supported on both sides on the narrow face. Tighten the jaws evenly all around. Now make sure that we don't get in trouble by protruding jaws. Check your clearance from the outside jaw tips to your ways. We don't want any excitement!
View attachment 408908
At least on my lathe, with a 6" 4 jaw chuck, there is plenty of clearance. Make sure you have enough clearance before going to the next step!
I used a 1/2" tool with a tough insert in it to do the facing. Here is the tool. Use something similar. We really don't need a super finish, we are just removing some stock.
View attachment 408909
With the lathe off, set up the tool at the outside edge of the tool holder, with the insert touching the bottom of the tool holder. Lock your carriage. Retract the slide. Set up your lathe to your slowest RPM. In my case, I set it to 100 RPM. Always a good idea, when starting out with a freshly chucked piece in a 4 jaw. Turn on the lathe. Advance the slide and face off the bottom of the tool holder. Here is a picture of only cutting in a little bit. You can see the circular cuts.
View attachment 408910
Slowly feed in the cross-slide until you complete this pass. Should look something like the following.
View attachment 408911
This was a very light cut on my lathe. You can see it isn't fully flat yet. I may take another pass at it. For the OP, loosen the carriage lock and move the carriage towards the chuck another 0.010". Lock the carriage again. Face off the piece. Keep doing this until the piece is short enough. If you were a smart person, you would have already measured how much you need to take off! In any case, just cut off a little at a time, until you get used to the cutting action in your set up.
Since my 4 jaw was already on the lathe, it took me only a couple of minutes to do this. It's not very difficult, and is a nice way to get a flat surface using only a lathe. Hope this helps.