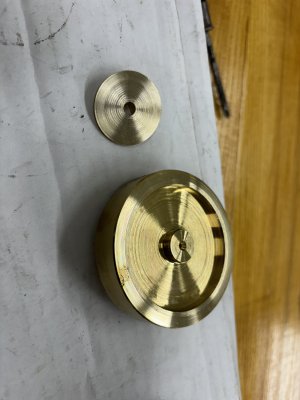
I’m very new to machining and in order to save some money, I bought a chunk of brass from the scrapyard. The problem arose when I started making my little flywheel-it took about 30 minutes to part it off (3” diameter). I don’t know a lot but I know it shouldn’t take that long. Using the exact same setup, I grabbed a small piece of C360 brass that I bought from a reputable supplier and parted it off in about 1 minute. Does anyone know what this might be? It’s the bigger wheel. The small piece is C360 for reference.) It’s a little bit more red than my C360 and did not like being machined.
-
Welcome back Guest! Did you know you can mentor other members here at H-M? If not, please check out our Relaunch of Hobby Machinist Mentoring Program!
You are using an out of date browser. It may not display this or other websites correctly.
You should upgrade or use an alternative browser.
You should upgrade or use an alternative browser.
What metal is this?
- Thread starter Calandrod
- Start date
I’m very new to machining and in order to save some money, I bought a chunk of brass from the scrapyard. The problem arose when I started making my little flywheel-it took about 30 minutes to part it off (3” diameter). I don’t know a lot but I know it shouldn’t take that long.
I agree, it shouldn't take "that" long. Brasses and bronzes have a wide range of "ease of machining". It should be of no surprise when they act differently. Some want a little back rake, some demand zero rake. Being exactly dead on center is critical with some. The parting blade will always be the first tool to act goofy when it's not happy.
C360 is a very nice brass to work with. It's not "that" fussy about what tools you use on it.
Using the exact same setup, I grabbed a small piece of C360 brass that I bought from a reputable supplier and parted it off in about 1 minute. Does anyone know what this might be? It’s the bigger wheel. The small piece is C360 for reference.) It’s a little bit more red than my C360 and did not like being machined.
What lathe are you using? What does your parting blade look like? Rakes, reliefs? Pictures? How are you holding it? What do the chips look like coming out of the cut? Pictures? Clearly we can't "properly" identify an alloy metal from afar, but some insight into "what's going wrong" (like generalizing and saying "yellower" alloys tend to sometimes kinda usually be easier to work with than redder alloys, and seeing the chips might lead into some insight as to how hard/brittle,soft/ductile this piece might be.
- Joined
- Jan 2, 2014
- Messages
- 9,533
I think all new machinists struggle with parting at least a little, and a 3" diameter makes it more difficult due to parting blade stick out.
Is there chatter? Are you cutting dry? I do for brass, but might try paraffin oil for unknown/difficult materials.
@Jake M is correct that parting blade and lathe matter a lot. Also wear on slides/gibs, tool post rigidity, etc.
We'd need more info to help any more.
Pictures would be great.
That part looks familiar, are you building the Clickspring gyroscope?
Brian
- Joined
- Jun 7, 2013
- Messages
- 10,466
Ampco would be lighter colored than yellow brass, some type of bronze. I have machined quite a lot of Ampco 18, and some Ampco 22, Yes, it is not fun to machine, some might say its a ***** ---Ampco (aluminum bronze). Miserable stuff to machine.
- Joined
- Oct 27, 2013
- Messages
- 65
Calandrod I think MrWhoopee has nailed it ! Aluminium bronze is easily mistaken for Brass and is much more difficult to machine, drilling in particular is difficult. I used to machine lots of it and when drilling usually ground the drill off centre thus it cut a little oversize - drill size adjusted accordingly leaving a finishing allowance. Personally I wold not part off 3" dia unless I have a substantial machine !
Thanks for all the input guys. I was dead on center and a flush 90 degrees with the material.
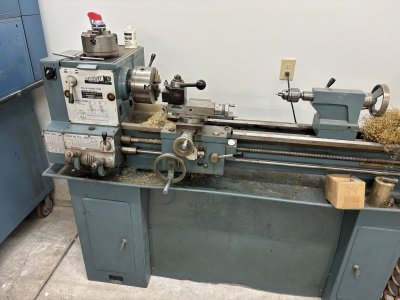
@Jake M I didn’t try zero rake. I have an MSC lathe. I sharpened it immediately before use and several times throughout.
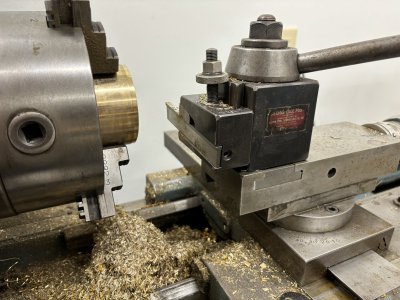
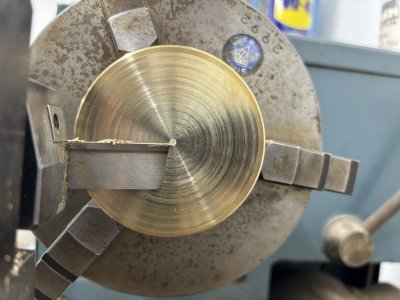
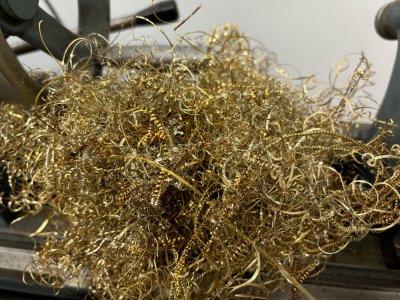
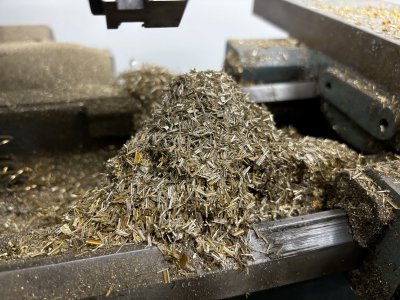
I have some photos below of the chips. When I first started they didn’t break at all and were very stringy. As I got closer in they cut very very fine. Some of that may have been due to experimenting with different RPMs. I eventually settled on 560 RPMs because it was the most effective.
@brino not a whole lot of chatter. Some squealing periodically. I cut most of it dry but did try cutting oil at one point which seemed useless. And no it’s not the clicksprong gyro, though I have considered making one. It’s for a “Wig Wag Engine” designed by Ade Swash in England. https://wigwagengine.wixsite.com/wigwag
He’s also on YouTube.
Attachments
I've never come across any brass that would string like that. I havn't used enough to say it "can't", but I've never seen it. Bronze on the other hand..... I've found some stringy bronze chunks in my rummaging.... Unfortunately, what worked best for me on "regular" cutters was no top rake (flat top), and a mid to light amount of of side rake. No bueno for a parting tool, they're already high strung enough as it is, they don't need more excuses to complain.
So I SUSPECT that you're into a bronze here, not a brass. The tool you're using does appear to be "cutting" that chip, not "buldozing" it. The second batch of chips- I see inconsistancy there, like maybe hesitant infeed (or just tired out hamds after half an hour....), but I'd call that general result a good direction to follow.
After that, because I think the tool is actually cutting, (not buldozing), that would make the pertinant variables being the surface speed, and the infeed rate. What were you doing when the descrete chips formed?
If you could speculate the RPMs and the actual diameter of the cut at any particular point where it was going better (not the whole part, the point where the tool was touching the work, that's where surface speed is), that might give you a good idea as to the surface speed that your lathe and your tool was working closest to "working well".
And the infeed- That changes with diameter too, but not as much. At least by feel, if you're hand feeding.. That wants to be smooth, steady, and constant. (Because "constant" is more about handwheel effort and less about actual infeed per revolution...) Load the tool up and keep it that way. If you need to stop, don't just stop, reverse and pull the tool back a whisker.
I think (I don't know, I think) that those two items there (and basically some practice and experimentation) is going to solve the problem here. The speed (which is surface speed of the work, NOT the rpm of the machine) will change dramatically as the diameter reduces. The infeed will reduce slightly as the diameter reduces, especially towards the center. (well, they both blow up into a singularity at the center, but by "feel", that's how they act).
So, when you have the opportunity and material to practice that again, keep your notes. Work out the surface speed of the work, infeed at one rate that you set with your hands, (one pressure on the hand wheel). Add some speed. Half the speed. Keep the infeed the same. keep all those notes. If faster or slower is good, put it in the noties. Try more yet. Or split the difference. Split it again. Find a good speed for you and yoru equipment and the material at hand. Then play with the feed. Same thing. A whisker more force. A whisker less force. Creap up on it. Give it the beans. Split the difference. Keep it steady...
It's a steep learning curve going in, but it starts to level off pretty quickly once you get going. Why so steep at first? Because you have to come to realize that your parting tool hates you. Never forget that. You will ALWAYS have to stay on top of it, to keep it acting properly. But with familiarity it gets a LOT easier.
So why don't I give you numbers? Well, because numbers are dependant on YOUR machine and YOUR tools. And after the steep part of the learning curve, you're not going to use too much for numbers either. Surface speed to start maybe. But you're going to find that the parting tool, with two constantly changing variables that change in different ways, is driven more by feel than it is by hard numbers. What I'm suggesting that you document EVERYTHING at every cut. That's to not to start a database, it's to establish a mental picture in your head. It's not forever, and looking up notes is NOT the final solution. You need -your- numbers to get started, it'll seem like a nightmare at first, but like I say, the steep inital learning curve quickly levels off, and muscle memory takes over, and the math reduces to just figuring a starting speed. Feed per inch reduces to an accurately appplied amount of hand pressure, and the ever reducing surface speed will reduce from calculating what diameter needs a gear change at what diameter to "yeah, that's slow enough, I can give it another gear now"
I said no numbers. But just for jumping off the cliff..... You're "probalby" cutting best (with "regular" cutters) at half to two thirds of the official numbers for "production work". So take whatever speed YOU are efficiently cutting the material at, and the parting speed will "probably" be half to two thirds of that number.
Zero guarantees, and don't be afraid to step outside of those estimates, high OR low. Just do it methodically, and not randomly.
Similar threads
- Replies
- 24
- Views
- 1K
- Replies
- 24
- Views
- 1K
- Replies
- 15
- Views
- 1K
- Replies
- 13
- Views
- 783

