POTD- PROJECT OF THE DAY: What Did You Make In Your Shop Today?

Finally got back to making chips after a two month period of intense organizing and cleaning out in my shop (I should make a separate post about that, because it was probably 10 hours of cleaning and 40-50 hours of organizing).

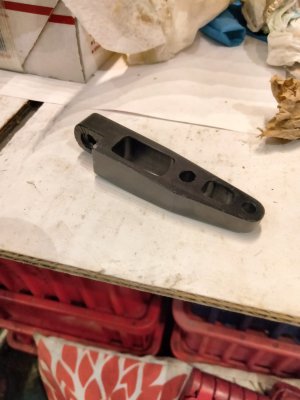
Decided to make a BlondiHacks side clamp out of some 4340PH:

View attachment 408630
View attachment 408631
View attachment 408632

This project would have taken me multiple days before I cleaned and organized. I would have spent way too much time losing my measuring tools in all of the crap that was spread everywhere. Now, I'm able to do a project like this in one day.

I milled the slots the way BlondiHacks did, meaning I had to take a boatload of passes using a 1/8" endmill. Next time, I might drill the end of the slot and then use a slotting saw. I only have one four flute end mill in this size, and it's been... Well used, let's just say.

I'm sorely tempted to polish this thing, but that would be silly, this part will surely get dinged up like crazy. I'll probably give it a cold blue treatment though.

Sorry for the rambling and meandering, I'm coming off of a migraine and my thoughts are a little disorganized.

Edit: I should add that I'm planning on making 2-3 more of these, so I've ordered some ground 4140PH bar stock that matches the dimensions a bit more closely than the 4340 I used for this clamp.

Edit: also, I should add that I tapped the holes ⅜"-24, which is a size I have absolutely zero hardware for. I have twenty ⅜"-24 spiral flute taps, but no hardware. Amazing.
I'm curious how it works. Seems like a good way of clamping from the side. But it does seem thick... 3/8 screws would make that about 1/2". I would be looking for 10-32 to spread it... that way it's maybe 1/4 high...
 
I'm curious how it works. Seems like a good way of clamping from the side. But it does seem thick... 3/8 screws would make that about 1/2". I would be looking for 10-32 to spread it... that way it's maybe 1/4 high...
It definitely is a bit tall, but that fits with the table work I've done in the past. The design seems pretty scalable though. I bet you could easily chop it to ⅜" or ¼" thick if you wanted.

Edit: BlondiHacks has said that her experiences with this clamp have been positive. I think she did have one let go one time, but that was due to user error, not a fault of the clamp.
 
Thanks for the offer! The shear does come in handy. I paid $700 for the Tennsmith around 10 years ago; Craig's List ad as I recall. It's missing the back gauge and front supports but came with an extra set of blades. Facebook Marketplace links don't attach, but if you do a search in the Atlanta area, here are a few options! Always fun to try to spend someone else's money on tools! Check out the ad at the bottom!

Bruce


View attachment 408538

View attachment 408539

View attachment 408540

View attachment 408541

View attachment 408542

I LOVE the truth in advertising on this one in MI! It seems the thing to do is to remove the front guard on shears? I looked at probably a dozen ads on FB MP and saw MANY examples with the front guard/hold down clamp removed. The guard/hold-down clamp obscures your view of the cut, but . . . I mounted a couple of LED strip lights on mine that shine down between the shear blade and the hold-down clamp.
View attachment 408546
Thanks for the heads-up, Bruce. 682bear just picked up that tool grinder last week, and I'm itching to find something to fill in the empty space. Would love to find a nice 6 x 18 surface grinder, but they're pretty scarce around here. If anybody knows of one that's reasonably close to me, please let me know. Almost had one two or three years ago, but the guy changed his mind. It was a nice one, too.

Regards
 
Finished stripping and re-anodizing the other part, a bracket for one of my commuter bikes lights. I made the original too light and it fatigue cracked. The new one is much beefierIMG_20220601_173313.jpg
on the light, you can see the original on the right
IMG_20220601_173426.jpgand back on the bikeIMG_20220601_173851.jpg
 

Attachments

  • IMG_20220601_173321.jpg
    IMG_20220601_173321.jpg
    166 KB · Views: 6
Thank you for the suggestions!!

Well folks, looks like I made my first tapered cut!!!! Laugh all you want, but it took me a few minutes to get my head around how the heck this needed to be setup to do the cut at an angle...

View attachment 408497

View attachment 408498

But by golly I did it!!

View attachment 408499

View attachment 408500

I read here somewhere, that better is the enemy of good... So I did not try to make it better by trying to get rid of that visual transition...;):p

On to the next step for this part...
Looks like your doing a great job! Where did you get the plans for the float lock vice?
 
Thanks for the heads-up, Bruce. 682bear just picked up that tool grinder last week, and I'm itching to find something to fill in the empty space. Would love to find a nice 6 x 18 surface grinder, but they're pretty scarce around here. If anybody knows of one that's reasonably close to me, please let me know. Almost had one two or three years ago, but the guy changed his mind. It was a nice one, too.

Regards
Here you go!

Bruce

Facebook Marketplace
1654127629159.png

1654127655194.png


I threw in a Sanford SG also. These are coveted by a number of members here.
 
Here you go!

Bruce

Facebook Marketplace
View attachment 408669

View attachment 408670


I threw in a Sanford SG also. These are coveted by a number of members here.
Whoa! How'd you do that? I'm following up on some of these tomorrow.

Thanks!
 
Looks like your doing a great job! Where did you get the plans for the float lock vice?
Mr. Pete posted them. Ken, a viewer from his YouTube channel, created them from a pristine vise he has...


Dropbox link


Attachments

  • Float Lock Vise-Parts_RevB.pdf
    1.4 MB · Views: 11
  • Float Lock Vise-Page1-2RevB.pdf
    132.7 KB · Views: 12
More progress on the parts for the vise... Handle parts are done. Threaded rod is done. Solid rod is done.

IMG_6088.jpeg

IMG_6090.jpeg

IMG_6091.jpeg

IMG_6093.jpeg

IMG_6095.jpeg

Now to work on the jaws...
 
Last edited:
Back
Top